Three creative ideas with Coffee – Art Craft

Hmm.. the aroma of a freshly brewed coffee can be so refreshing, isn’t it? Sniffing coffee beans can almost reset your sense of smell. When we sample different perfumes and a particular strong smell gets to our head, it lingers. How to clear it? Take a few coffee beans in a cup and smell them. After sometime smell another perfume.

We can creatively use coffee for many things other than just sipping a nice cup of coffee. You may have come across or tried these. In this post I am sharing three artistic creative ideas of arts and crafts with coffee. I have tried my hand at all the three and they can be wonderful creative outlets for anyone, especially coffee lovers. It is the skill and material that make this art unique.

Latte Art (Photo Courtesy WordPress Photo Library)

The first one is using coffee beans – I had some coffee beans left in the pack. They were way past their expiry date on the packet. I wasn’t sure if these were safe for consumption. So I decided to do some art craft with them. The method is selecting a drawing of your choice and creating a design by pasting these beans on the paper. It’s like ‘button craft’. Draw the design and paste the coffee beans. Jute pieces or jute strings make a good combination with it.

Alternatively they can be decoratively filled in bottles or jars to make showpieces at kitchens, coffee shops and restaurants. Choose a simple design with distinct lines. The artwork can be framed in a box frame and kept as wall art. However, Coffee beans are natural and perishable. They can get infested in future and the artwork may get spoilt. This thought made me go a step further.

Designs with Coffee Beans (Photo Courtesy – WordPress Photo Library)

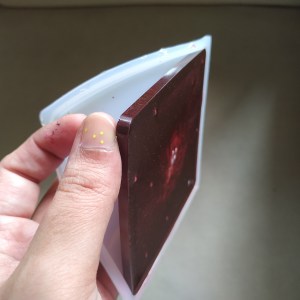
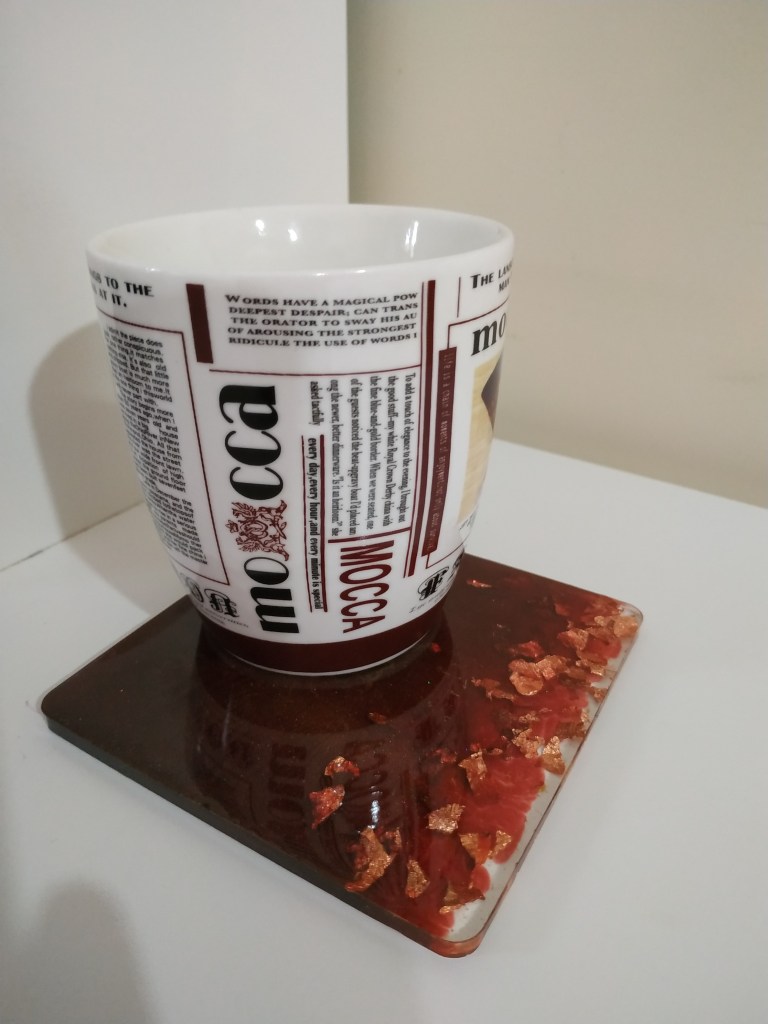
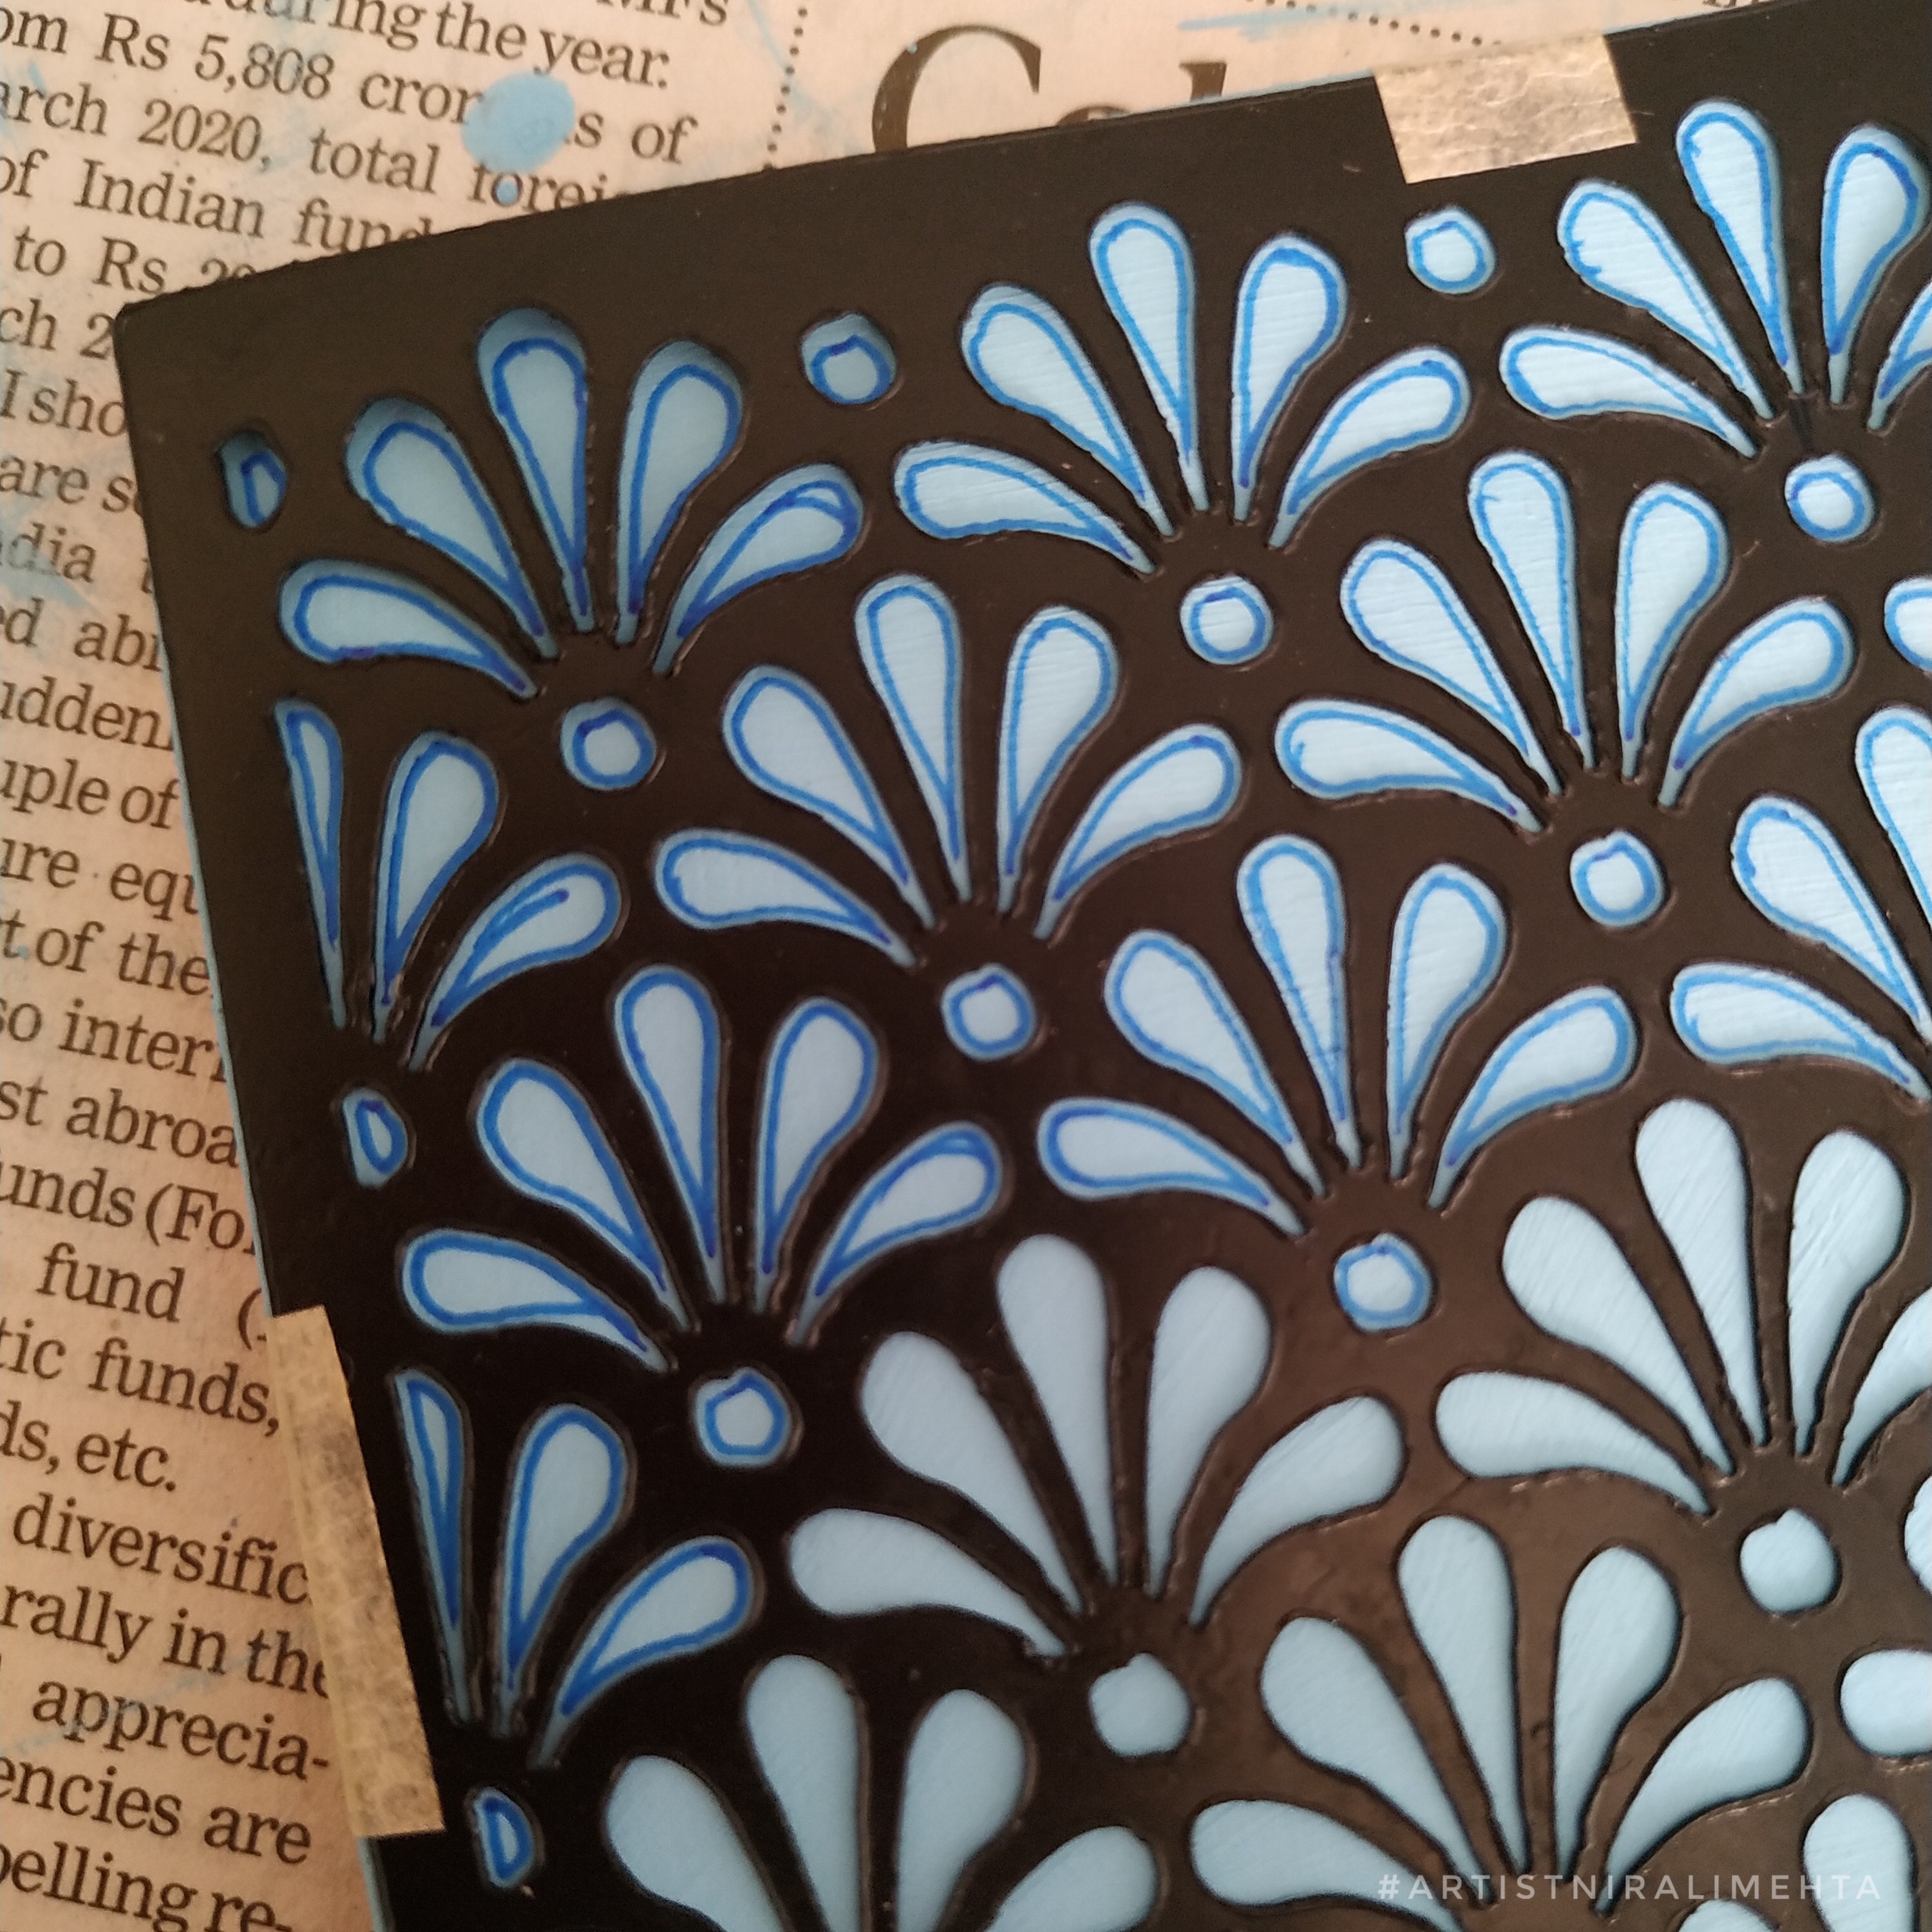
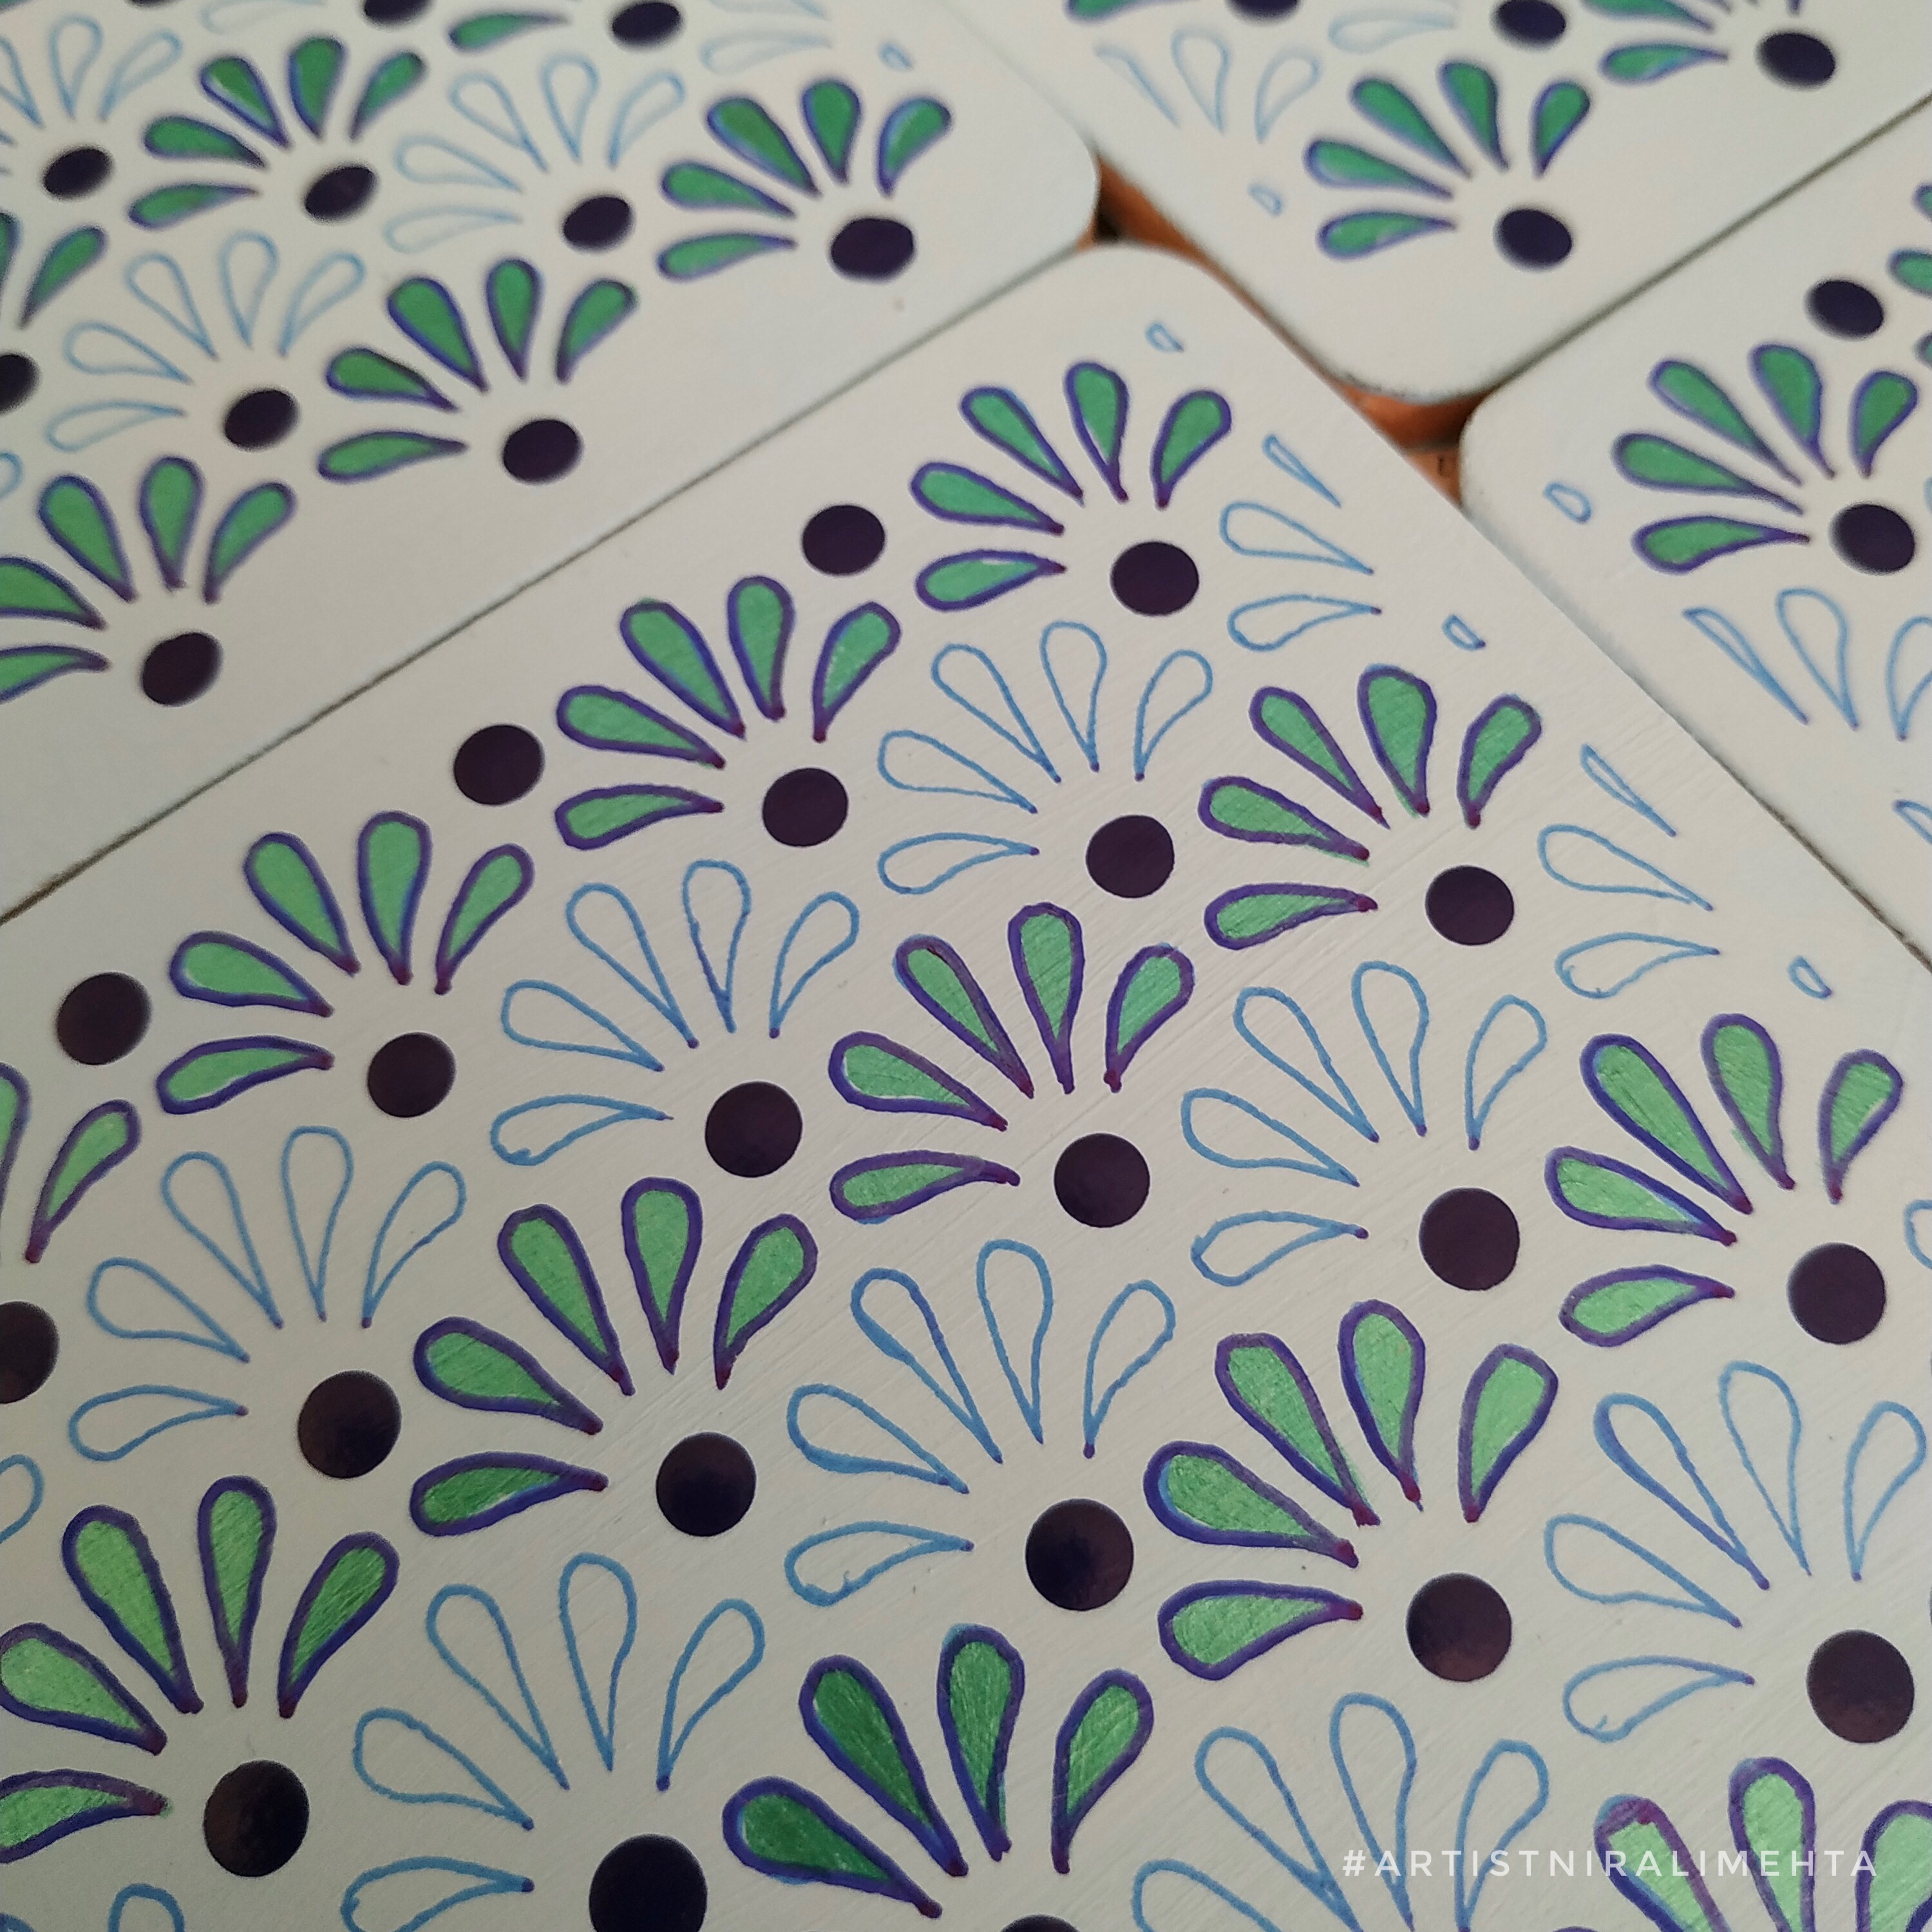
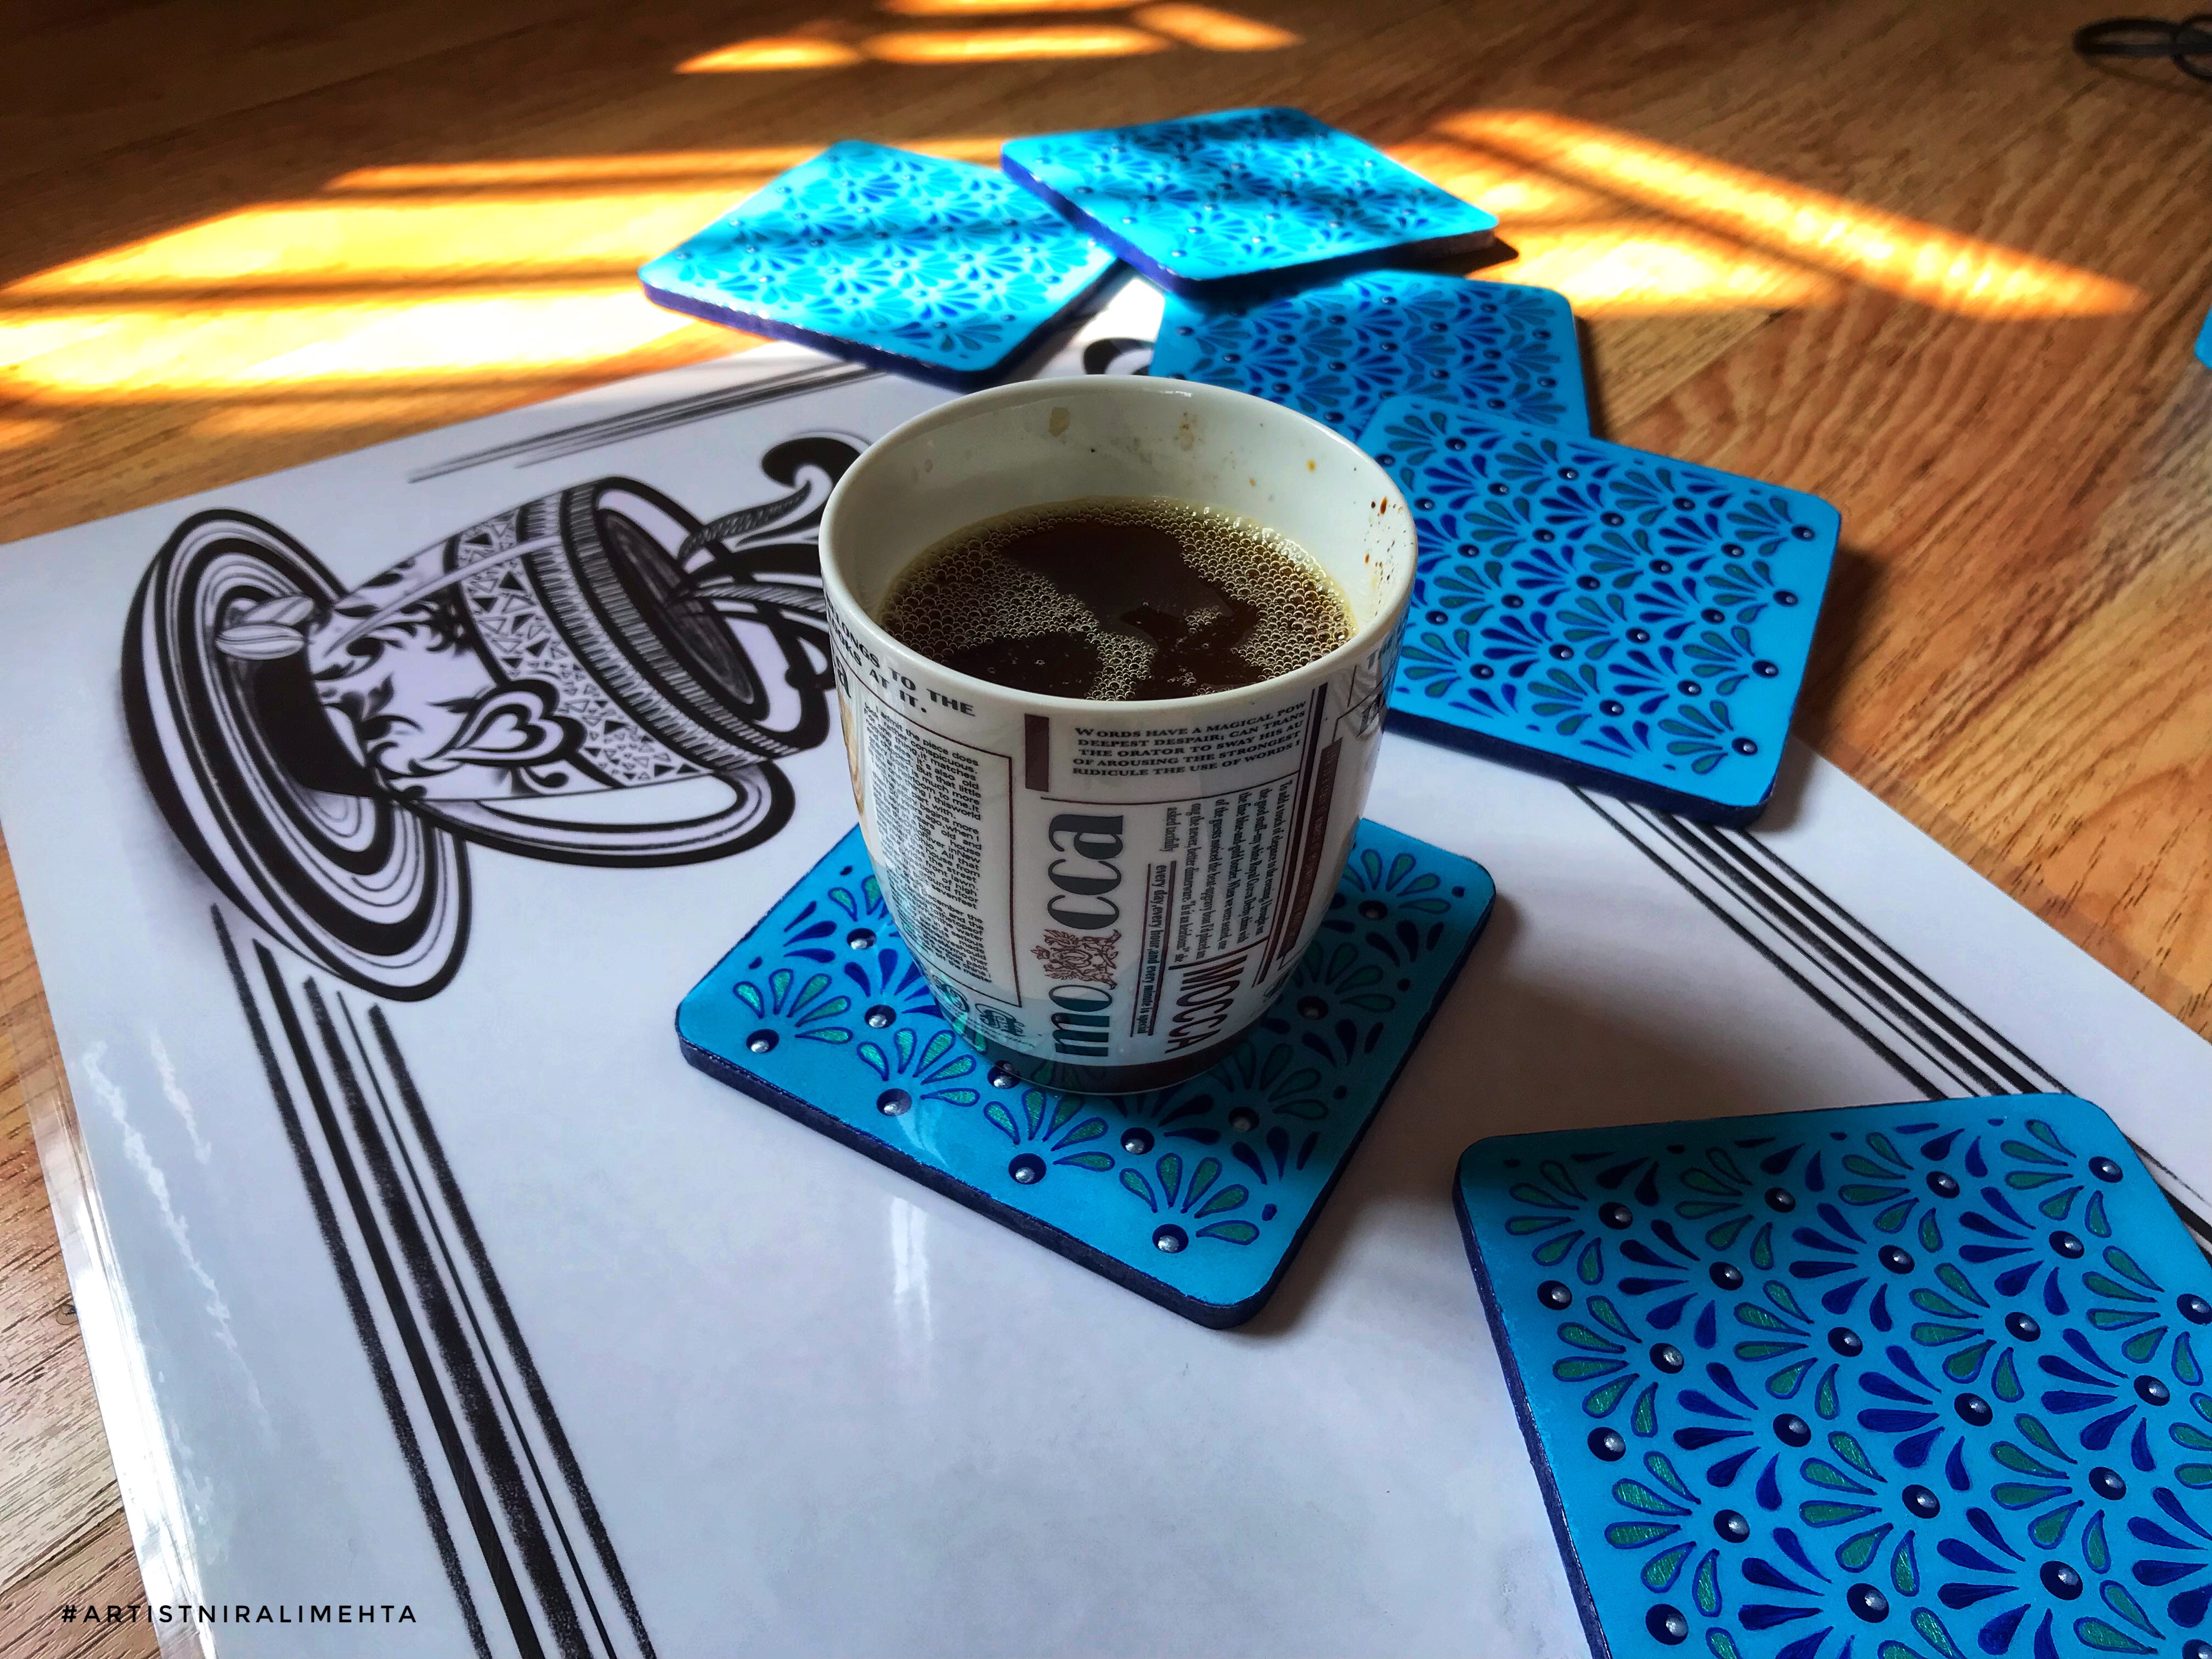
I made coasters with coffee beans and resin. We can use the coffee beans with resin to make decorative clocks, trays, coasters, jar lids and everything else that we make with resin otherwise. This way, they have a protective covering and they are air tight. Do check my posts on resin art for more ideas. It is the same process. We use coffee beans just like any other embellishments or materials. We can combine it with resin colours and other materials too.

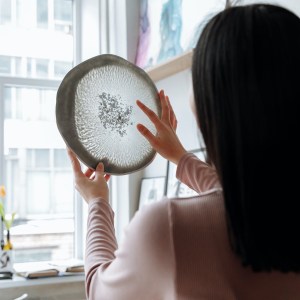
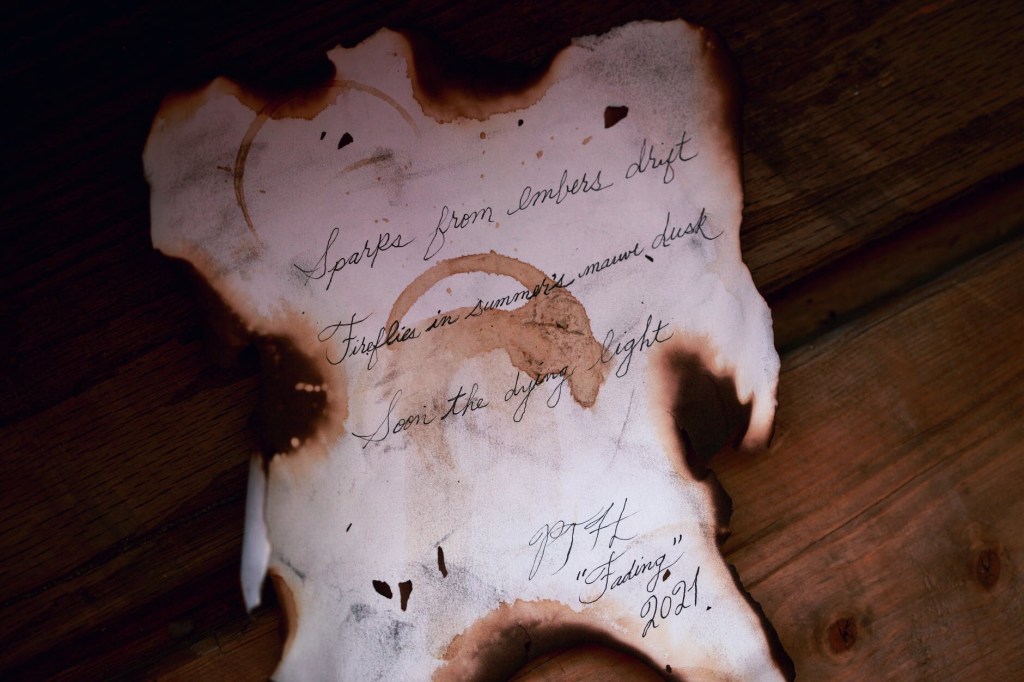
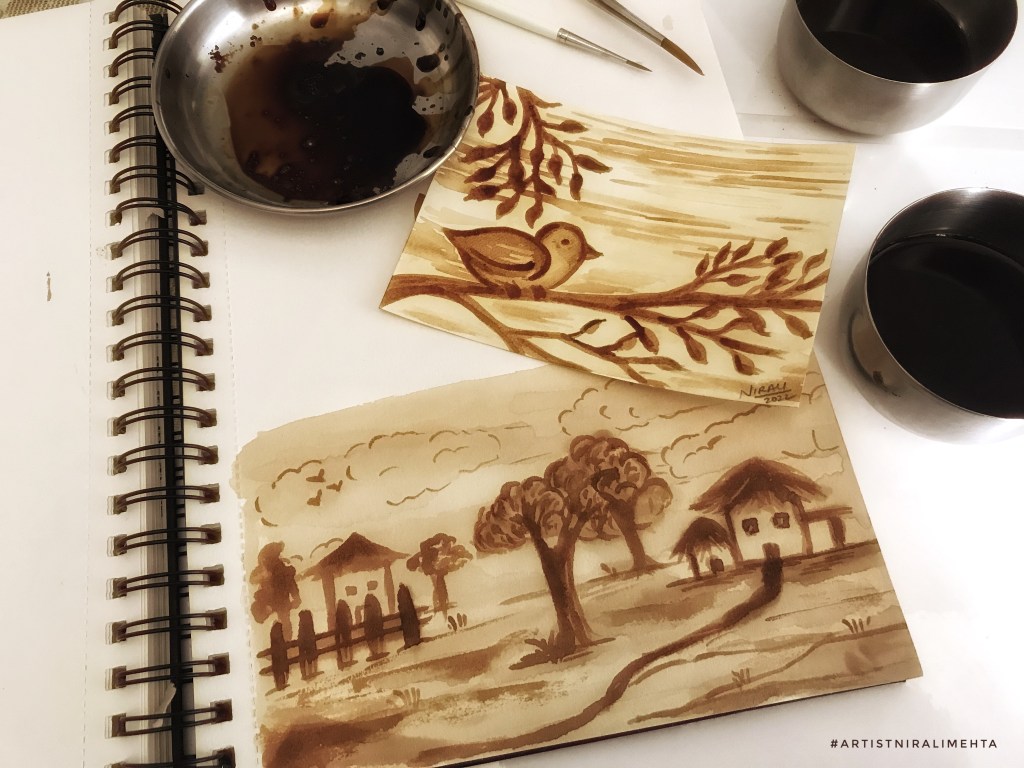
Second one is Coffee Painting. Yes! We can paint with coffee just like we paint with any other paint. The painting technique is very similar to watercolour painting but in monochrome. ‘Sepia tones’ is the correct term used for artworks in shades of brown. We often use this palette to show something as ancient or old or aged.

I used to make ancient historic looking scrolls using this method. To make it, we take a sheet of paper and paint with coffee paint. The light yellow brown will make the paper look aged. Darker paint on the edges and lighter in the centre. Cover the whole page. Blocks or patches of dark light shades look natural. We need a thick paper for this, more than 200gsm or at least 200gsm watercolour paper. Give the edges a slight burn with candle. Write the scroll in calligraphy to make it look authentic. It could be a treasure map too!

Coffee Paint and Sepia tones (Photo Courtesy WordPress Photo Library)

If you have artistic skills, we can actually paint with coffee. Take two bowls. In the first one add one spoon coffee powder and two spoons water. In the second bowl for a darker thick concentrate take one spoon coffee powder and one spoon water. Mix it. The painting and blending art style is like painting with watercolour. Other than that painting with coffee is a very different experience. To create the coffee paint we need instant coffee powder. I used Nescafé powder as it blends well in water. No lumps or chunks.

Actual Picture of the materials I used

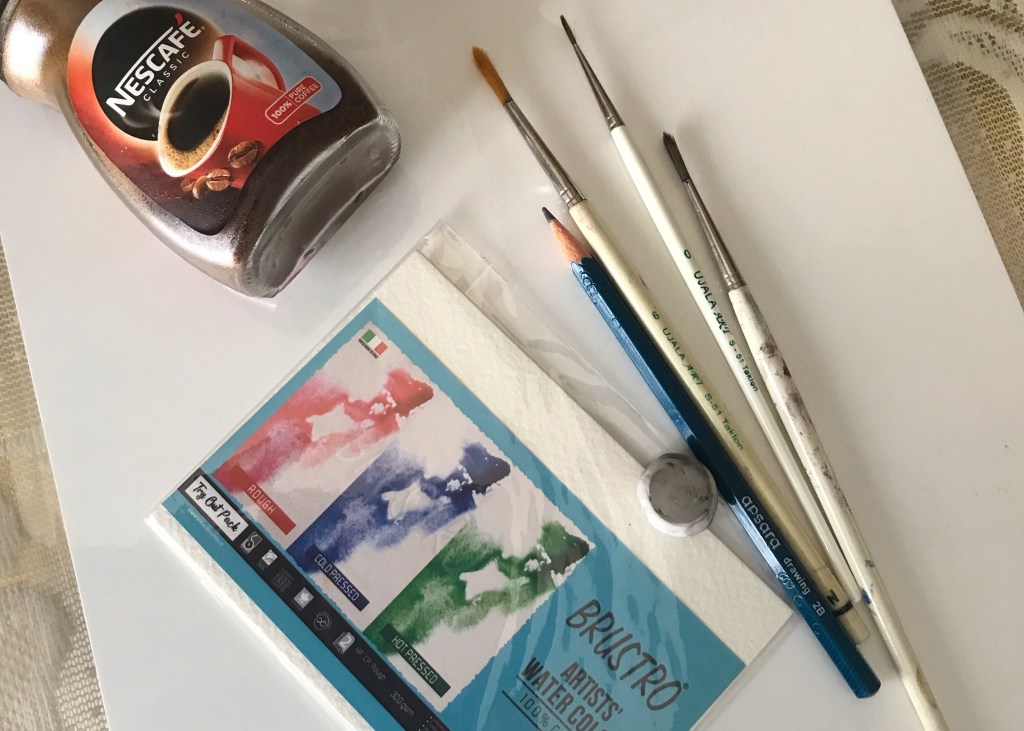
Creating an actual artwork using coffee requires prior experience and skills in painting. That is why I suggested the scroll design which is very easy and will always look good. I recently bought some art material from ‘Creative Hand Art Materials’. They sent me a small sample pack for watercolour paper. The paper is 300GSM. I painted the Bird Artwork on it. The scenery is painted in my regular Art journal.

My artworks – Coffee Painting. First I painted the scenery then the Bird.

Third and last is ‘Latte Art’. It is a very skilled art but many coffee shops let you try it. The coffee is first poured in a particular manner and then designs are created on the surface. Originally, ‘Pouring’ was the only technique to create designs. Designs were created by pouring the cream in a particular way. Now there are more techniques in Latte Art. ‘The Leaf’ is the first basic design in Latte Art.

Latte Art Leaf Design (Photo Courtesy WordPress Photo Library)

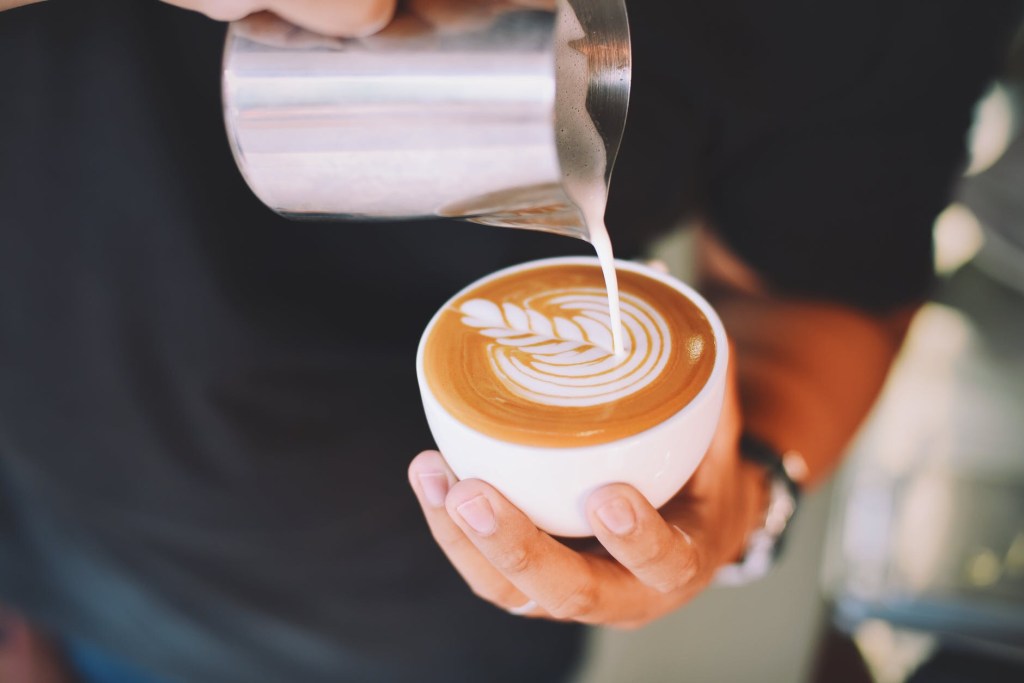
‘Latte’ is coffee with cream or milk and ‘Art’ because we are creating designs, hence ‘Latte Art’. The easiest technique is to use a stencil. We place the stencil on top of the coffee cup and dust it with coffee powder through a strainer.

Stencil + Coffee Powder Design (Photo Courtesy WordPress Photo Library)

Further after the coffee is poured we use toothpicks or the tool to create enhanced artworks. The drop is a dot, we drag the point in a single direction to create the designs. We can dip the point in cream or coffee concentrate to add little details.

Creating using Toothpick or Tool (Photo Courtesy WordPress Photo Library)

This swan is a combination of the pouring method and using the tool. After the leaf is poured, the art is then enhanced using the tool. Sometimes, we directly use the tool to paint with cream. They also add food colour to make colourful artworks.

Swan – Latte Art (Photo Courtesy – WordPress Photo Library)

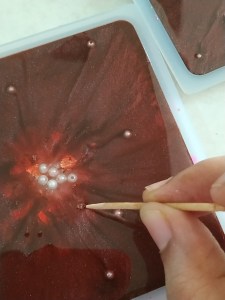
The most complex of these I feel, is the 3D Latte Art. Here, they create 3D structures on the coffee surface with cream and coffee concentrate or chocolate sauce. 3D Latte Art is very Popular in Japan. It was started by a Japanese Artist. Cute things are always liked in Japan. Sharing a few pictures from the internet below. Do browse and look up for more. I don’t hold any rights in them, it is just to show the readers what I am talking about.

Did you know, we get printing machines that print designs on coffee? A cream gun that makes the white cream for art. There is a lot to explore if you are a coffee lover, isn’t it. Although the cream flattens as time passes, I am sure you will agree that these creations make the coffee more alluring and tempting. They are very fascinating to watch as well as try.

The main ingredient is the cream. Creating that at home is difficult. I have tried it with the beater at home but it doesn’t give the same effect. We need the coffee machine or it’s tools. Best to let the Barista pour it for us and then try the designs along with them. That way they prepare the base for us, making it easy.

After that admire your creation, click as many pictures and then drink the coffee. As simple as that! It is a fun and relaxing activity to do on a weekend. Try it for your next date at a coffee shop, if you want to make it more interesting or if you are dating an artist. Hehe.. of course, you can try it otherwise too!

Isn’t it amazing how we can use something so regular from our daily kitchen to make such beautiful artworks. Have an Arty week!

Resin Art, Fluid Art and Art with Alcohol Inks – Go with the Flow

Hello everyone! As promised, I am here, with complete details on working with this sticky, messy and crazy material called ‘Resin’. I will also share about creating designs with alcohol inks. I have clubbed these three styles because their methods are the same – random, uncontrolled, indisciplined and crazy.

It is because of this property that each piece of art is very different from the other. We create beautiful waves and ripples like flowing water resulting in abstract designs to make various usable objects.

Trays, Coasters, Keychains, Name Plates, Cookie stands, Cheese Boards, Wall Clocks, Wall Art, Bowls and Boxes to store little things, Jewellery, Stationery and more: there are so many things we can make with these art styles. We do not need any prior training in art for it. All three are popular activities for art-themed parties.

The material for these art styles is available in large quantities. I would say, “It is a good idea to share the material with a small group of people.” Everyone can take home a souvenir they made at the party. The colours can be mixed and provided in paper cups. The participants follow along instructions and everyone creates a beautiful and unique work of art. Imagine having fun and making art both at the same time.

Here is what you need and how to go about creating amazing works of art. The material is easily available at art stores and online. Some may feel the material is expensive as the minimum quantity is also large. It would be a good idea to use the material for other arts and crafts too. For a single project the material will turn out to be very expensive.

Fluid Art and Resin Art take about 24hrs to dry and set completely. Last but not least, if we spill the resin or the paint, it can get very messy. So unless you want a scolding from the house owner, please take adequate measures to cover your table or desk with newspapers or disposable mats or plastic sheets that will be discarded after the activity.

Fluid Art

Artwork created by pouring acrylic paint onto a surface is called Fluid Art. Acrylic paint with pouring consistency is readily available. All we need to do is pour the colours onto the surface. We pour multiple colours into a cup (one inside another) and then spill them on the canvas without mixing. A blower or dryer is used to blast hot air and create some special effects. It is a lot of paint. The excess paint drips from the surface. As the paint dries, it hardens.

An artist uses colour combinations to create designs of his taste and choice. The canvas must be kept horizontally on a levelled surface. We also get ready art kits for this kind of paint parties. Once the art is done, tap the canvas lightly at any corner to level out the paint and avoid lumps. The vibration created by tapping the canvas levels out the paint. Acrylic paint has its own shine. The last step is to spray varnish as a protective layer for your art.

Fluid Art
Fluid Art – Photo has been taken from the WordPress Library

You can clear coat it with resin to give a smooth glass like finish to the bumpy colours if you wish. It is like applying top coat to your nail art.

Alcohol Inks

Alcohol-based inks that have a nice deep colour are readily available in bottles. The bottle nozzle has a dropper. They are available in a wide range of colours. One thing we definitely need is an ‘alcohol blending solution’. Make sure you add that to your basket while shopping for alcohol-based inks.

The paper we use for this art is important. An impermeable surface works best. I used a thick textured watercolour paper. Sometimes, the ink can come on to the other side of the paper. It is not necessary to use paper. Other materials can also be used but they need to be primed or treated before use. Ceramic tiles can also be painted using this method. Clear coat the tiles with resin to give a glass like finish.

Alcohol Inks
My collection of Alcohol Inks – by the brand ‘Little Birdie’

How to use them? Simply drop a few drops onto the surface and let them flow. The drops create ripples and flow in different directions. They never walk straight or as instructed. Jokingly I say the inks behave as if they are drunk and so they are called alcohol inks.

We can lift the paper and change the level of the paper to control the direction of the flowing ink. This helps avoid getting a large clump at a single spot. Alcohol Inks dry instantly. We use drops of the alcohol blending solution to blend the inks. Try both methods – first the ink drops and then the solution and vice versa. The results in both the case will be different but both are great ways to create art.

We get them in gold and silver too. Browse a few alcohol ink artworks online and notice a nice gold outline in the artwork. We can rub gilding flakes on the dry ink clump. It is tacky and the flakes easily stick to it. I really love stationery created with this method. It has a pop of colour, is simple and classy.

Cards with alcohol ink art
Cards I made with the alcohol ink technique. I added artificial flowers.

Resin Art

Resin is a kind of lacquer. It gives a nice reflective glass like finish. A clear coat is applied as a protective layer on various artefacts. I did a detail step-by-step post on clear coating your canvas in one of my earlier posts. As my hands were busy I could not share pictures. You may read the second half of the post on blue MDF coasters to know about clear coating using Resin.

The other method is using silicone moulds. Alcohol inks can also be added to the resin in order to create effects. Alcohol inks do not dissolve or blend completely in resin. Once a clear resin is poured into the mould, add a few drops of alcohol ink and see how it spreads in all directions like rays of the sun. I used a wooden toothpick in circular movements to create marble effect. Alcohol Inks have a certain amount of transparency when used with resin.

Pouring Resin
Pouring Resin Picture from the WordPress Library

Beach scenes or seawater effects are the most trending works of Resin Art. We mix something called ‘Resin Pigment’ in the clear Resin to make opaque colours. We can add gilding flakes, sequins, dried flowers and leaves, acrylic cut lettering, glitter and other decorative things to the art. I just saw a few videos they used 3D liners and Washi Tape to create stain glass like effects. Bottles of crystals that look like crushed glass are readily available in various colours for Resin Art.

Dried Flowers with Resin
Dried Flowers with Resin Picture from WordPress Library

Art Resin is best for home use. It comes in two bottles. One will be the ‘Resin’ and the other will be the ‘Hardener’. Depending on the brand it is to be mixed in a paper cup in the proportion 1:1 or 2:1. Please read the instructions on the Resin bottles. The proportion is very important. In case it is not mixed in the correct proportion, it will not set correctly.

Resin Coasters waves
Resin Coasters with Waves effect – WordPress Library

Stir the mixture continuously for 3mins until it becomes colourless. This is the clear Resin. Resin starts hardening after 30-40 minutes. So complete all the designing by then. Pigments are concentrated colours to be added and mixed with the resin using a wooden spoon or stick. They blend well with the Resin. Make a different colour in a different cup. Paper cups and wooden spoons work best for resin.

There is no method to pour these colours or mediums. We have to ‘go with the flow’. A heat gun is used to pop air bubbles that come up to the surface in the resin. I pop them using the pointed side of the toothpick. Resin is self-setting and must be left to dry on a levelled surface. Pour from the centre and it automatically spreads to the ends. Try different pours and see the results. It’s just fun!

I wanted Coasters for my table so I bought the square moulds. Moulds for all the objects are easily available at art and craft stores and online on Amazon and other marketplaces. If you want to make something else you can buy those moulds. The process is the same. It takes 12 hours to set and another 12 hrs for curing – a minimum of 24hrs are required before un moulding.

Professionally Resin is used with wood to make decorative furniture too. This requires further processing and is better to work in a studio. Resin gives out fumes that can be harmful if inhaled. They wear a mask while working. That is why for home use, we use a milder version – Art Resin. Children can work with resin if supervised by an adult. Once the resin hardens, it feels like an acrylic block.

Special Tip: A hairdryer or hot air blower helps push the colour in a particular direction or dry the ink before it spreads further. It also helps create special effects in Fluid Art – bubbles or fizzy kind of border. Use it to blow and lightly pop the bubbles in the resin. Now you see! It is such a handy tool while working with any of them. But be careful not to over do it or you will get blown away.

I made the Pink Coasters just to try the material. After that my Mom wanted me to make her a set of these wine and rose gold coasters. Abstract art is all about your aesthetic sense. It looks beautiful for any decor. Give these art styles a try for a fun-filled creative activity. Have an Arty Week!


View about clear coating with Resin in my previous post

Art Project : Set of Coasters

Hot or Cold ? It is a good idea to use coasters when you want to avoid marks on the table that happen because of the condensate on drinks. I like customised or things made especially for me. Buying a ready coaster off the shelf was boring, making one myself sounded more fun.

That is why I decided to make my own coasters. And what is a project without a challenge? For this project, my challenge was to clear coat the coasters. The first thought for anyone when I say ‘handmade coasters’ is to think of them as school crafts made by children. This isn’t that. We want something professional looking and long lasting. Just because it is handmade does not mean it should be any less. Isn’t it?

Blue Handmade Coaster Set
This is the handmade Coaster Set that I made

These are coated and exactly like those available in the market. They are durable and stand various temperatures. The coating protects the colour and design as well.

Materials Needed :

  1. Pieces from MDF Board – These could be any size and shape. We get ready ones at all art and craft stores. The quantity depends on your table. I picked six square shape boards of 3.5 x 3.5 inches
  2. Chalk Paint – I picked the frozen blue shade of chalk paint by a company called ‘Little Birdie’
  3. Acrylic Paints – I used acrylic paints in bottles. Pearl finish teal blue and regular finish persian blue colour. One has a glitter finish while the other has a plain finish. The brand for my acrylic paints is ‘Fevicryl’
  4. 3D liner White Pearl by ‘Fevicryl’ for highlights (optional)
  5. Permanent Markers to draw or outline the design
  6. Design Stencil – You can use a readily available one or make one with paper yourself for the design. To get the exact same design on all coasters it is important to have a stencil. It makes replicating the design easier.
  7. Acrylic Varnish – I used the spray from the brand ‘Camlin’
  8. Art Resin – comes in two bottles (resin + hardener) to be mixed and used. The resin to hardener proportion is different for different brands but will either be 1:1 or 2:1. This is for the coating. I used epoxy art resin by the company ‘Little Birdie’

Method :

MDF Board is thick board made from wood fiber. For art and craft the material is handled just like plywood or wood. Ready pieces of different shapes and sizes are available in the market for various arts and crafts. For coasters they are available as multiple packs or single pieces, with and without a stand to complement it. The choice is yours.

MDF Coasters to paint
MDF Board Pieces in Brown and Blue Chalk Paint

I had picked six square shaped board pieces with rounded corners. They don’t have a wrong side or right side. We can paint on either. Select the side you feel looks good and make that the top side. I painted them on both sides with chalk paint using a flat brush.

First coat of chalk paint
Applying the first coat of Chalk Paint

What is chalk paint? Most acrylic paints leave a self texture and gloss after drying. Further, we need to prime the base before using them. Chalk paint is also an acrylic paint but it gives a matt finish and better coverage. There is no need to prime the base. Can be applied directly to any wood or wood like surface. I have applied two coats of chalk paint on both the top and bottom of all coasters.

It is quick drying. An interval of 15-20mins between coats is sufficient for it to dry. On the side rim as a dark colour and just to have a contrast I applied Persian blue colour from the acrylic bottle paints. These are liquid and of pouring consistency. Work very well for Dot Painting as well.

Chalk paint two coats
Dried vs wet Chalk Paint after Two Coats

After drying I secured the stencil with a paper tape on the top side of the coaster. I traced the design using a blue permanent marker. Did this for all the coasters. Painted the design using acrylic paints in bottles. Highlighted using a 3D liner – white pearl colour. You can use the permanent marker on dried acrylic paint for touch up of the design.

Stencil for coasters
Tracing the Stencil with Permanent Marker

Now we need to let this dry completely. Acrylic Paints are fast drying. We may feel it is dried after an hour but before the next process let it dry completely to the last particle for at least 24hours. Apply two coats of acrylic varnish after that and leave it for another day 24hours after that. I sprayed varnish on the backside as well. Makes an easy clean surface in case it gets dirty.

Acrylic varnished coasters
After Varnish. Note the Gloss and Texture of the Surface

It is usable after this but I wanted to coat it with resin. Resin is a thick clear coat making it durable against extreme temperatures and gives a reflective glass like finish. Even a small piece of dust will sit and stick to it. The acrylic varnish makes it easy to clean the dust and locks the paint. That is why, the colours don’t smudge or bleed when we pour the resin.

Now for the challenging part – applying the coat of resin. Working with resin can be messy. The clean up is very difficult. Make sure you do this at a place well protected with paper or plastic for any unwanted spills.

Resin is like lacquer. Art resin is a slightly milder form and better to work with at home. Use masking tape or paper tape and pack the edges of the coasters. So in case the resin spills you can remove it with the tape after it dries. Put the coasters on a levelled lifted surface. I placed a paper cup upside down and put the coaster on it.

Wear silicon gloves or plastic bag as gloves. Resin sticks to the hand. It becomes sticky and is difficult to remove. In case you get some on your hand while working use an alcohol based solution or acetone or sanitiser to remove it. It does not go with soap water. I haven’t clicked pictures of the process as both my hands were occupied and I couldn’t touch the camera with dirty hands.

In another paper cup I mixed resin in the ratio 2:1 (resin to hardener) as mentioned in the description on their bottles by ‘Little Birdie’. The next process is same for all resins. We have to stir it continuously using a wooden stick for 3 mins till it becomes transparent and then pour on the surface to coat. 40ml + 20ml = 60ml was sufficient to nicely coat six coasters. The proportion has to be correct else it will not harden upon drying.

I poured the resin mixture at the centre and spread it to the edges using another wooden stick. The excess drips. I cleaned it using the stick. It is a self setting liquid and any craters will level out as it dries. Lightly pop the bubbles that come up using the pointed side of a toothpick. Also use a heat gun or a hair dryer or blower over it once. This pops the bubbles too.

Let it dry in a dust free environment. It gives out a mild smell or fumes as it dries. Hence best to leave it at a spot not frequented by anyone. It takes 12 hours to set and 24 to 48 hours for curing. The surface will be hardened, clear and reflective like a glass. Easy to clean and protective for coasters. We get food grade resin also. They use it for making trays and other kitchen items.

Handmade Coasters
Resin Coasted. The Coating is about 1-2mm in thickness. Note the Reflective and Smooth Surface.

Think creatively and make your own design. Coasters made entirely from resin using silicon moulds and fluid art as also popular. They mix a paste called resin pigment to add an opaque colour, alcohol inks for transparent colours, decorative elements like glitter, stones and dried flowers to the resin and make many artistic home decor items.

Do try it out and share your experience. Have a creative weekend!


Note: This is not an advertisement or paid promotion. I bought the materials, made the coasters and clicked the pictures all myself. Kindly do not use without permission.