Resin Art, Fluid Art and Art with Alcohol Inks – Go with the Flow

Hello everyone! As promised, I am here, with complete details on working with this sticky, messy and crazy material called ‘Resin’. I will also share about creating designs with alcohol inks. I have clubbed these three styles because their methods are the same – random, uncontrolled, indisciplined and crazy.

It is because of this property that each piece of art is very different from the other. We create beautiful waves and ripples like flowing water resulting in abstract designs to make various usable objects.

Trays, Coasters, Keychains, Name Plates, Cookie stands, Cheese Boards, Wall Clocks, Wall Art, Bowls and Boxes to store little things, Jewellery, Stationery and more: there are so many things we can make with these art styles. We do not need any prior training in art for it. All three are popular activities for art-themed parties.

The material for these art styles is available in large quantities. I would say, “It is a good idea to share the material with a small group of people.” Everyone can take home a souvenir they made at the party. The colours can be mixed and provided in paper cups. The participants follow along instructions and everyone creates a beautiful and unique work of art. Imagine having fun and making art both at the same time.

Here is what you need and how to go about creating amazing works of art. The material is easily available at art stores and online. Some may feel the material is expensive as the minimum quantity is also large. It would be a good idea to use the material for other arts and crafts too. For a single project the material will turn out to be very expensive.

Fluid Art and Resin Art take about 24hrs to dry and set completely. Last but not least, if we spill the resin or the paint, it can get very messy. So unless you want a scolding from the house owner, please take adequate measures to cover your table or desk with newspapers or disposable mats or plastic sheets that will be discarded after the activity.

Fluid Art

Artwork created by pouring acrylic paint onto a surface is called Fluid Art. Acrylic paint with pouring consistency is readily available. All we need to do is pour the colours onto the surface. We pour multiple colours into a cup (one inside another) and then spill them on the canvas without mixing. A blower or dryer is used to blast hot air and create some special effects. It is a lot of paint. The excess paint drips from the surface. As the paint dries, it hardens.

An artist uses colour combinations to create designs of his taste and choice. The canvas must be kept horizontally on a levelled surface. We also get ready art kits for this kind of paint parties. Once the art is done, tap the canvas lightly at any corner to level out the paint and avoid lumps. The vibration created by tapping the canvas levels out the paint. Acrylic paint has its own shine. The last step is to spray varnish as a protective layer for your art.

Fluid Art
Fluid Art – Photo has been taken from the WordPress Library

You can clear coat it with resin to give a smooth glass like finish to the bumpy colours if you wish. It is like applying top coat to your nail art.

Alcohol Inks

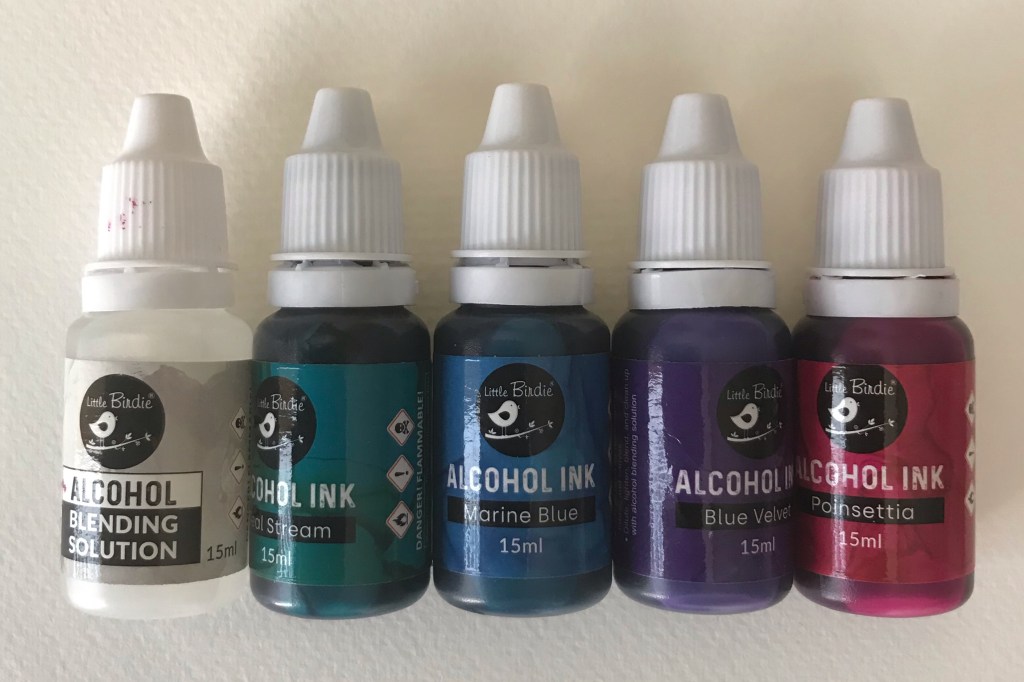
Alcohol-based inks that have a nice deep colour are readily available in bottles. The bottle nozzle has a dropper. They are available in a wide range of colours. One thing we definitely need is an ‘alcohol blending solution’. Make sure you add that to your basket while shopping for alcohol-based inks.

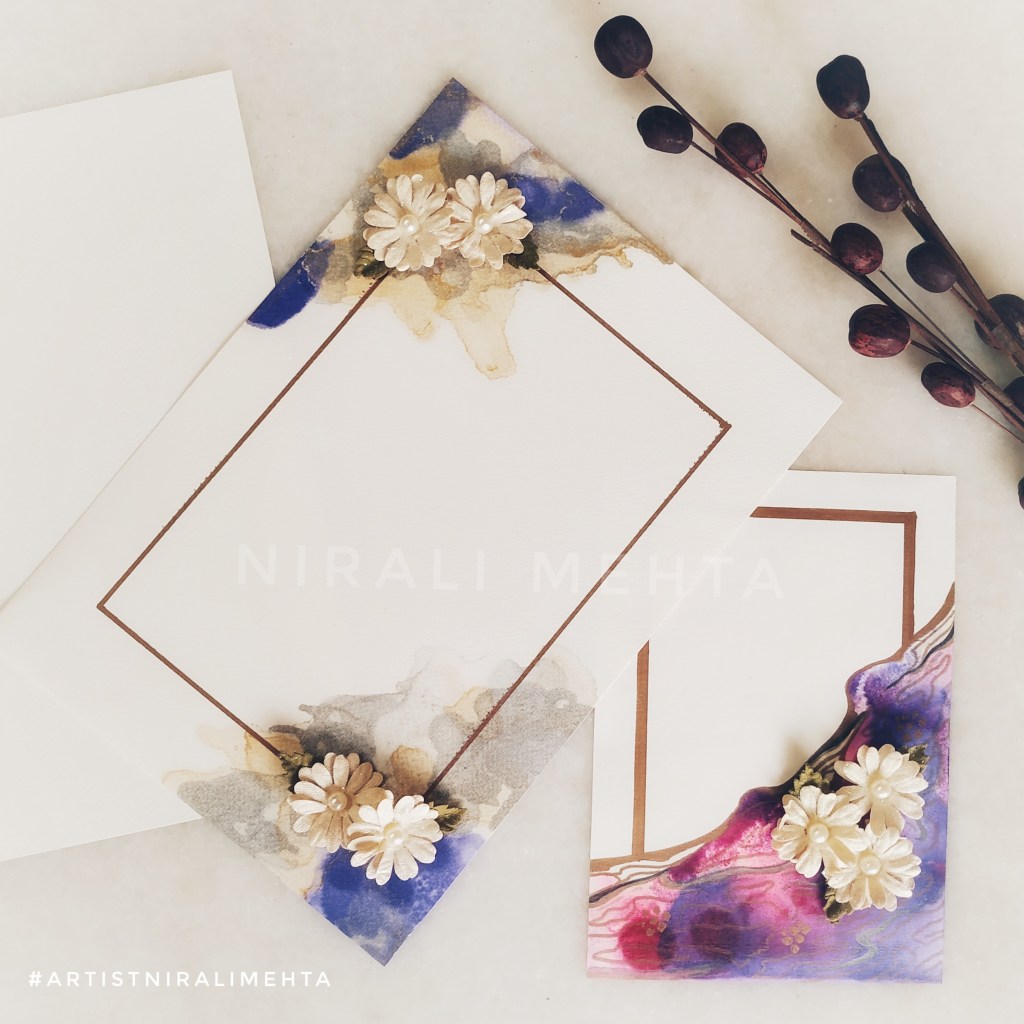
The paper we use for this art is important. An impermeable surface works best. I used a thick textured watercolour paper. Sometimes, the ink can come on to the other side of the paper. It is not necessary to use paper. Other materials can also be used but they need to be primed or treated before use. Ceramic tiles can also be painted using this method. Clear coat the tiles with resin to give a glass like finish.

Alcohol Inks
My collection of Alcohol Inks – by the brand ‘Little Birdie’

How to use them? Simply drop a few drops onto the surface and let them flow. The drops create ripples and flow in different directions. They never walk straight or as instructed. Jokingly I say the inks behave as if they are drunk and so they are called alcohol inks.

We can lift the paper and change the level of the paper to control the direction of the flowing ink. This helps avoid getting a large clump at a single spot. Alcohol Inks dry instantly. We use drops of the alcohol blending solution to blend the inks. Try both methods – first the ink drops and then the solution and vice versa. The results in both the case will be different but both are great ways to create art.

We get them in gold and silver too. Browse a few alcohol ink artworks online and notice a nice gold outline in the artwork. We can rub gilding flakes on the dry ink clump. It is tacky and the flakes easily stick to it. I really love stationery created with this method. It has a pop of colour, is simple and classy.
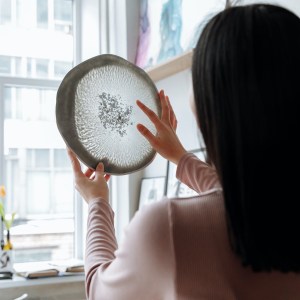
Cards with alcohol ink art
Cards I made with the alcohol ink technique. I added artificial flowers.

Resin Art

Resin is a kind of lacquer. It gives a nice reflective glass like finish. A clear coat is applied as a protective layer on various artefacts. I did a detail step-by-step post on clear coating your canvas in one of my earlier posts. As my hands were busy I could not share pictures. You may read the second half of the post on blue MDF coasters to know about clear coating using Resin.

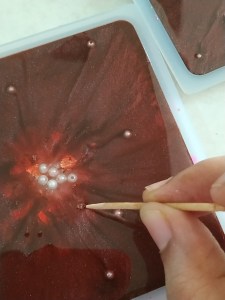
The other method is using silicone moulds. Alcohol inks can also be added to the resin in order to create effects. Alcohol inks do not dissolve or blend completely in resin. Once a clear resin is poured into the mould, add a few drops of alcohol ink and see how it spreads in all directions like rays of the sun. I used a wooden toothpick in circular movements to create marble effect. Alcohol Inks have a certain amount of transparency when used with resin.

Pouring Resin
Pouring Resin Picture from the WordPress Library

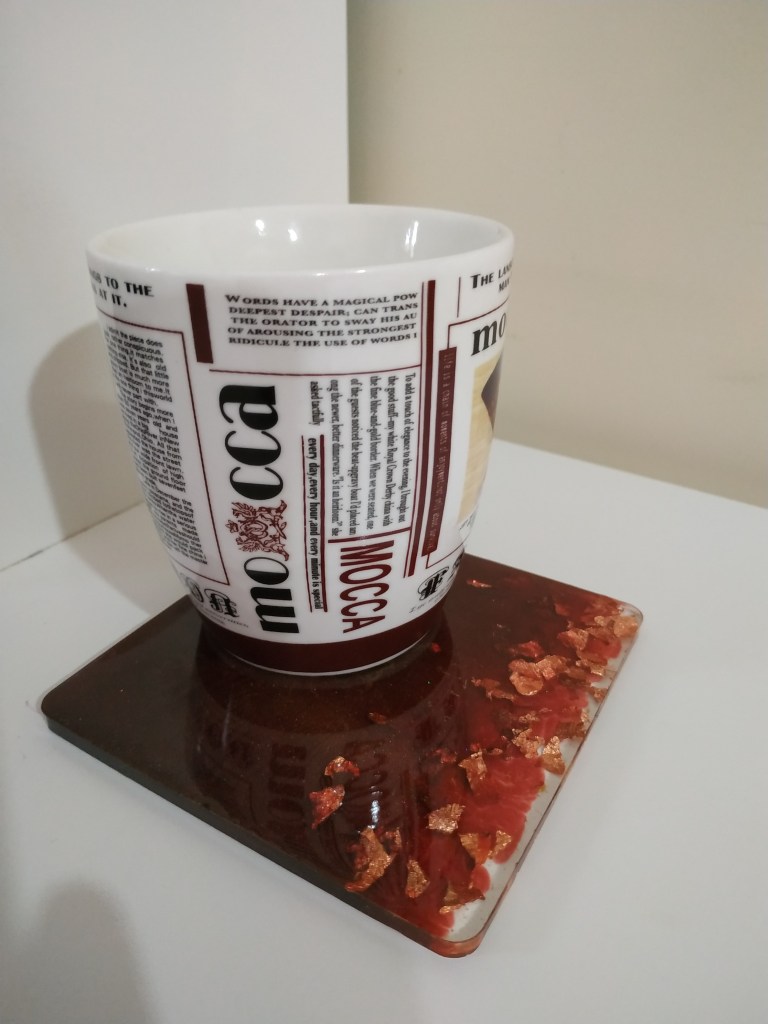
Beach scenes or seawater effects are the most trending works of Resin Art. We mix something called ‘Resin Pigment’ in the clear Resin to make opaque colours. We can add gilding flakes, sequins, dried flowers and leaves, acrylic cut lettering, glitter and other decorative things to the art. I just saw a few videos they used 3D liners and Washi Tape to create stain glass like effects. Bottles of crystals that look like crushed glass are readily available in various colours for Resin Art.

Dried Flowers with Resin
Dried Flowers with Resin Picture from WordPress Library

Art Resin is best for home use. It comes in two bottles. One will be the ‘Resin’ and the other will be the ‘Hardener’. Depending on the brand it is to be mixed in a paper cup in the proportion 1:1 or 2:1. Please read the instructions on the Resin bottles. The proportion is very important. In case it is not mixed in the correct proportion, it will not set correctly.

Resin Coasters waves
Resin Coasters with Waves effect – WordPress Library

Stir the mixture continuously for 3mins until it becomes colourless. This is the clear Resin. Resin starts hardening after 30-40 minutes. So complete all the designing by then. Pigments are concentrated colours to be added and mixed with the resin using a wooden spoon or stick. They blend well with the Resin. Make a different colour in a different cup. Paper cups and wooden spoons work best for resin.

There is no method to pour these colours or mediums. We have to ‘go with the flow’. A heat gun is used to pop air bubbles that come up to the surface in the resin. I pop them using the pointed side of the toothpick. Resin is self-setting and must be left to dry on a levelled surface. Pour from the centre and it automatically spreads to the ends. Try different pours and see the results. It’s just fun!

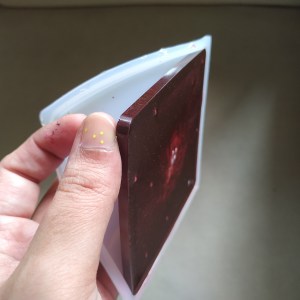
I wanted Coasters for my table so I bought the square moulds. Moulds for all the objects are easily available at art and craft stores and online on Amazon and other marketplaces. If you want to make something else you can buy those moulds. The process is the same. It takes 12 hours to set and another 12 hrs for curing – a minimum of 24hrs are required before un moulding.

Professionally Resin is used with wood to make decorative furniture too. This requires further processing and is better to work in a studio. Resin gives out fumes that can be harmful if inhaled. They wear a mask while working. That is why for home use, we use a milder version – Art Resin. Children can work with resin if supervised by an adult. Once the resin hardens, it feels like an acrylic block.

Special Tip: A hairdryer or hot air blower helps push the colour in a particular direction or dry the ink before it spreads further. It also helps create special effects in Fluid Art – bubbles or fizzy kind of border. Use it to blow and lightly pop the bubbles in the resin. Now you see! It is such a handy tool while working with any of them. But be careful not to over do it or you will get blown away.

I made the Pink Coasters just to try the material. After that my Mom wanted me to make her a set of these wine and rose gold coasters. Abstract art is all about your aesthetic sense. It looks beautiful for any decor. Give these art styles a try for a fun-filled creative activity. Have an Arty Week!


View about clear coating with Resin in my previous post

Playing with Colours and Textures

On my way home, I stopped to grab a coffee at my regular coffee joint when I peaked at the new poster coming up on the notice board. It was a poster of an Art Exhibition coming up at the display gallery on the first floor. The exhibition was by a five-year-old artist.

Wow! At that age, I didn’t even know how to spell art or write anything. A little girl, just five having an entire gallery display, a solo artist. Did I wonder how? What? Why? When? Who? My mind began to run at the fastest speed that I had known.

Modern Art, Abstract Art and Contemporary Art these terms are used together or in place of the other many times. This little artist was into Contemporary Art. Her guardians were organising her show. She was trying for the world records as the youngest artist to have a solo art show.

I don’t know if she made it but it got me my topic for this post. Yes! We will be discussing Modern Art, Contemporary Art and Abstract Art in this post. Are these the same? Not really. Honestly very few people understand these or know. It is more about visual appeal. If they like to look at it, they buy it. Simple!

Abstract Art
A square tile of my Abstract Art

Modern Art is a term used for the thought process. The artist is painting something that is not restricted by the traditional boundaries of the past. Abstract Art means it doesn’t resemble anything in form as such. Contemporary means more of the style of today. As art styles evolved every landmark change coined a new term. More like the terms are used for the art style in a particular era.

Modern Art is better defined in terms of shapes and textures. It looks more like patterns and designs. Contemporary Art on the other hand is more abstract than modern Art. Modern Art is a style popular in 1860s to 1970s. Contemporary Art is more as today’s Art style.

The key point in selection is the colour scheme. This art goes well with today’s modern contemporary interiors. It doesn’t represent or mean anything. Just adds a look and feel to the whole place. Many people like to purchase Art that doesn’t have an exact defined meaning.

Highlight a Wall with Abstract Art

This Art looks better on a nice big canvas. Reprints are easy. Selections are quick and simple – most of the times people just go with what their interior designer suggested. And the prices are affordable. Art galleries also like to stock more of these because it is a fast-running product for them.

Abstract Art
One of my artworks shown in an actual space – Living Room

Jokingly I am sure at least one person looking at it will be like “Hey! I can paint that!” Haha! True and False both. True because people think it is easy I can dip a brush in colour and run it on the canvas and call it Art. False because you can’t recreate the same thing. Your Art will always be different. Interesting! Isn’t it!

Abstract Art is all about shapes, textures and colours. It completely depends on the artist’s aesthetic sense. The Art can be geometric or random. The artist paints a mood, an emotion or a feeling using colours and creating textures with brushes, hands or tools. Big bold strokes and striking colours are my style.

Abstract Art
Two of my artworks shown in a commercial space – Work Desk

There is no good or bad here. One either likes it or doesn’t like it. No two ways about it. One cannot say if this was like this maybe it will be better. Here it is an artist’s call when to say complete. It must be visually appealing. This Art gains meaning when it is installed in a space. It is more like it completes the space and gives the look to a place. What one feels is too much may be perfect for another. Always to your taste!

Abstract Art
One of my artworks – square prints – Bathroom

‘Dream of your Art and Paint your dream.’ All in all paint whatever comes to your mind with complete confidence. To get that beautiful artwork preferably paint on a canvas in acrylic colours. This gives a lot of options in creating different textures. You may want to read my previous post on painting with acrylic colours to know why it is a preferred medium to paint. View Post on Acrylic Colours.

Modern Art
Two of my artworks – Bedroom

No one can teach anything here, we paint what comes to us naturally. We can browse the internet and look at paintings by famous artists for inspiration. The technique is we paint directly with colour. No erasing, going back and forth or smoothening or anything. And paint in layers. One colour over another is completely ok. No need to blend.

I have made abstract modern art designs for my products at my Society shop and Redbubble shop NMARTWORKS. Here I am sharing some printable posters with my Art which would make suitable Wall Art pieces for residential as well as commercial spaces. These are more on the lines of contemporary art. These artworks have been created digitally for prints in different sizes but exactly on the lines of how we would paint them offline.

Have an Arty Week!

Let’s get you in a Frame! Selecting a suitable Frame for your Art and Creating an Art Wall

Looking for some Art to up the aesthetic appeal of your space? You did a search and found something that you just couldn’t take your eyes off. “It is so me! I think it will look fantastic on that wall in our room. Just what we needed!” Ta-da! Bought!

Now comes the difficult part – selecting a Frame that goes with it. The task isn’t as difficult as it seems but many people find it stressful to make up their minds while selecting a Frame. A lot of questions and confusion. Have I made the right choice? What if I had selected another Frame? Matt or not? Vintage or Classic? Metal or Wood? After all, the Frame can make such a big difference to the final look.

Shipping Framed Art can be difficult which is why most Artists sell their Art unframed. I am an Artist and I also sell most of my Art unframed. I do upload Framing ideas on my social media accounts regularly so as to assist potential buyers. Framing is an additional service that I provide to close friends & family as well as local buyers upon request. At online shops, my Artwork is shown with and without Frames so the onlooker can imagine how it would look once it is framed. I usually show Frames that are common and easily available or standard market Frames.

With the advent of 3D and AR (Artificial Reality) a cool new feature will soon be available – We can scan our wall or space using the camera in our phone and the software will project and show us how the Art will look framed on our wall, like on that wall in your house, like what if you bought it and put it there how would it look? All this in real-time before buying. Although it seemed unbelievable at first, this feature is currently in the beta testing phase and very much implementable.

Art is to everyone’s taste and choice. It isn’t a one shoe fits all formula. Some may like a minimal wall with just one big Art while others may want many Frames filling up the whole wall end to end. I totally agree ‘Beauty lies in the eyes of the beholder’. I am not an expert at Framing but I can definitely share whatever I have known or learnt so far about ‘Making an Art Wall and Framing your Art’.

These are basically ideas and suggestions that would help anyone make a simple ‘you cannot go wrong with this’ kind of choice. It works best for people who wish to decorate their spaces with Art but on a budget. Yup! Definitely recommend expert help from a professional if it suits you. Even then this information will help. When the Frame maker asks you questions to understand your requirements, you would know what exactly is he talking about. So here’s answering some of the questions I usually come across about selecting Frames and putting up Art on the wall.

1. Edges of the Art – A minimum of half inches on all the sides gets enveloped into the frame. Even in a plain classic thin black or white frame without matting the edges get hidden into the portion of the frame. An artist paints these edges knowing well that it will get covered up or may leave a white border edge for it.

Framing Art
Two Artworks – One painted to the end and other with white border left out. Thick white panel is the Matt Board.

If the Art doesn’t have a blank border and you don’t want to cover up the edges then select a Floating Frame or a Sandwich Glass Frame. In a floating frame the Art is put above the matt making it look like it is floating, while in a double wall glass frame the Art is sandwiched between two glass panels. Only the glass touches the frame and the Art looks floating. See the picture below.

Wall Art
A double wall glass frame giving a floating effect.

2. What is Matt – A Matt or a Mat or a Mount is an additional border around the Art cut from a sheet of paper or board. Although it has a decorative purpose, it is more to preserve the Art by avoiding direct contact between the Art and the edges of the frame and glass. They recommend using an acid free material for it. A window for the Art is cut out. We can have any colour mat. Black, white and off – white are standard colours.

Frames that are available at shops include a mat or we can make one from paper sheets available in the market too. A mat is preferred for photos, prints and Art on paper that is otherwise small. The matt makes the frame look bigger while keeping the focus on the Art. Art Galleries and Museums have Artwork with matts.

There are double matt frames too. It means the Art encased in the first matt and then another matt and finally the frame. Looks like multiple frames inside each other. Ready Frames in the market will have only a single matt option.

Framing  your Art
Half inch Black Frame with One inch Matt on all sides

3. Size of the Art – How big is the wall? What is the size of the Art? Take a scale (ruler) and approximately measure the size of the Art that you will be putting up. How much space you want to cover or leave out? In case you are going to put up multiple Frames then space them out well. How many of them are landscapes and how many portraits? Visualise!

Placing a paper of the same size as the Art on the wall to visualise the Framed Art can help map the space for a beginner. Any Frame adds to the size of the Art and if you get a frame done with matting, it adds even more. The chances of a miscalculation in the size can be reduced if we understand this.

Explaining it with the help of an example : Let’s take an art on paper that has a finished size : 8 inches width and 10 inches height. We find a Frame of 11 x 14 inches. So for the 3 inches in width and 4 inches in height we can add a matt OR we add 3 inches equally and get a custom Frame of size 11 x 13 inches.

Art Wall
All the frames have same size plain black simple classic Frame. No Matt.

Even without the matt, it would be about 8.5 x 11 inches. The Frame moulding would add about an inch or more depending on its design, bevel and thickness. Always check the finished size written in the info when buying a standard market Frame. As for custom framing, you can control this better. This applies for all paintings on canvas or on paper, photos and prints that you can Frame.

It makes complete sense in buying the Art first and then selecting a suitable Frame. Also always calculate an approximate finished size on the wall before clicking the purchase button. We may not be able to make an exact calculation but the nearest can be rounded off to the next number on the higher side to avoid any bloopers.

4. Matching the Canvas with Frames – A board canvas needs to have a frame. With glass or without is ok, but a moulding around defines the Art. Paintings with acrylic paint can be used as wall mounting Frames. In this case the wooden frame in the stretched canvas is itself the final frame and it can be hanged on the wall directly. In case you wish to frame such a canvas you would need a Box Frame because this canvas is 1 or 1.5 inches thick like a box. For a canvas we have to consider the thickness also. The glass must not touch the canvas. A regular Frame wouldn’t fit so we would have to opt for custom framing. That is why wall mounting canvas frames are popular.

Ready standard size Frames work best for prints, art and photos on paper. They have a chart with common sizes for photos and A4 or maximum A3 size. Frames for Art larger than that may be difficult to source. The cost of framing an oil painting is the highest. It is high maintenance and must be done by a professional so that it is airtight and avoids contact with the glass. Even if it is custom framed, it needs a very experienced Frame maker or the Art can get spoilt.

5. Glass or Acrylic – Here they don’t mean the Acrylic paint. They are asking if we want the transparent panel in the frame that is made of glass or acrylic material. Acrylic is lighter in weight. It is cheaper too. A glass Frame will always cost more. The advantage with glass is that it doesn’t develop scratches. Acrylic does not break or chip off easily. Most over the counter Frames that are available for prices as low as a few dollars have acrylic panels.

Art Wall
Art Wall : All of them have a Matt and different Frames.

6. Material and Type of the frame – It can be metal, wood or plastic? Vintage or Classic? Thin or thick? This selection is based more on the look and the cost. Only thing to remember is that the Frame shouldn’t be more than the Art itself. We want to Frame the Art to preserve it longer and be able to hang it on the wall. Other than that the Frame should add to the decorative factor of the Art and not the other way around. A simple suggestion would be to consider the other factors of the space. Some frames may look too heavy or cheap and not in sync with the other things around. A simple elegant black or white Frame with or without a matt or a nice wooden Frame in dark or light brown polish that matches the rest of the room works very well.

7. Changeable – Frames where we can remove and change the inserted Art by opening them are changeable frames. If you don’t want to go through the hassle of getting a Frame and putting a nail each time, this is also a good option. Also when you want the same Frame for all the Art on that wall, one would opt for a changeable Frame. In future when you buy new Art you can use the same Frame and all of them match each other. This is because if we buy Frames over a period of time then there are chances that all will not be the same. Besides it is a one time investment. In this case the frames should be more sturdy and of good quality to last for years.

Frames for Art
Changeable Glass Frame made of Plastic.

8. Hooks to hang the frame – Don’t miss this out when selecting your frame. Some Frames have movable hooks, some have a single hook, some double and the distance between these hooks matter. The hook may be small or fitted to the same level as the frame or could be coming out a level higher. These things we can’t determine while looking at the Frame in pictures. Only when we actually go to put the Frame up on the wall we realise that the Frame doesn’t sit well in place and it is because of the hook.

That was the hook on the Frame and now to put it up on the wall, we have to put a suitable nail. Now a days we get adhesive hooks that stick to the wall. No need to put nails that damage the wall. Works best if you don’t want to put a nail in the wall but select these as per the weight of the Frame. The options are vacuum hooks, velcro hooks and hooks with tape or adhesive. They will not damage the wall and no need to drill either. They are called ‘no nail or no damage hooks’.

Photo Wall
Photo Wall with different sized Frames on a printed Wallpaper background

9. Selecting the Wall – What I have learnt is that the Wall stands out when it’s made into an Art Wall. Basically when you want to highlight a particular wall or want a wall to grab attention in a room, it is the wall to select and make an Art Wall. Single large Framed Artworks on a single colour painted wall work best for abstract or modern Art. These look beautiful on wall mounted canvas without any frame or glass.

A small cluster of about two or three same sized Frames on a wall gives a classy contemporary look. The only big no-no here is having Frames on all the walls in a single room. That makes it look like a library or a museum or an Art gallery. The walls of staircases and passages are good for memory walls or photo walls. A little light that illuminates the Art is better than a dark space. Then again it is more to your taste.

10. Wallpaper and Decals : Often used for a photo wall. For a nursery or a commercial space it would be a good idea to have Framed prints or posters and decals around. Decals are vinyl stickers that we can stick on the wall. They are available in many designs. Having a nice background with a printed wall paper and Art frames on it also look good for some Art. Mixing these along with Art give a very different new look. It isn’t the traditional style and may not appeal to some.

I hope this clears most of the doubts on Framing and creating an Art Wall. If you have time, please visit my Pinterest account. I have an album for ideas on creating an Art Wall. Have an Arty Weekend!


Photo Credits: Pictures that I have clicked have my name and the others are from the WordPress Library.