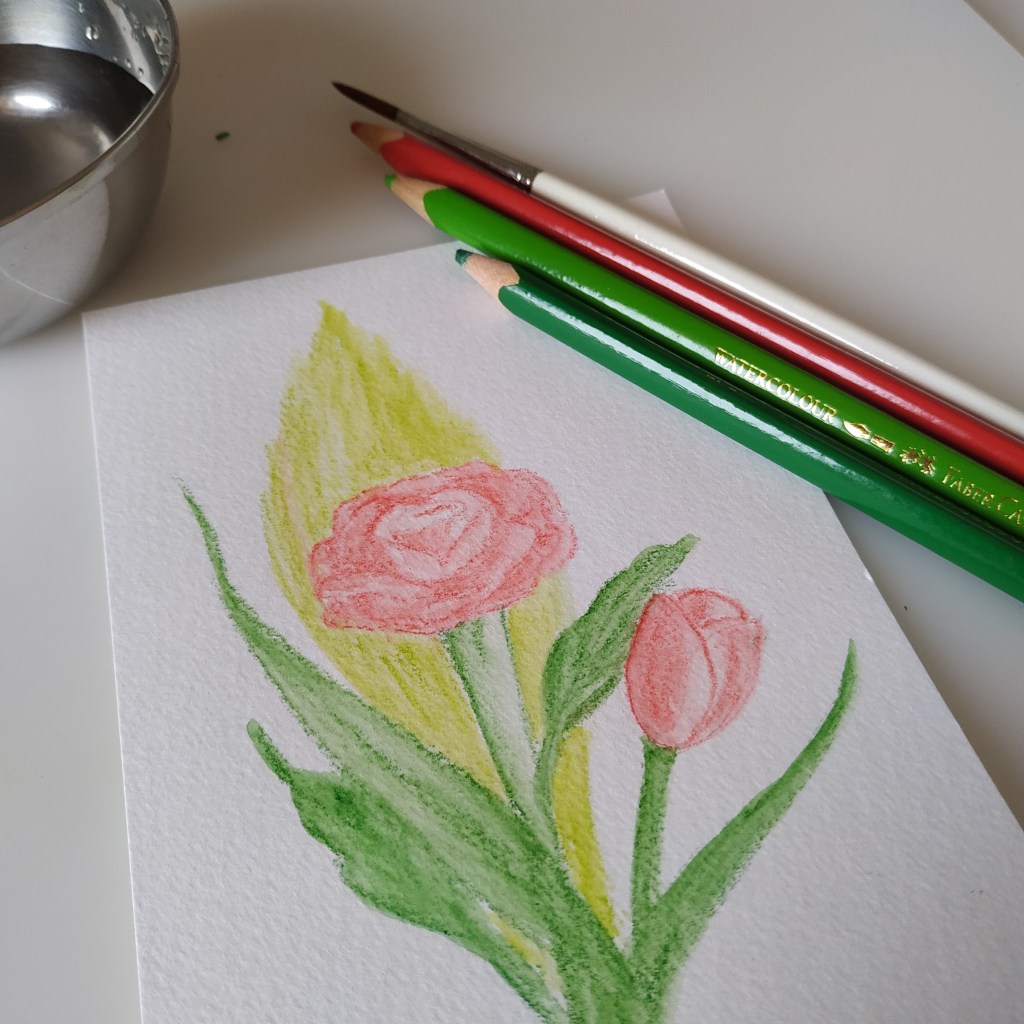
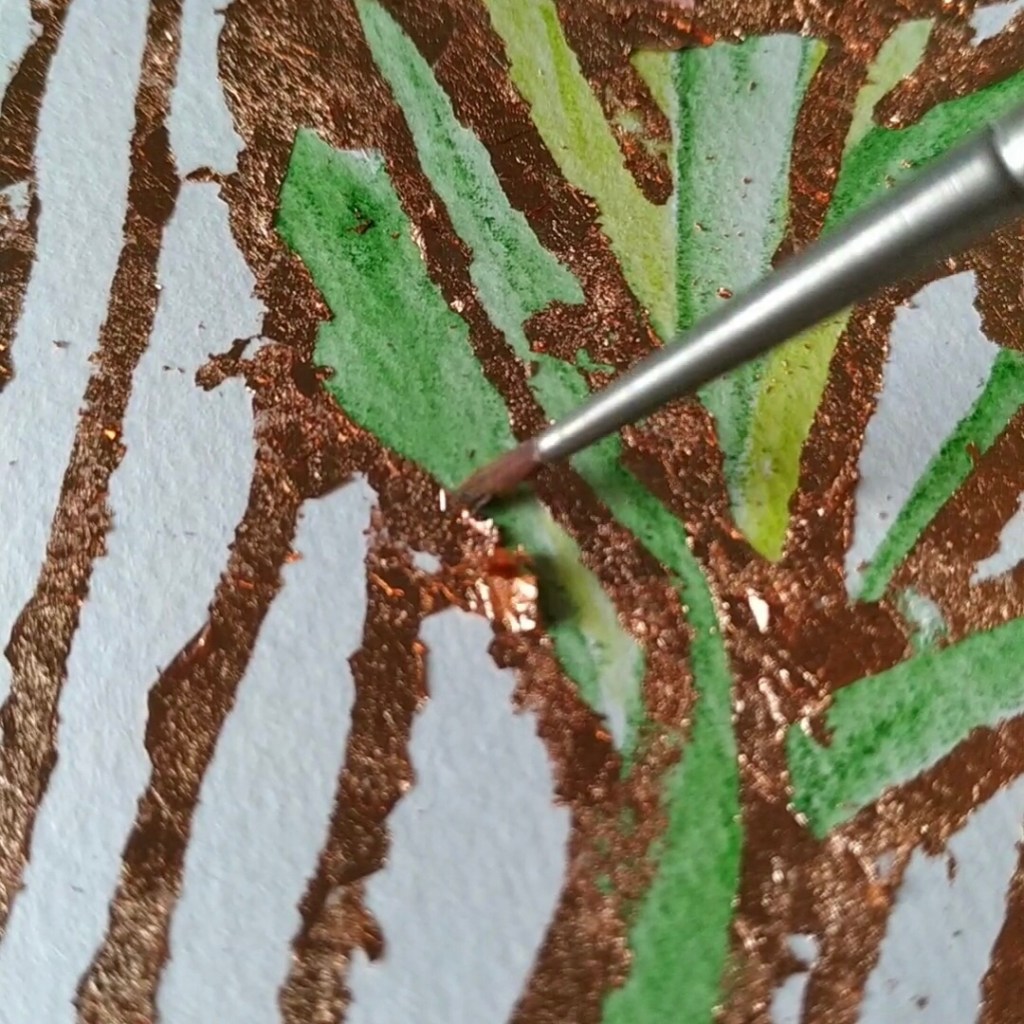
There are different ways to add the sparkle to your artwork. One of them is ‘Gilding’. It creates a nice embossed sparkling effect. It could be a simple outline or dots or stars or more in that shiny effect. Embossing with the gilding method is best suited for greeting cards as well as art and craft projects in school. In this post, I am going to share some tips to get this process right!
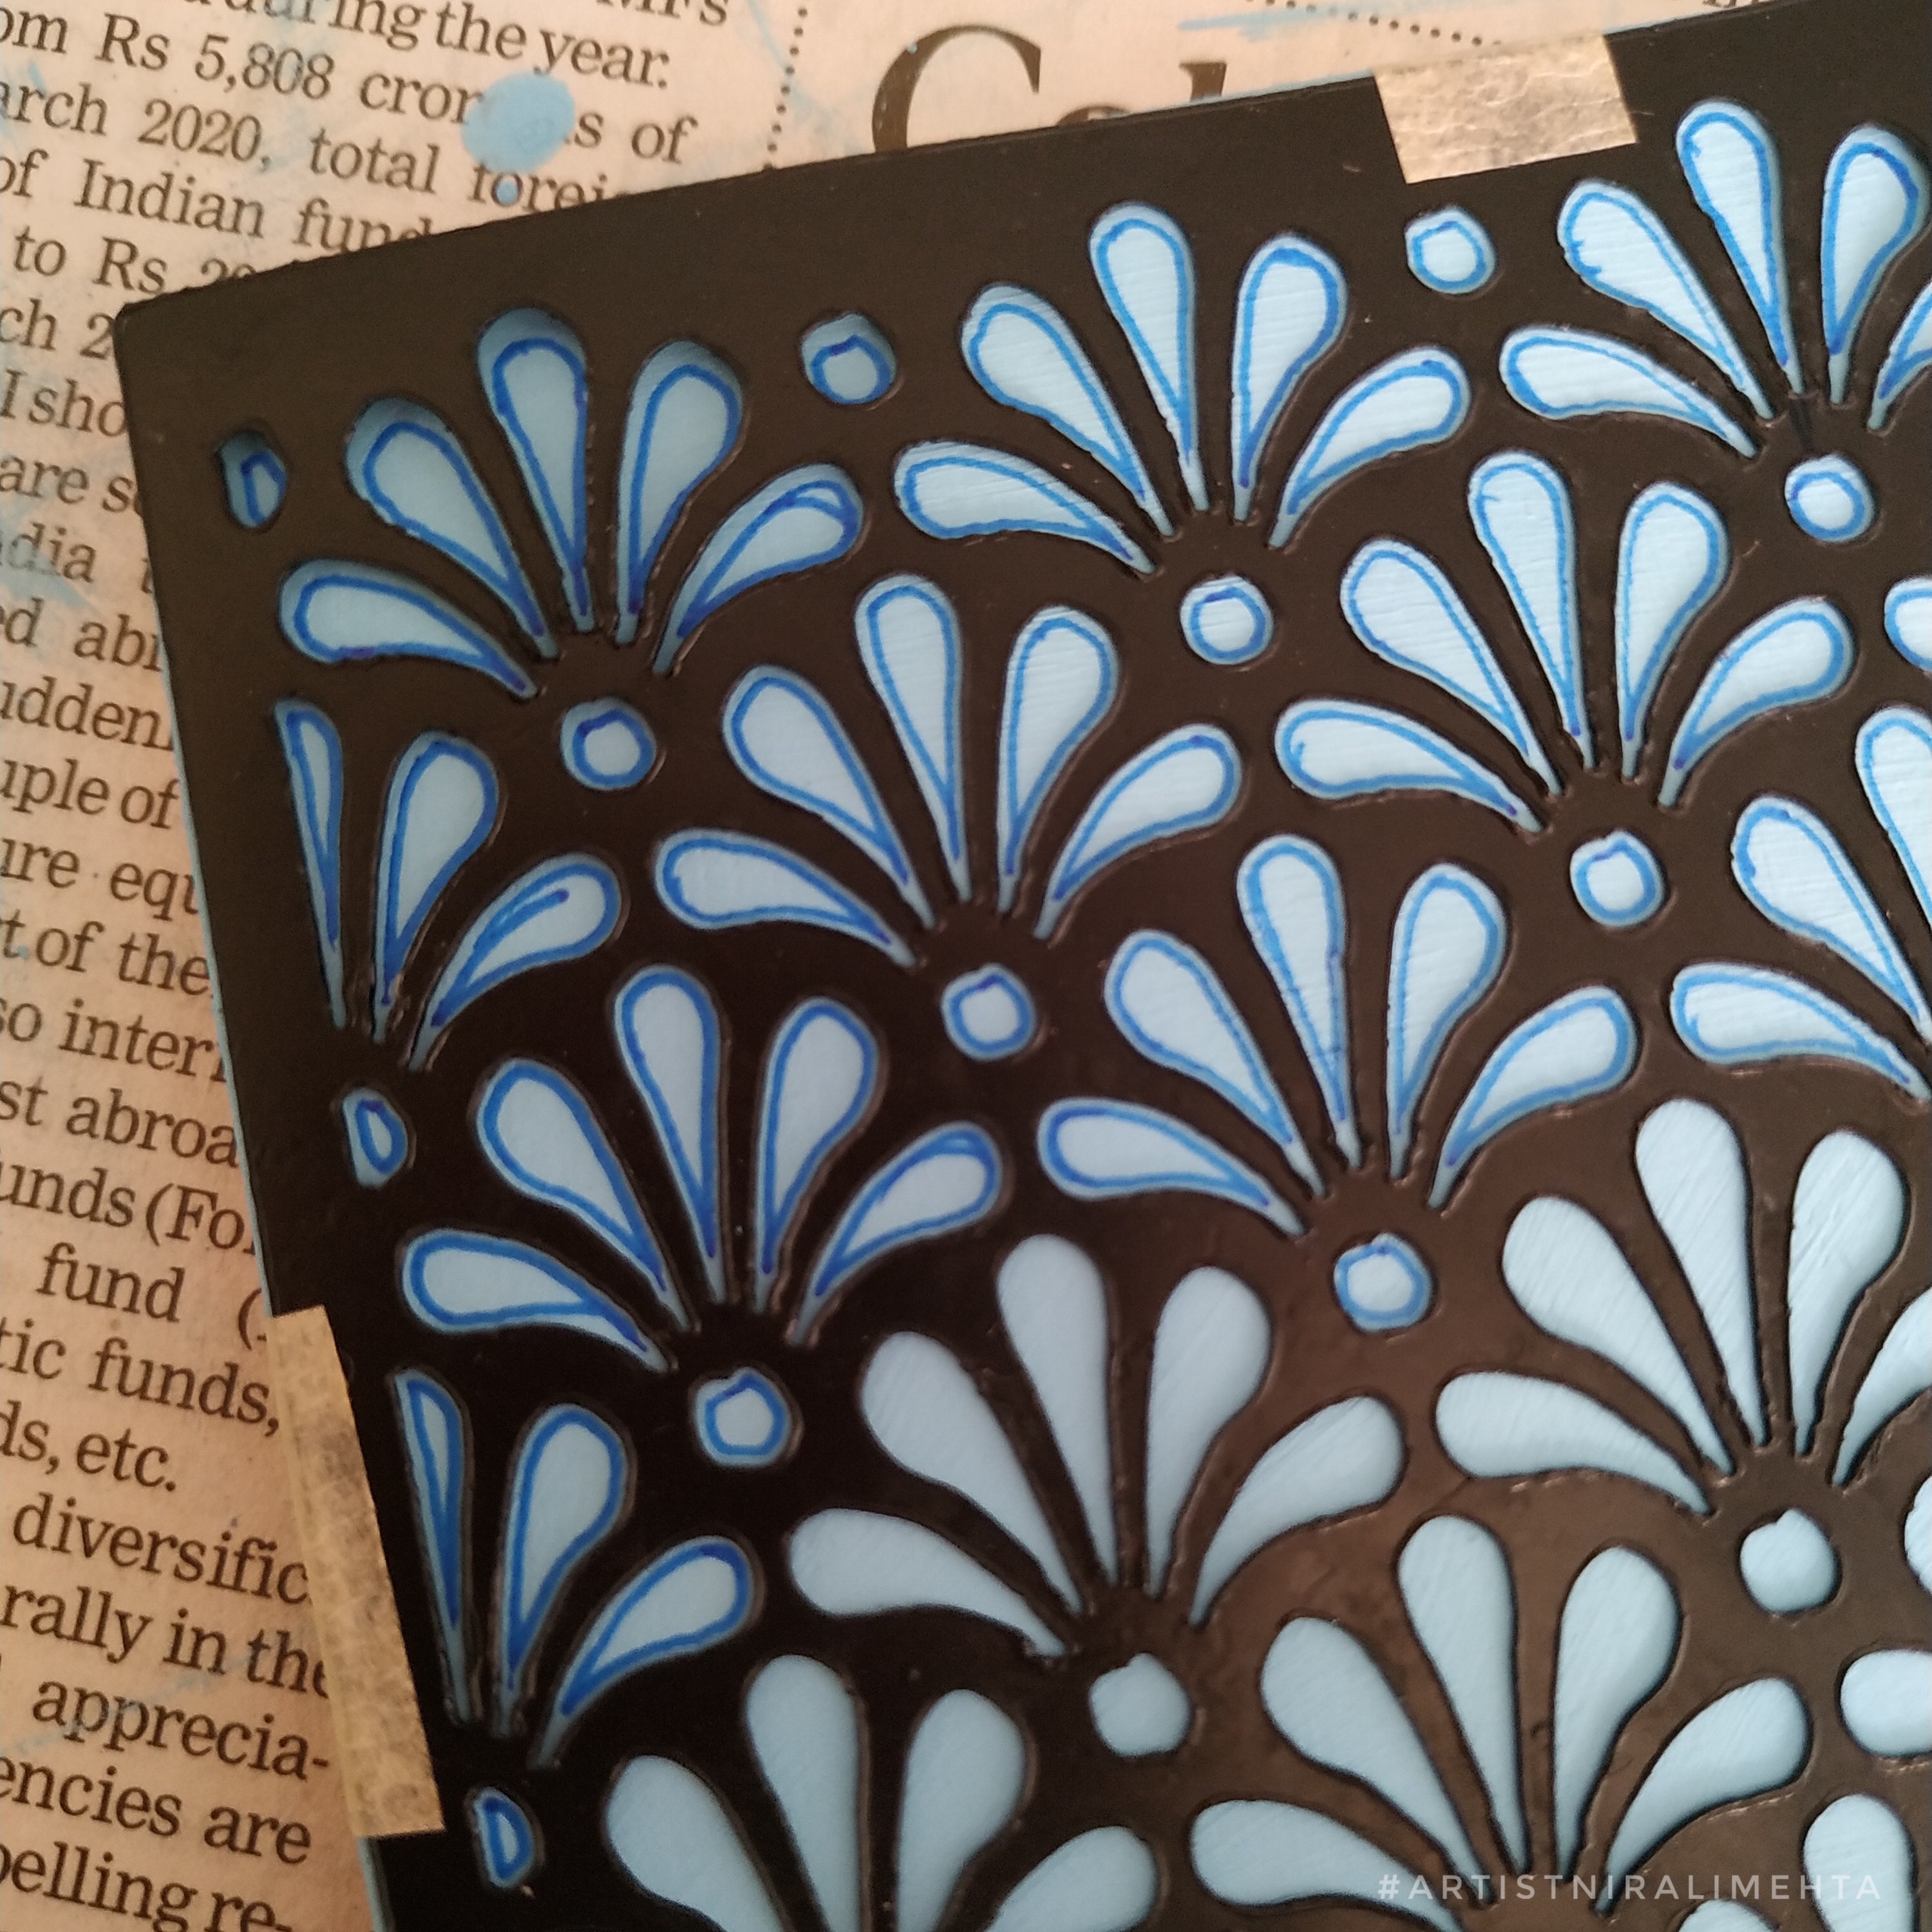
Materials used – Gilding Glue & Gilding Flakes
What is the material required? Gilding Glue and Foil Sheets are the main materials. Since I had Gilding Flakes at home, I used them. Gilding Foil Sheets are like cheese slices while Flakes are like crumbs or grated cheese. Hehe..I didn’t know how else to explain it without showing the product. The flakes give a crackled finish while a foil sheet gives a very smooth finish. Other than that we need a brush to apply the glue and dust off excess. Last but not least tissue paper or cloth. Gilding method is a highlight or add on to your existing artwork.
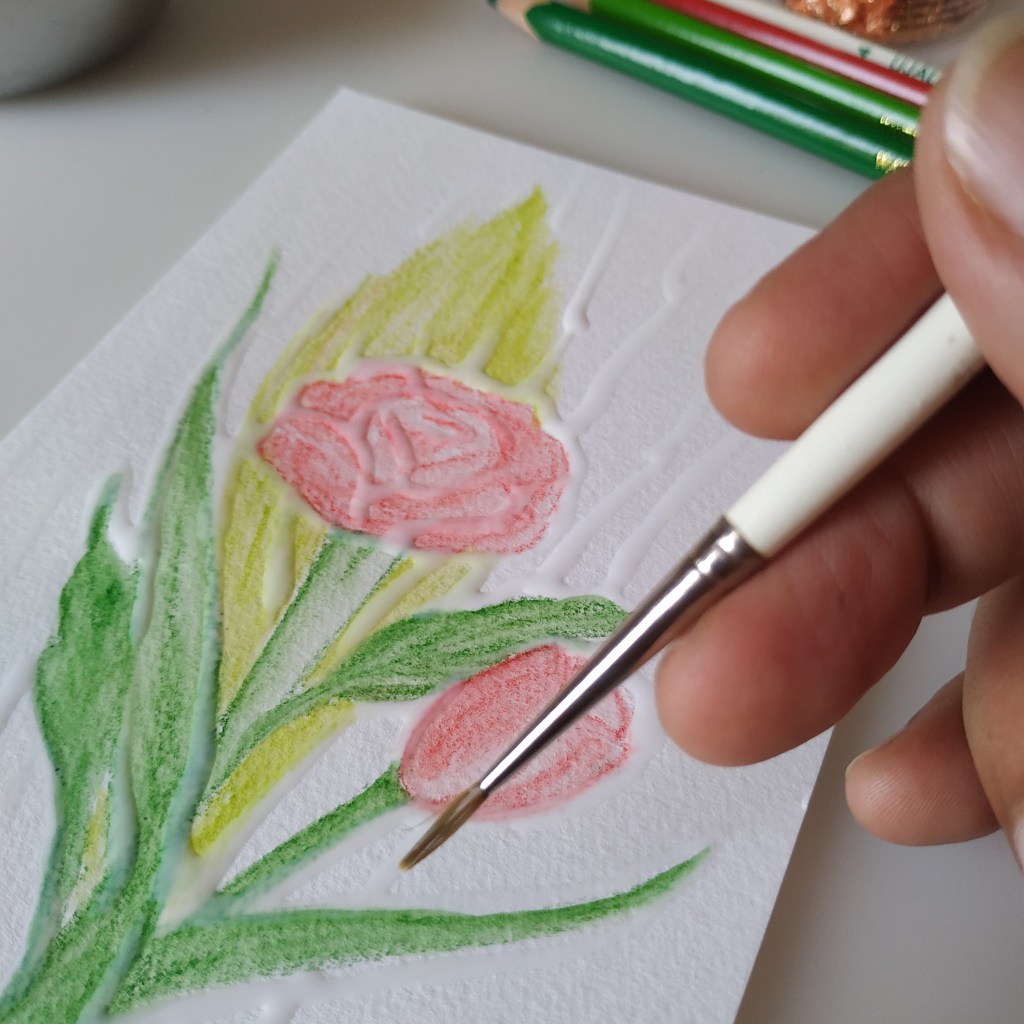
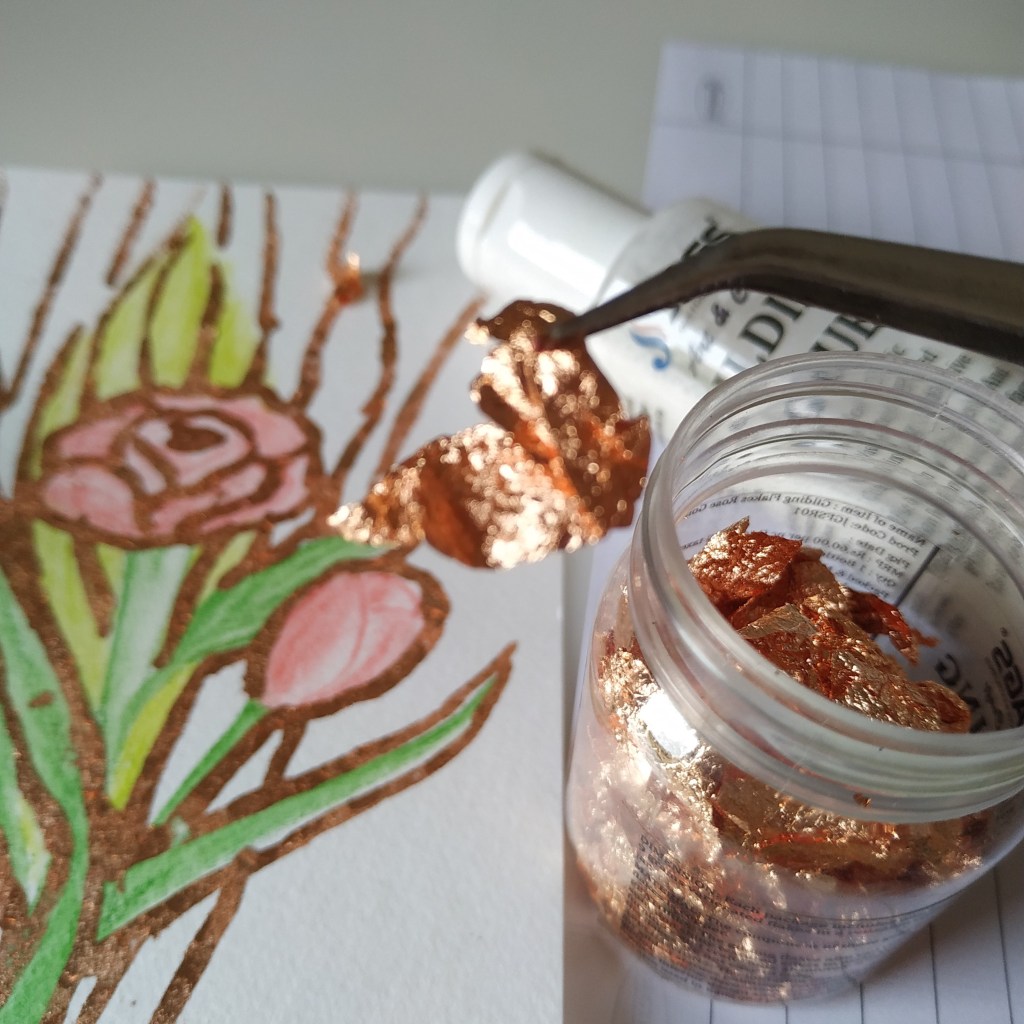
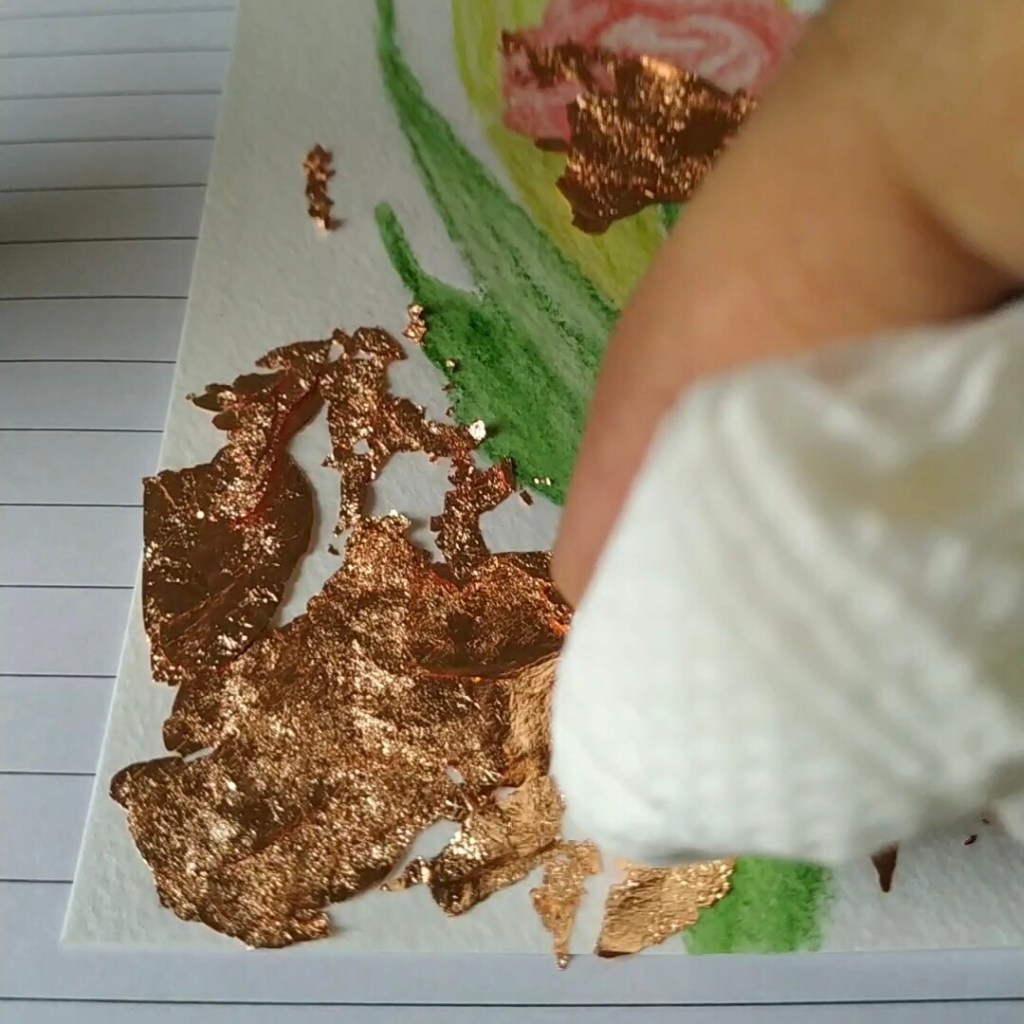
Next, let’s discuss the process. The process is simple. We apply the gilding glue using a brush. It becomes transparent as it dries. It is tacky or sticky for a few hours once it dries. Carefully transfer or lay the sheet on top of the artwork. The foil will automatically stick to this sticky base. Areas in excess where the glue was not applied but the foil fell can be dusted off later.
Basic Art with Colour PencilsThe White line is the GlueGlue and Gilding FlakesCloser look at Gilding FlakesDabbing the FoilDusting Off Excess
Gilding gives that metallic embossed look. Unlike ‘Embossing’ which requires a heat gun ‘Gilding’ is a natural drying technique. We use embossing glue and stick fine glitter powder in embossing method. Then we use a heat gun to fix the powder. The powder melts with the heat and sticks to the surface, giving the embossing effect. The look and finish may be similar for both methods. Best to choose the one you like. Depends on the purpose, material and your use.
Five tips for getting the gilding method right :-
Apply a sufficient amount of glue neatly like a thick outline. Points where the glue was less, will not get sticky enough to stick the foil. This will result in breaks in the line or flow.
The glue remains tacky for a good number of hours to work with. No need to hurry. Take your time.
Open the flakes like a sheet or use sheets for a neater look. Rolled or crumbled flakes give a lumpy finish.
Keep a paper or extra tissue below your artwork to collect the excess dusted off. It can be put back into the box for use next time.
Switch off the fan while working on it. The dust flies off very easily. Even if you breathe, the foil or flakes fly off. They are so light in weight.
Artwork using Gilding Glue and Flakes from JAGS store
I tried it on a small postcard first to understand how to use the material. You could do that too. For the background, I drew flowers using watercolour pencils. I am aware that we do get a home-use heat press that works on this principle and gives a more professional finish. The print is like glue, we then insert the foil with the paper in the heat press which sticks the foil to it. I had that machine earlier as a kid. The finishing that I could manage with the heat press was similar to the one that I managed here when I did the process by hand.
Hence if your use is sparing, you need not invest in the heat press or the heat gun. The gilding method will work wonders. For lettering or calligraphy artists, ‘Gilding’ could add that zing to your next artwork. Let me know your views if you have tried this technique. Have an arty week ahead!
I find it very exciting and interesting to make and give handmade greetings with personalised messages. I think I have to tell you, all the cards that I have received till date, I have kept them very neatly stored in my drawer. They are all special and a beautiful memory. In fact whenever I conduct workshops, it is that special thank you card that is worth a billion to me. Is it just me?
Now a days most of the people use digital ways to send messages. Very few people call to wish or invite. I know! The personal touch has changed to digital. That is why, if even one person puts in the effort to send a handmade card, it makes the receiver feel loved. The time, effort and the thought is what counts. Paying or downloading and sending is what anyone can do. Isn’t it?
Making a greeting card all by yourself may seem difficult for some. No one wants to be judged or mocked for their artistic skills. Besides not everyone can be a master at it. I understand. But what if I were to tell you that even with minimal artistic skills and creativity one can make beautiful professional looking greeting cards.
Holiday Season Coming Up! PC : WordPress Library
Yes! In this post, we will be discussing a few tools and techniques for making professional looking greeting cards with ease. There are so many of them, so I have clubbed them as per the method of making. The materials are expensive and a mistake in selection means it was a waste or is just lying around. It is a costly affair. This makes it more important to know about them. I am going to try and explain the tools and the methods together, so that we know what all we will be adding to our shopping lists.
1. Stamps and Inks – Stamps with a variety of designs are available. Every few months all shops stock new designs. I buy them based on the theme like – Birthdays or Christmas. We get everything from alphabets to numbers to florals to the popular movies and more. I buy stamps in off season or bulk for discounts. They stay well for years and is usually a box collection we can share among creative friends too.
Colouring
Coloured
Along with stamps we need a stamping block or a stamping pad. What is that used for? The stamps are silicon and not firm. They have a glue side which helps attach them to the block, dip it in ink and press it on paper for an even finish. A neat finish is very important when selecting quality. Once complete we clean the stamp with a cleaner or dry cloth and put it back in the pack. The same block can now be used along with another stamp. A stamping pad works to stamp multiple ones quickly and neatly. It is a great tool if you make multiple greeting cards.
Stamping Block
Next we select ink pads or pigments for the stamp. A good choice for selecting from the colour options is available. My pick – A black archival ink stamp pad is a must have. The ink is waterproof and instant drying. We can colour the stamped design with markers. We need not worry about any smudges. Other than that a few more standard colours can be selected according to the theme. We also get oxidised inks. They give a different finish and their colour shades are also different. The inks give a kind of the rustic finish rather than the bright regular shades.
Stamping Tools
For beginners, basic tools are great. Once you get a hang of it and use them more often, I am sure you will pick more. There are innumerable creative ways of using stamps. We can use them for journals and other tags too! Most stamp sellers share ideas for using stamps and their latest collection on social media. I am always amazed to see how much creativity one can have. Do check them for inspirations.
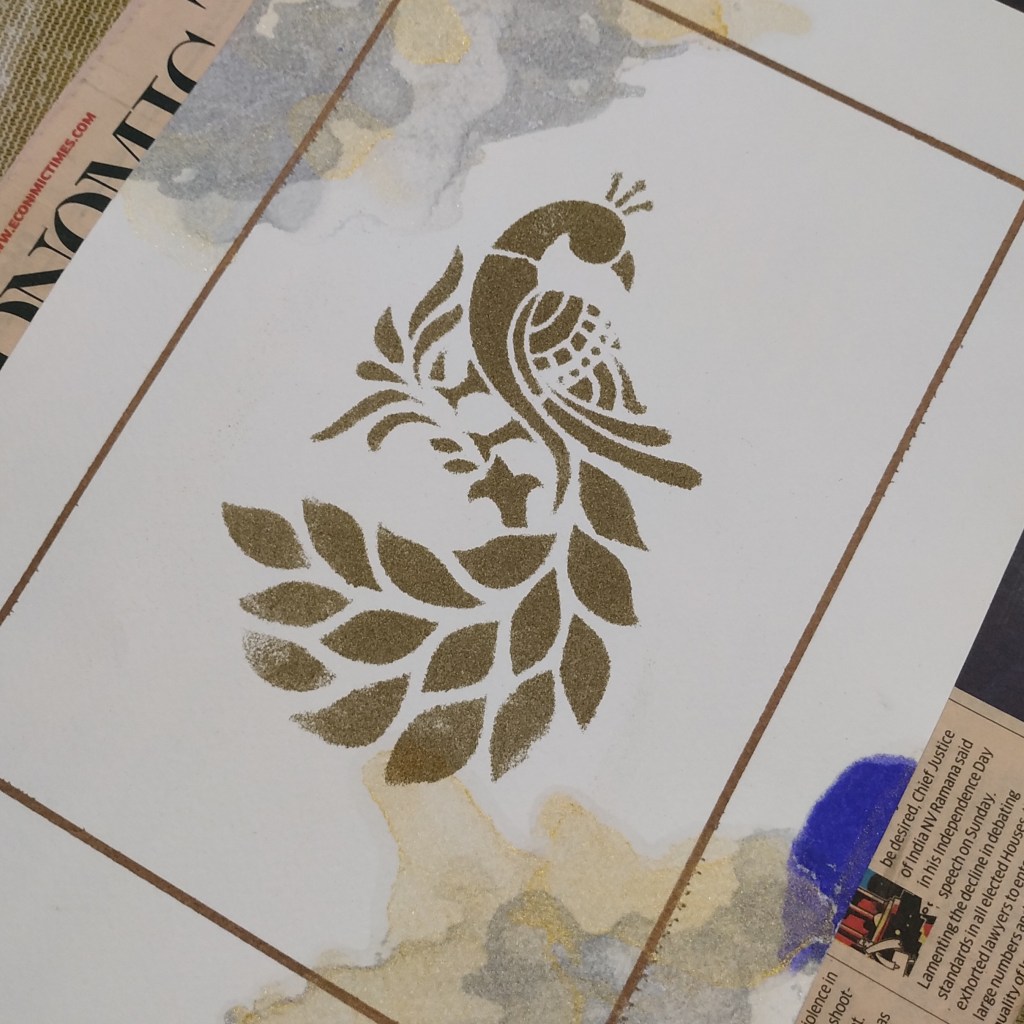
2. Embossing – The process of embossing is very simple. The material quality matters. Earlier embossing techniques and materials were not that great and they looked very messy, more like a beginner’ school project. We have now started getting good quality embossing glue and embossing powders. We apply glue using the stencil and then dust it with the embossing powder. The glue is either dabbed onto the surface or applied with a brush. The excess powder falls off once it dries. It is the same method of sticking glitter powders. The difference is in setting embossing powders. An embossing heat gun is used to set the powder. The powder melts due to the heat and binds to the paper.
Embossing
Materials
Different grain sizes and colours are available. They all give a different texture or finish. I select embossing powders in fine grains so that they melt and set evenly.
3. Stencils – As the name suggests these are cut outs of various designs on plastic or paper. They are either one use or multiple use stencils. We also get stencils with a sticky backside to stick them on the surface we are working on. This helps secure the stencil in place. We can do the same thing with tape. Stencils are helpful in tracing artwork and can be used for embossing and painting with most materials. It makes a great assistant for the creative folks.
Leaves Stencil
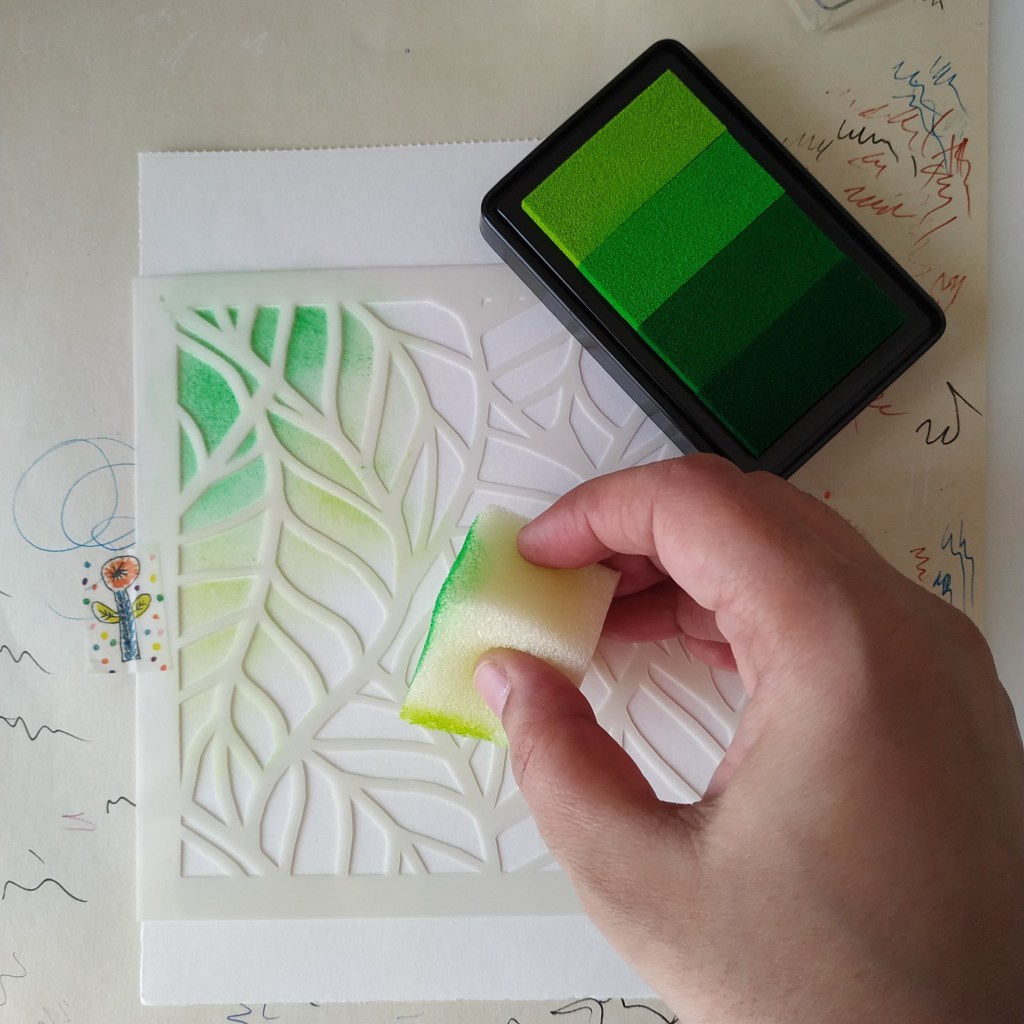
4. Pigments – The name means colour which is present in Inks and paints. We get a concentrated version in a box just like the stamp pad. Pigments are powdery and the composition is different from inks. I find them similar to compressed powder in makeup. They are very useful in applying background colour to the card paper.
Using Pigments
We need a sponge with or without holders to apply and blend it. They are available as single solid colours or as multiple shades in the same box for creating shading. They are very easy to use and create a nice perfect finish if applied correctly. I picked up boxes with basic shades that go on almost all designs. They can be used with stamps and stencils to create different effects. In fact I liked it so much that I bought the other colours too!
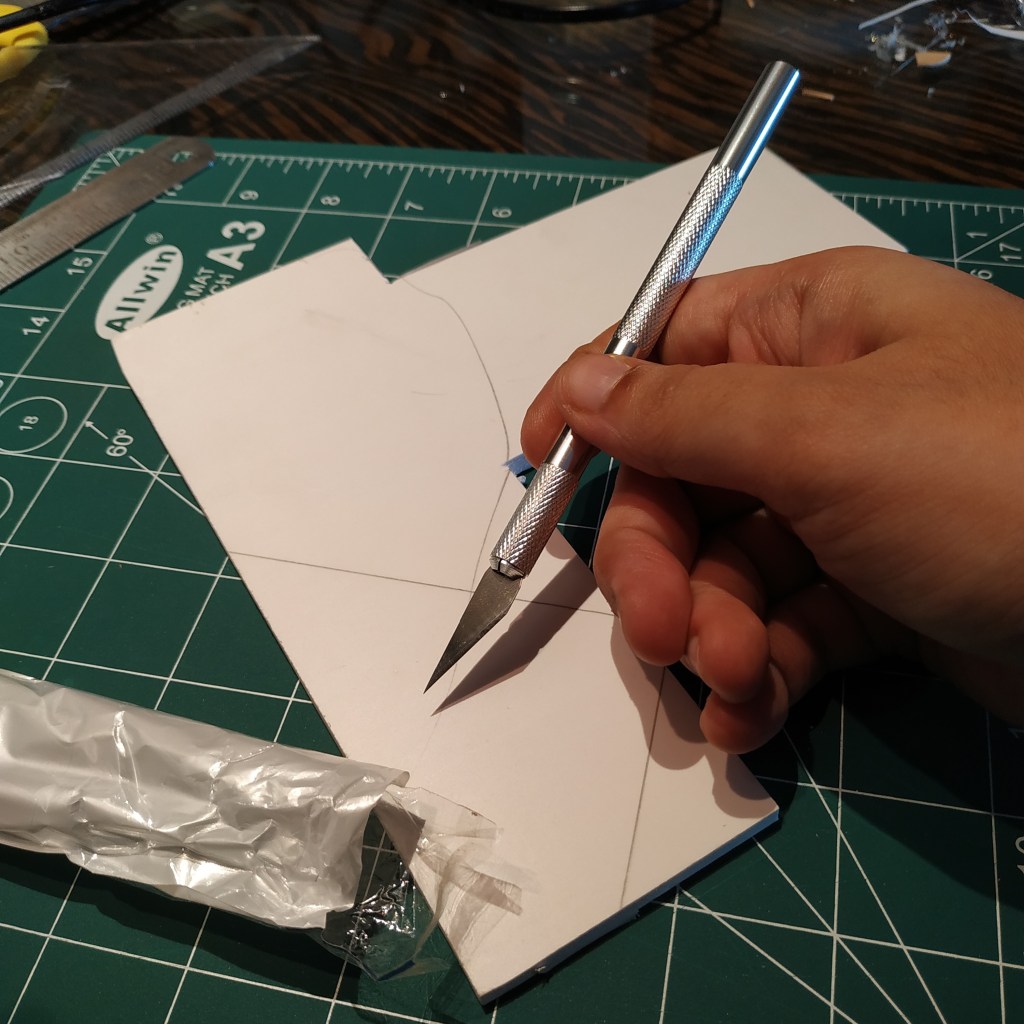
5. Punch – This is the cutting part. Specialised paper cutting knives are available. However if cutting is not exactly your main skill it is best to use a punch machine. Small individual punch machines with small designs like flowers, leaves and more are available. This punch is just like a regular punch machine, just that this one punches fancy shapes instead of the regular circles.
Shapes Cut using the Punch Machine will be equal – PC WordPress Library
Further we get a small dye cutting machine that has metal stencils to cut multiple shapes from paper at the same time. And last but not the least we also get a larger complex machine that cuts various shapes from paper based on computerised designs that we provide. The prices are also likewise.
Specialised Knife
Changeable Blades
The small punch machines are easy to carry and work well for many basic crafts. Professionals might want to invest in the other cutting tools. I prefer the specialised cutting knives because that is my skill. There are many cutting blades that come along with it that are for precision cutting.
A few other helpful tools and materials are – 1) double sided tape and 2) washi tape for graphics or protecting a surface or marking (my detailed post on using Washi Tape is there on the blog page) 3) folding, rolling and shaping tools to make paper crafts. An interesting idea is 3D cards and Shaker Cards. Teachers can ask their students to make shaker cards with all the stars they collected during the month.
I just saw the meme that reads ‘buying crafting materials is a different hobby’. Hehe! That is true. We all stock materials we may not use but we can always try to stock only what we use. Including my previous posts on paper crafts I have now covered all the methods of making creative handmade greeting cards. If you have made a creative paper craft, do share them. I would be very happy to see them. Have a crafty week ahead!
Yaaaaay!!! We have achieved a milestone! 50 posts! That is why I have listed links to all the 50 posts plus 3 review posts on the blog tab. Any post that you missed reading or wish to revisit you can by selecting it from the blog page. I hope you have subscribed to the blog by now, because if you haven’t done it yet, now is a good time!
A big thank you to all those who have been following and supporting the blog. I hope you are enjoying reading the posts. Any topics on Art and Craft that you want me to share about or if you wish to send us a feedback, please do so in the comments section below. I would be very happy to hear from you! Thank you! Have an Arty weekend!
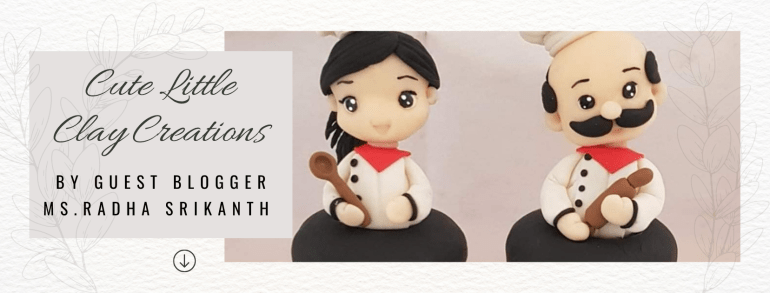
Taking imagination and fantasy from the world of magic and transforming it into something beautiful in this world; is what I do every day. Does that sound interesting? Hello everyone, I am Radha, a clay artist. Doing something creative by shaping earth with your hands can be an incredibly humble, joyful and healing experience. I enjoy working with clay. Minutes to hours and hours to days, I do not realise how time flies when I am working.
My journey as a clay artist started in 2012. I was highly impressed by a clay artist named Iris Mishly and her clay crafts. Indian clay crafts – terracotta jewellery has always been my personal favourite. Yes, I am a self-taught artist. I have not taken any formal training in clay modelling. But arts and crafts were always my hobbies since childhood. I like all kinds of painting: including oil painting, fabric painting and mandala painting. Anything challenging and creative, I do not mind trying.
Initially, I made jewellery for myself – mainly small earrings and pendants. Friends and family loved it as I made a few for them too. Then as I learnt more complex patterns and forms, I made more designer fashionable jewellery. Learning, designing and creating more and more new projects in clay continued for a few years. And by now, I had developed a steady hand and good speed in working with clay. What started as a hobby is now my full-time profession.
Radha making her clay creations
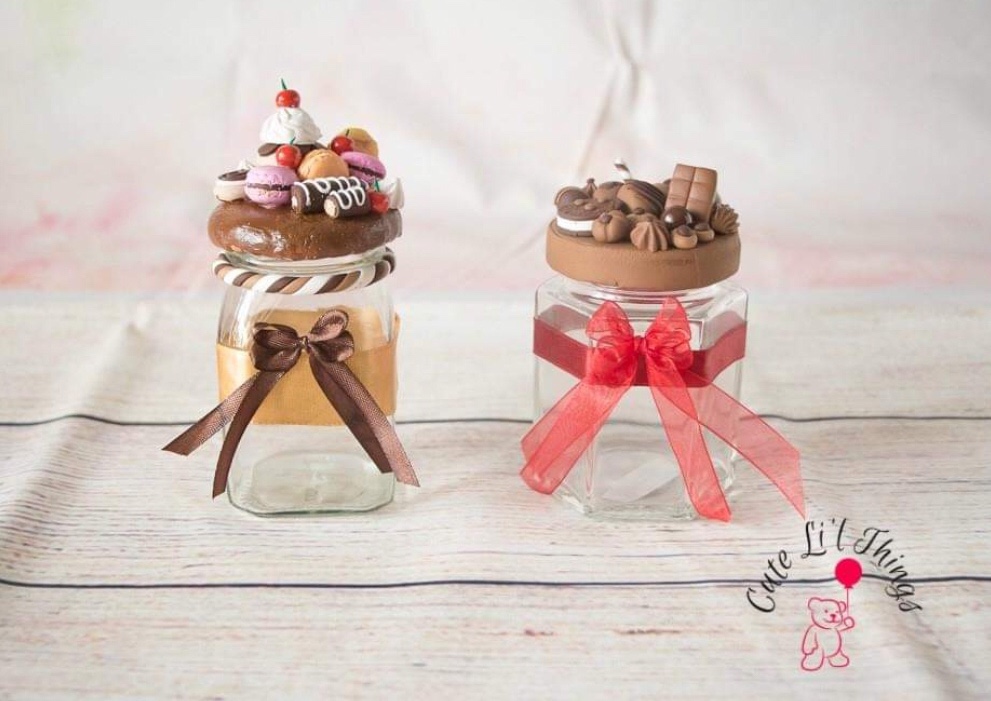
Later after a few years, making small figurines or dolls from clay interested me a lot. Then I started making dolls for the shop. The appreciation for them was overwhelming. Everyone liked the new dolls. They were a great success. It has been 10yrs since I set off on this journey. Now I have a store online where I design, make and sell clay dolls as cake toppers, fridge magnets, pencil toppers, keychains, jewellery and more. You might want to take a look at my work. They make great gifts too!
Creations by Radha
‘Clay’ has many forms; air dry clay, polymer clay, wet clay, and porcelain clay. And among them, a personal favourite to work with is Polymer Clay. It is more versatile and flexible to work with comparatively. Earlier I used this clay for most of my works. However, later as I started making figurines, polymer clay did not give me the option to produce it in large quantities. Hence I chose to create using air-dry clay. To make a clay model, we would need clay – Polymer or Air-dry (whichever one would like to use), moulds, acrylic paints and brushes. Clay modelling tools if and where required. Glue and embellishments if you wish to decorate them further.
Materials that are available locally and with ease make it an attractive hobby to take up. Other than that, it involves a lot of finesse and patience. It does not require much space either. I design the model on paper, select the clay and material and then begin to create it. Even I got stuck while converting the design on paper to the model. I needed to make modifications or rework some of it. Finally, the Clay project is ready to be shipped after a week of hard work. Shipping an article that is this fragile and hoping it reaches the customer perfectly the way it is, used to give me nightmares. With time I learned to wrap it up with enough cushioning, to ensure the clay model reaches the buyer safe and sound.
I like to personalise and customise my orders. ‘Cake Toppers’ are my best sellers. There was one order that I distinctly remember. It was quite a challenge to design a doll sitting on a swing, while the swing was hanging from a tree. It was sweet, cute and delicate. I was on the edge of my seat waiting to know the customer’s reaction when she receives it. The wait finally ended when she replied “I have received it. It is in great condition and I simply love it. It is exactly what I was looking for!” I was so relieved. It made my day.
There are a lot of things that one can make using clay. Food miniatures are a trend picking up very fast. Realistic-looking miniature pieces of foods to create displays or for the dollhouses are called food miniatures. Wedding Memories of a couple, decorations for gift hampers as well bottle caps are all popular clay figurine models. If you are thinking of taking up clay crafts as a hobby, I suggest you stop thinking and take it up. It is something I feel all creative artists will like and can give a try.
Make a simple clay model with me
Make a simple clay model with me :-
I use air dry clay for my project. Most of them are available in different colors or you can mix them accordingly to your project design.
For the face I use skin color, hair black color and for the dress use colors as per your choice.
If you have a mould simply press the clay into the mould as required. Clean up the extra. It helps to make multiple pieces.
Once the desired design is complete, unmould the design and smoothen the edges. For the hair I use black clay depending upon the hairdo, I use resin eyes or acrylic paints for the eyes and eyebrows.
Now let the clay air dry for the next 24 hours or until it’s solid.
And it’s ready! Your first easy clay project. Have an Arty Weekend!
Ms. Radha Srikanth is a clay artist and the owner at ‘Cute Li’l Things’. A mother of two, Radha manages to keep a balance between work and home.
Nature has it’s way of healing. Clay has been used for making arts and crafts since times immemorial. An easily available, natural material, used to make numerous household and decorative items ; mud and clay also have cooling properties. Playing in mud or working with clay can have therapeutic effects too.
Dr. Bhau Daji Lad Museum, Mumbai has a section dedicated to the evolution in this art. They take us through different types of clay that were used and the evolution in designs of the objects made from clay. Yes! Even though it is called ‘pottery’ world over, many artisans have unique methods in : mixing the clay, making the art and designs and drying the objects.
I got to work on the potter’s wheel thrice. We made pots of different designs each time. I don’t think I can do it all by myself though. Pottery is a very skilled art. We definitely need help from the artisan for the start and the finish. At summer camps they call a local artist and arrange for the potters wheel as an added attraction. One thing that I clearly noticed is, that all the potters had a different mix of clay. They used the local soil or mud and mixed it with other ingredients such as minerals to prepare their clay.
Once the pot was dry, I would decorate and paint it. ‘Pot Decorating and Painting’ as they call it, is an art anyone would enjoy. Those who work in the kitchen might find it similar to working with a dough. We also make toys or models from clay. India is a country of festivals where we make idols of gods and goddesses from clay. Clay sculpting is a very well known and age old art form here. The ‘Diyas’ we make during the festival ‘Diwali’ are an example of painting clay pots and lamps.
Then there is another art, where we use mud or clay to decorate the walls. It is called ‘Lippan Art’. ‘Lippan Art’ is a traditional art in India where mud mouldings are used to make decorative designs on walls or panels. Thereafter the entire panel or wall is painted in white. Once dry they embellish it with mirrors. It is definitely worth a try if you get a chance. Essentially in white, we also get them in coloured designs. Workshops in Lippan Art are held during the summer holidays.
These crafts are best done in their studio settings or at the artisans place. In India as tourists when we visit the countryside or village, we may get a chance to try them. Whenever I visit the interiors I make it a point to learn, try a local art or interact with the local artisans. It is very insightful and is my idea of a fun and interesting holiday. These clay arts are difficult to do in a home setup. At home, we can make other items that have a simpler process.
For arts and crafts at home, we use Clay that is available at art and craft stores. Basically for hobby crafts and crafts at home there are two types of clay : one is the air drying and the other one that needs to be baked. We can use them to make many artistic objects from the comforts of our home. I have made wall murals, decorated wooden and glass panels, mirrors, jewellery and toy models with both types of clay. Yes! I know friends who have made saleable products from these. They are now successful small businesses.
‘Lamasa’ is a clay craft where the clay is coloured using natural ingredients from the kitchen. The clay is a type of a dough made from corn flour. The process includes mixing and heating the clay dough. Varnish is applied to the dried clay models for lustre. Statues and sculptures made using this technique are expensive and famous world over. Have you heard of it?
Plaster of Paris (POP) is also a kind of clay used for craft projects. POP Sheets are used to make decorative ceilings. We also mix ceramic powder with glue to form a paste. Fill it in cones (like mehendi) and make designs. I have used this method in making traditional Indian folk style wall murals.
Unfortunately I made these artworks more than a decade ago and I don’t have pictures to share. If in future I make these again, I will be happy to share them. There are loads of images, designs and videos on all these crafts online, if they interest you.
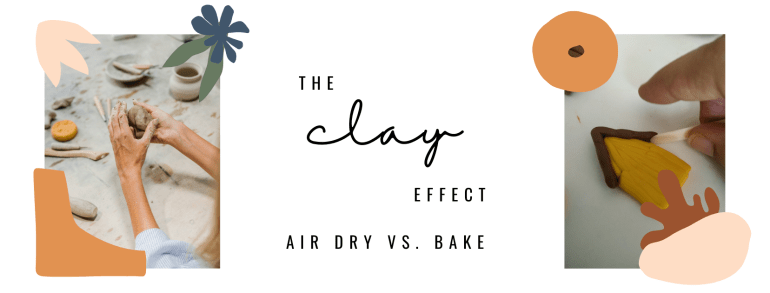
There isn’t a recommended type of clay here. It is to understand one’s crafting process and decide which clay will be suitable. There are some differences in properties and methods on processing both types of clay. We need to understand these differences to choose the clay best suited for our project.
Air Drying Clay – As the name suggests, this clay hardens naturally if left open in air. It is available as two separate materials to be mixed well for a chemical reaction. The clay made from mixing hardens over time in natural air. In the meantime we have to shape it. The time we get is barely a few hours. This clay is a bit messy and sticky to use. So, we dust it with talcum powder while working. This clay is either black or white. We can paint it with acrylic paints after it dries completely.
Bake Clay – This clay is available in a variety of colours. It is oil based and needs heat treatment to produce a chemical reaction for bonding. The clay hardens only if it is baked in the oven for the correct time at the right temperature. It is quite advantageous for an artisan to work with it, if the design or product is time consuming.
For my artworks I have used the white clay of the brand ‘M-Seal’. White so that it is a good base to paint any colour shade. Moulding Clay by ‘Fevicryl’ is also good. For the bake clay, I used the pack from the art store by the brand ‘JAGS’. There are other brands and types, but I am happy using these. If you wish to try, you may use the same ones for your crafts.
Here is a short intro to clay crafts. Have you tried any of these? Do share your experiences in the comments below. Have an arty week ahead!
The title says it all ; this is a all you want to know kind of post and it is all about ‘The Washi Tape’. Ok! What is so special about it? Fine! It is just another tape, so use it as one. True! I think it is a door to creativity. Especially for storytellers who cannot draw well but have so much to say and share.
What is Washi Tape?
The name literally translates to Japanese Paper Tape. In India we have been using paper tapes for painting jobs. It is usually to protect an edge from unwanted paint. It is often referred to as masking tape. However Washi Tape is way better in terms of quality. It was originally used for Arts and Crafts. I think it is a must have for everyone, for students and professionals both alike. If your children are in school and have to do a lot of projects or journals, you will definitely agree. I just love them.
Photo Courtesy- Downloaded from Unsplash – Photo by Sticker Mule
What is so special about it?
The paper is different. It is strong and stiff like a tape but light and semi transparent like paper. Layering is possible. Next, the glue is very good to stick it smoothly on a surface. At the same when we remove it, it will not leave any stickies or damage the surface. Comes off very easily. The glue can be easily cleaned with soap and water, if any. Last but not the least we get them in a HUGE, yes HUGE variety of colours, sizes and designs. We can cut and use them as stickers too!
This is a portion of my collection – An idea on how to use it
Where will I get them? What is the price point?
It is a Japanese Tape so obviously it is available at stores that sell art craft materials and stationery from Japan. I bought mine during my visit to Japan. I have original Japanese Washi Tapes from The Japanese Paper Museum. In India, we now get them online as well as at all Art and Craft stores. We do get products that may not be the original one from Japan but are referred to as Washi Tape only because they are decorative tapes made from paper or titled so for search engines.
Washi Tapes are available in different sizes (broad) and usually bought in combos. Depending on themes, designs, colour matching and so on. It all depends on how you wish to use them. The prices are also offered like wise. The more you buy, the higher discount. For example INR. 30/- for one or 6 for INR.120/- It is an example, actual price may vary but is approximately in the same range.
How to use them?
As a regular tape in your diary to stick or attach something
As a decorative tape for borders, arts crafts, projects. journals, diary, your writing book, greeting cards, memory journals and more.
As a protective edging tape while painting surfaces. We tape the surface we don’t want the colour on. So when we remove the tape the extra colour or resin is removed and that surface is clean.
To create effects in some abstract geometric art
Labelling products
Marking a straight line while painting or drawing
Colour CombinationLabellingprotecting edgesGlitter onesJournalingPhoto Courtesy – Downloaded from Un splash and Word Press Library only for idea purposes – Rights with respective owners
Special Tip – A new Tape may have strong glue that may erode the paper surface a teeny bit. To avoid that simply paste the tape on the paper and lift immediately once or twice. Then stick it. Now when we remove it, the paper will not erode.
A photo to explain the special tip
Paper Tape can be used on any surface for edging or protecting the edge or surface. I used it to protect my coasters while coating resin. It works well with liquid paints as well as spray paints. It is an essential for re- furnishing and re- painting jobs. The plain colours are cheaper than the fancy ones.
Yes! I think they are totally worth the investment. There are ample ideas on creatively using them shared on Social Media. Take a look to get started. I have covered all the important information for a crafter or artist in short. If you wish to know more, you can always search online. Do check my Pinterest Board – Washi Tape Ideas to get started. I have pinned 50 different projects or ways one can use Washi Tape.
Valentines Day tomorrow! You can buy Washi Tapes and make your last minute preparations like a pro. Have an Arty Week!
Click! Click! Hehe! We don’t get to hear this clicking sound anymore. The cameras are silent but we still click as many pictures or probably more. Now that our phones have a very strong camera lens, we like to capture every memory.
It is a memory, it is special. Then why let it remain in the phone. Let’s print it and put it in a nice photo frame. That is my topic for today’s post – a very simple easy DIY Photo Frame. It also makes a great handmade gift to share with your loved ones.
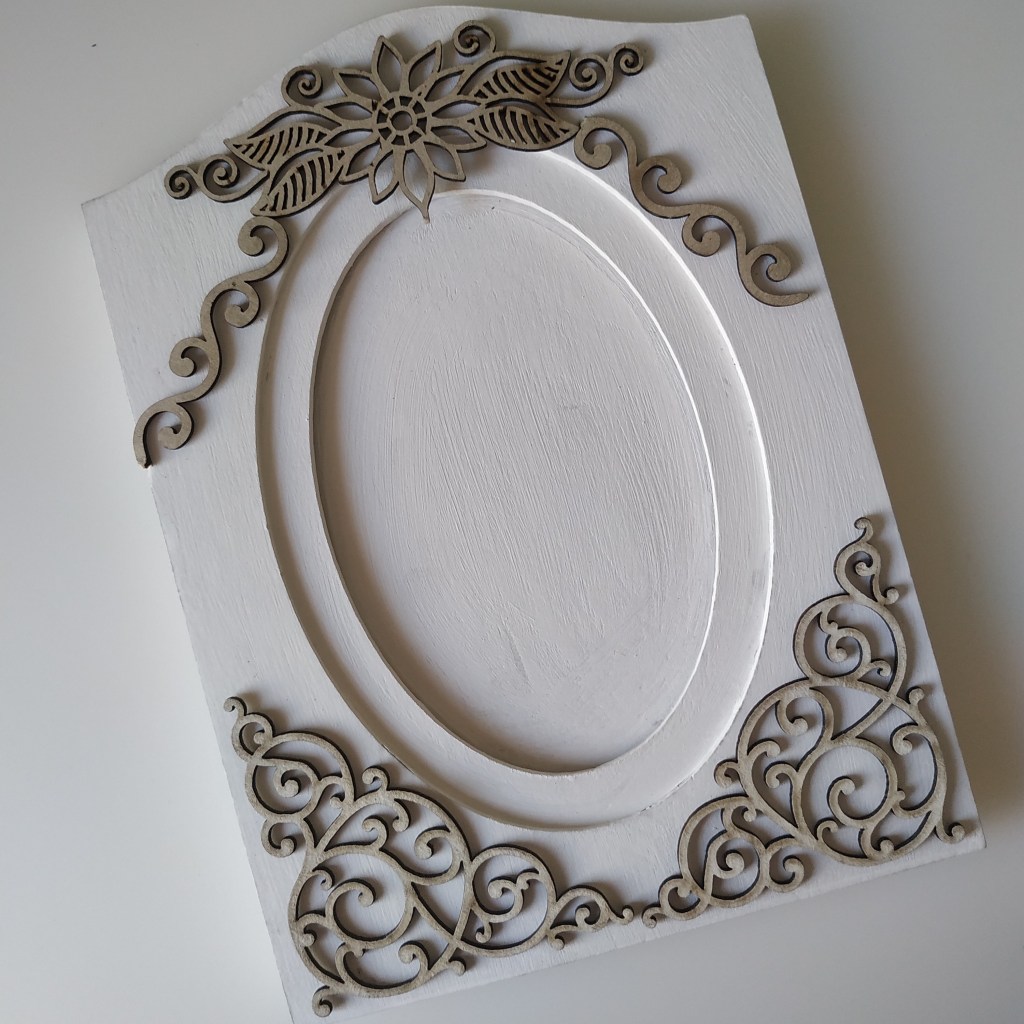
The Photo Frame that I made
Earlier if I had to make something like this I would have to buy mount board or ply and then cut and make the frame myself. Also cut such vintage design decorative pieces. I agree, it wasn’t everyone’s cup of tea to get a good finishing at these. Tedious too!
Now we easily get ready made stuff like plates in different shapes, pen stands, photo frames, coasters, alphabets and much more. The art and craft stores stock these. Further we get a large variety in primed chip board pieces. These designs are laser cut from plywood or board. They are primed ; meaning painted with a base paint. Won’t require gesso or primer to paint. We can directly use acrylic paints.
The material is plywood or fibreboard for all of them and hence for any craft or painting it is the same family. I did do a project earlier with the same materials – A Nameplate and Coasters. In case you wish to read those posts, the links are at the bottom. Yes! The material is mainly used for Mixed Media projects. Some stores are offering DIY kits with these.
I think one can always get more creative and use them differently, isn’t it! A big smile 😀 How is this project different? The method of painting is different. This method is super easy. Anyone just anyone can make it and it will still be a masterpiece.
Materials Required :
Ready Plywood Base – Photo Frame – any design of your choice
Decorative Primed Chipboard pieces – any design of your choice
Acrylic Paints and Brushes
Embellishments
Varnish for Acrylic – Spray or Liquid – either will do
Your enthusiasm to create something new
Minimum materials and most of it will be from your paintbox. No need to buy them. Make use of whatever you already have at home. Let’s get started! Put enough newspapers or plastic to protect your table or floor, wherever you are working. We do spill paint while doing this.
Ready Base and Chipboard Pieces
Special Tip : Cut out a rectangle from the plastic envelope of the frame or chipboard pieces. The size of the photo to be inserted. Insert it in the photo slot to avoid it getting blocked due to paint. This way we give a protective base and avoid colouring that portion.
Further we can use stencils to create textures on the base. We can use Tape to create designs as well. Pack the edges with Masking Tape or Washi Tape to avoid colouring the wrong side. We can even paint the edges in a different colour. Remove it once done. I will do a post on using tape soon.
Trying and deciding their placements
Arrange these pieces and roughly decide their placements. Next select the colours. Individually paint all the pieces in any single colour. Here, I have painted the chipboard pieces in Gold. Chipboard pieces are by the brand ‘Little Birdie’. We can shade them but they are already 3D and hence I feel a single colour looks better.
Work in progress
The frame base is painted in Titanium White. One edge I have painted in Pink – Medium Magenta. After that I have dusted the frame with the same Gold used for the pieces. Gold on White is blended to look like gold is dusted on it. Finish the edges and back side likewise. Acrylic colours are painted in layers and blend even after the base colour dries. Use a wet brush only if needed. We use water only to clean the brush.
Thereafter I added the Gold Border using acrylic pens or paint pens. I use ‘Posca’ and ‘sharpie’ brands. They work well. This one is a bronze by sharpie. Once the pieces dry we can assemble or stick them together. They dry very well in about half an hour maximum. Next, we assemble or stick them together with glue. I use ‘Fevicol’ – India’s most popular glue.
It’s painted! Time to add embellishments
Next we add the embellishments. Any finishing touches if you require. Let this dry completely. Varnish it the next day and it is ready for use.
Photo Frame at my table
I like the colours in this one. Reminds me of my doll houses and princess fairy tales. I have mentioned the shades if you wish to use the exact same shades. Acrylic Paints are Artist Colours by the brand ‘Camel – Kokuyo Camlin’. I use spray varnish also by the same brand.
As you see, ones painting skills will not make much of a difference. It will still look as elegant and beautiful. Don’t forget to add your photo! Hope you enjoyed this post. Have an Arty Weekend!
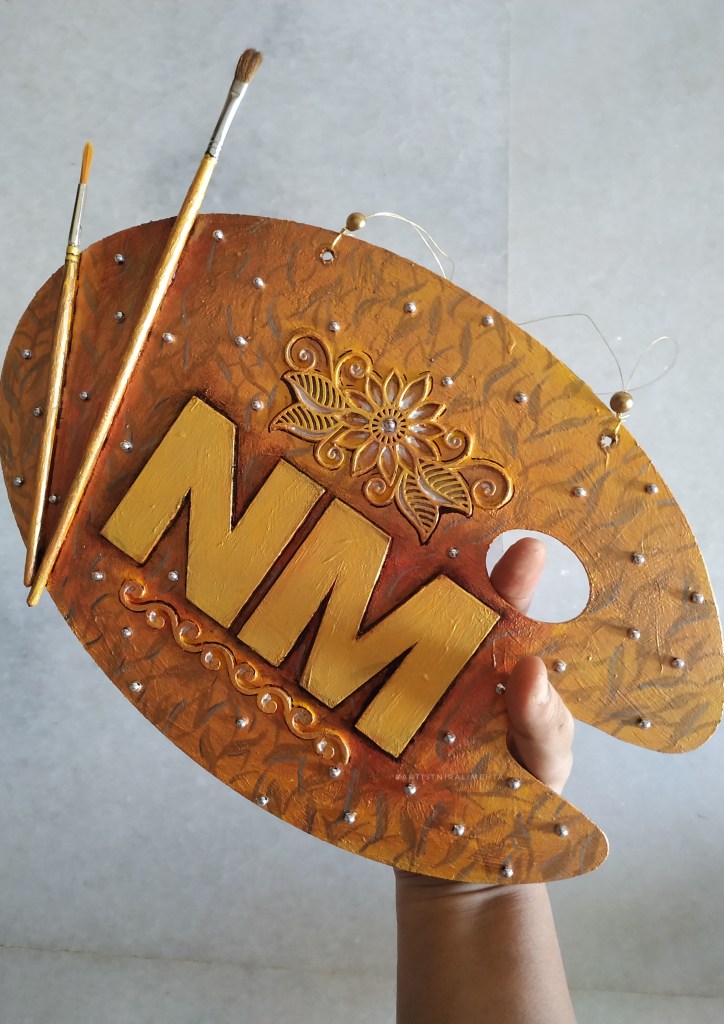
The first thing we usually ask or get to know about someone is their name. That is how we relate to them. We all like it when someone calls us by our name, isn’t it? That is what my next project is all about – a name. In this post, I am sharing about making a nameplate. It could be a simple door sign for your room or studio, an open or close sign for your store or a board sign for your home.
I wanted one for my creative corner. My initials are ‘NM’ and my shop name is ‘NMartworks’. Although I do various Arts and Crafts but mainly I’m into Drawing and Painting. That is why I selected a ‘Palette and Brush’ theme for myself. I wish to to make this project using the art materials that I already have and buy as little as possible. A common problem for such projects is about assessing the quantity of various materials required.
The first step to any project is to visualise. I visit art and craft shops to look for what is available. After that I design the project. Next I list the requirements and make a rough estimate considering the variance. I check my stock, meaning I check the material that I have at home and then I source the remaining. Most of the time this works out just great and other times I have to re-work it to cross the hurdles.
If there is a special price or discount on the material it is a bonus. Once in a while, that stuff you really wanted can get picked up before you get your hands on it. Certain materials are available only in large packs or you run out of it at the last minute. Also sometimes the same design is unavailable later. These hurdles are a part and parcel of the making process. Unless you are into selling and regularly stock material, these little hiccups are for everyone. Doing my homework makes me feel in control of the situation for my peace of mind.
List of Materials
MDF Board – Palette Shape
Primed Chipboard pieces – Vintage design and Floral
Old Brushes
Glue – Fevicol
Gesso
Acrylic Paints
Embellishments
Gold and Bronze Sharpie Pens
String
Acrylic Varnish
The material I have used
The quantity for all the material for this project can be the smallest size bottle or tube available in the market. It is a small one. We can use all the material for other projects too. To know more about selecting art materials check my previous posts. I have covered the topic in detail.
Let’s get started
I have made the Nameplate on the lines of a Mixed Media Project. What is Mixed Media? As the name suggests it is mixing different media or materials. Wood, Metal, Fabric and Paper are commonly used for Mixed Media Projects. We use objects made from different materials, arrange the objects and make one new object. I placed the MDF Palette, the chip board pieces and brushes together.
The objects I have used are of the same material family – wood. The best way to glue wood is using India’s most popular glue – Fevicol. If you don’t believe me? Check their advertisements. Yes! Even if we were to use fabric, metal or paper in our project we would have used Fevicol. The surfaces of the objects that I have used for the nameplate have different colours and textures. Some are polished, some unpolished.
Assembling the small objects to make one big object
Colour always sticks well on a clean rough surface. Sanding them is one option but not ideal. The other is ‘Gesso’ pronounced with a ‘J’ and not as a ‘G’. Gesso is a kind of primer. It primes the base and makes it ready for painting. Gesso is a mixture of POP (Plaster of Paris) or Chalk/ Gypsum and Glue or a binder. I have used a textured one. It is thicker than paint and is used to create textures. We get a variety of them. The cracked effect is one of them. It develops cracks as it dries. We have two colour options – Black and White.
Painting the Gesso
What is a primer? As the name suggests it is the first or prime paint applied. Think of it as the base coat. It prepares the surface for painting. A primed and painted surface will look very smooth and finished. It also lasts longer than a non primed one. Gesso is quick drying. It is always applied as a single coat. We can paint on top of the first coat only if any spot was left out. If we paint another coat it destroys the texture of the previous coat. Let’s paint it now.
Primed the Base with Gesso. Looks like one object now.
I wanted a red gold finish. I painted it using Gold, Crimson, Black and Copper colours. I added little highlights in White colour. Last but not least I used Sharpie Pens to paint the leafy texture in the background and added silver embellishments. Thereafter I tied matching Gold string to hang it. In case you bought an MDF Palette that does have the holes, make these in the very beginning itself.
Painting the Nameplate
Alternatively we can paint the pieces individually and then arrange them. Even that works. The chipboard is already primed and can be painted directly. Chalk Paints work very well on MDF pieces. About two coats is good and no need to prime it. I wanted the whole plate to look like it’s made from one single block. Hence I painted it as a single piece in the same colours.
All of this is fast drying. However it is important to let it set and dry completely before varnishing. What is varnish? It is a clear coat. A kind of resin. We get gloss or matt options. I often use gloss because I like a little shine that the acrylic colours give. We get liquid ones to apply using a brush and a spray as well. Personally, I like using the spray because it covers the whole canvas equally without any lumps. A varnish protects your work from dust and other particles and seals the paint.
It’s Ready! The Nameplate
It becomes easy to clean an artwork after varnish. To clean a varnished Art we lightly wipe off the dust using a dry paintbrush or soft cloth. No need to frame the Paintings either. Hence varnish is a good idea for a nameplate. Now it’s ready to use! Let us put it up as the door sign.
Do share your views about the project in the comments below. Have a creative weekend!
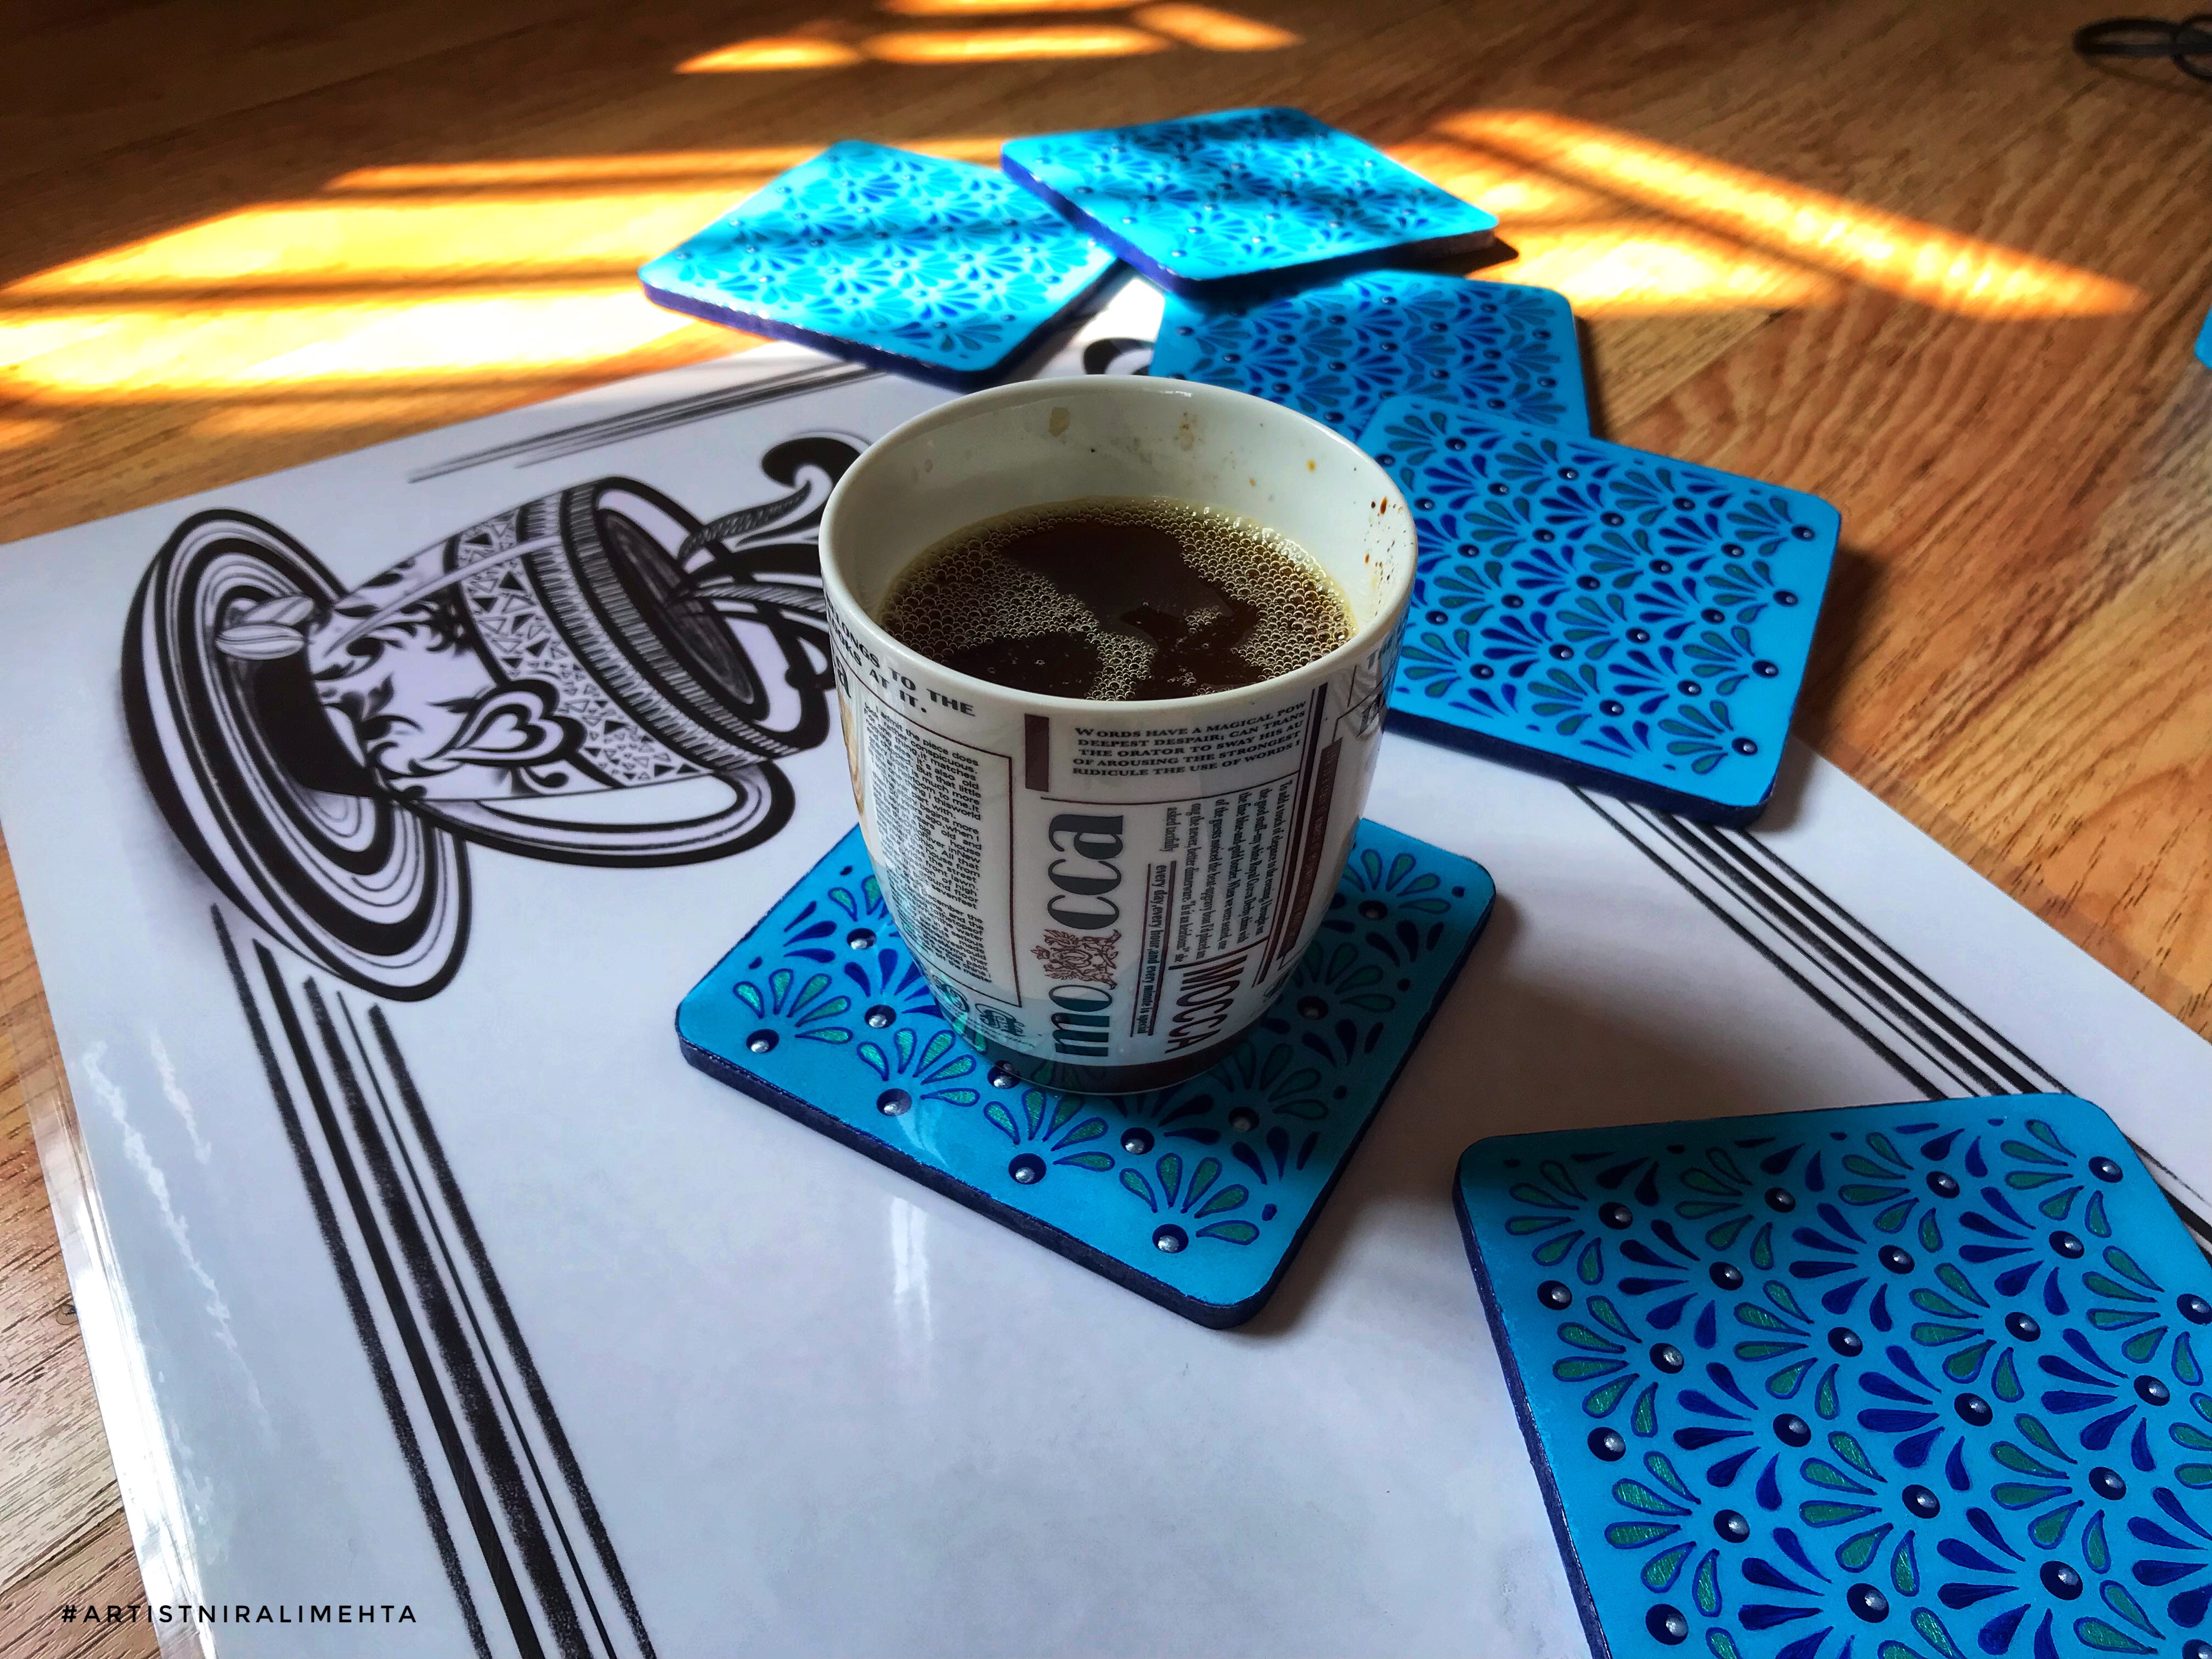
Hot or Cold ? It is a good idea to use coasters when you want to avoid marks on the table that happen because of the condensate on drinks. I like customised or things made especially for me. Buying a ready coaster off the shelf was boring, making one myself sounded more fun.
That is why I decided to make my own coasters. And what is a project without a challenge? For this project, my challenge was to clear coat the coasters. The first thought for anyone when I say ‘handmade coasters’ is to think of them as school crafts made by children. This isn’t that. We want something professional looking and long lasting. Just because it is handmade does not mean it should be any less. Isn’t it?
This is the handmade Coaster Set that I made
These are coated and exactly like those available in the market. They are durable and stand various temperatures. The coating protects the colour and design as well.
Materials Needed :
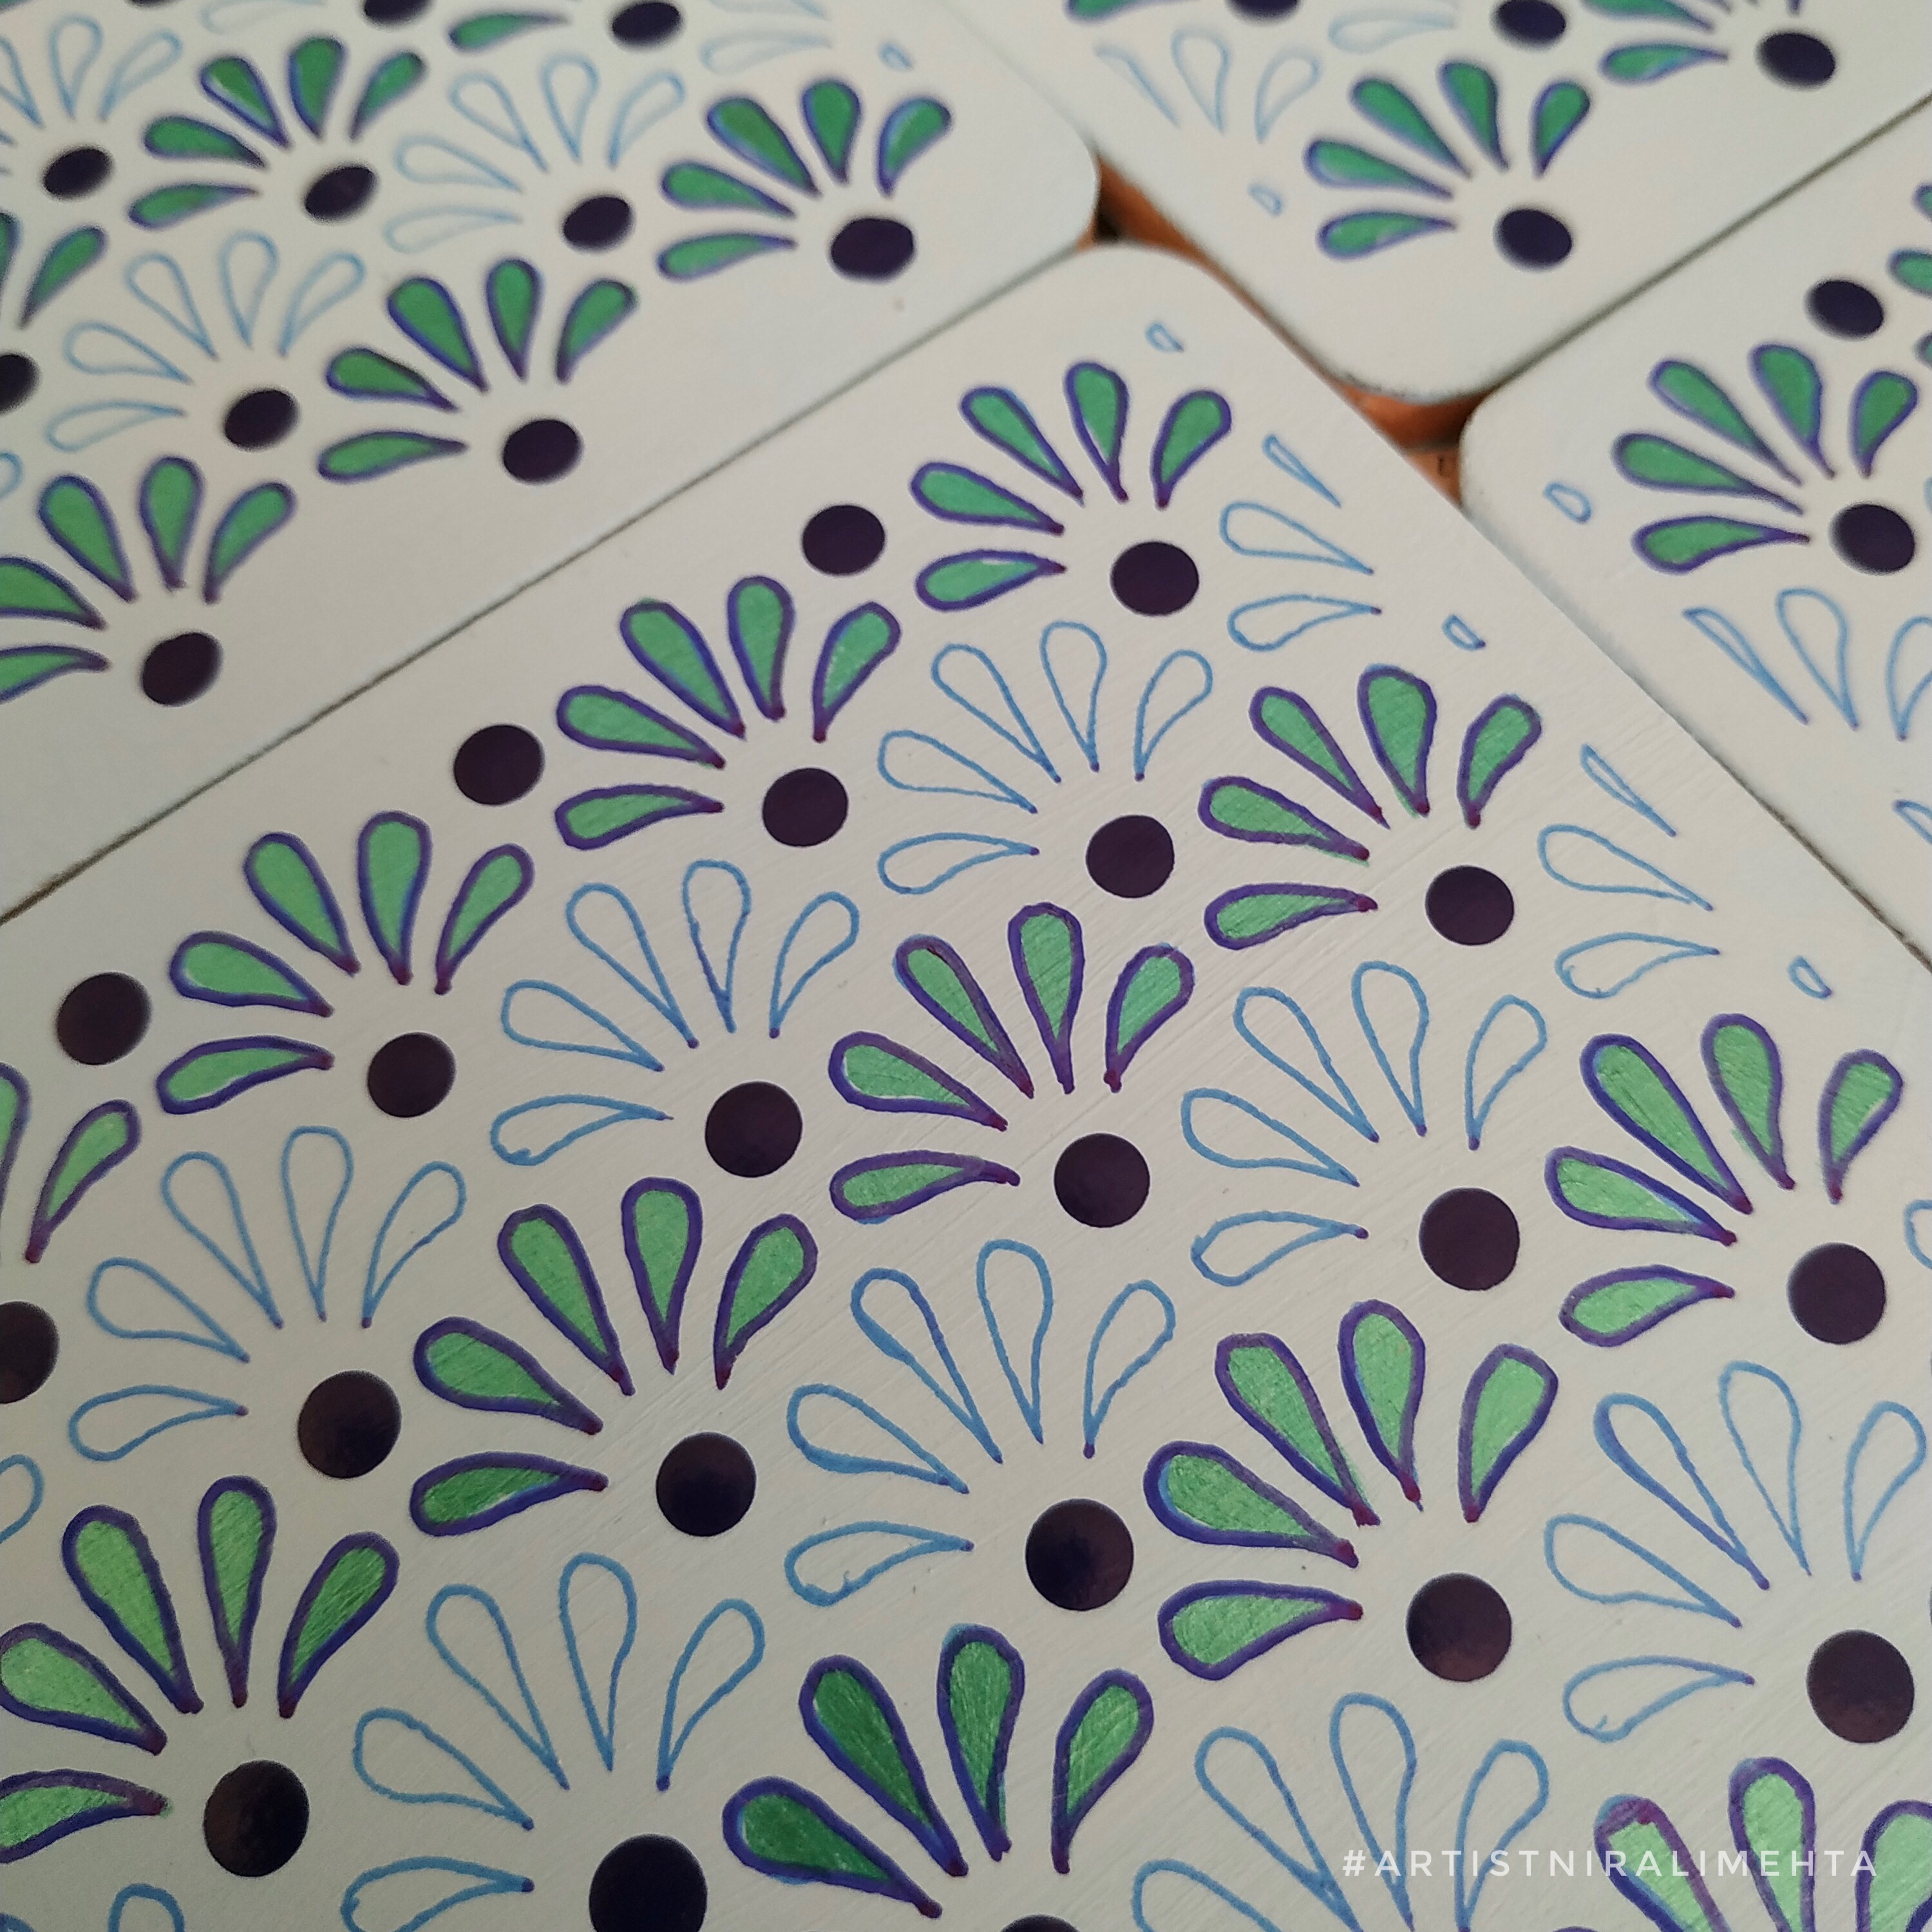
Pieces from MDF Board – These could be any size and shape. We get ready ones at all art and craft stores. The quantity depends on your table. I picked six square shape boards of 3.5 x 3.5 inches
Chalk Paint – I picked the frozen blue shade of chalk paint by a company called ‘Little Birdie’
Acrylic Paints – I used acrylic paints in bottles. Pearl finish teal blue and regular finish persian blue colour. One has a glitter finish while the other has a plain finish. The brand for my acrylic paints is ‘Fevicryl’
3D liner White Pearl by ‘Fevicryl’ for highlights (optional)
Permanent Markers to draw or outline the design
Design Stencil – You can use a readily available one or make one with paper yourself for the design. To get the exact same design on all coasters it is important to have a stencil. It makes replicating the design easier.
Acrylic Varnish – I used the spray from the brand ‘Camlin’
Art Resin – comes in two bottles (resin + hardener) to be mixed and used. The resin to hardener proportion is different for different brands but will either be 1:1 or 2:1. This is for the coating. I used epoxy art resin by the company ‘Little Birdie’
Method :
MDF Board is thick board made from wood fiber. For art and craft the material is handled just like plywood or wood. Ready pieces of different shapes and sizes are available in the market for various arts and crafts. For coasters they are available as multiple packs or single pieces, with and without a stand to complement it. The choice is yours.
MDF Board Pieces in Brown and Blue Chalk Paint
I had picked six square shaped board pieces with rounded corners. They don’t have a wrong side or right side. We can paint on either. Select the side you feel looks good and make that the top side. I painted them on both sides with chalk paint using a flat brush.
Applying the first coat of Chalk Paint
What is chalk paint? Most acrylic paints leave a self texture and gloss after drying. Further, we need to prime the base before using them. Chalk paint is also an acrylic paint but it gives a matt finish and better coverage. There is no need to prime the base. Can be applied directly to any wood or wood like surface. I have applied two coats of chalk paint on both the top and bottom of all coasters.
It is quick drying. An interval of 15-20mins between coats is sufficient for it to dry. On the side rim as a dark colour and just to have a contrast I applied Persian blue colour from the acrylic bottle paints. These are liquid and of pouring consistency. Work very well for Dot Painting as well.
Dried vs wet Chalk Paint after Two Coats
After drying I secured the stencil with a paper tape on the top side of the coaster. I traced the design using a blue permanent marker. Did this for all the coasters. Painted the design using acrylic paints in bottles. Highlighted using a 3D liner – white pearl colour. You can use the permanent marker on dried acrylic paint for touch up of the design.
Tracing the Stencil with Permanent Marker
Painting the Design Step by Step
Now we need to let this dry completely. Acrylic Paints are fast drying. We may feel it is dried after an hour but before the next process let it dry completely to the last particle for at least 24hours. Apply two coats of acrylic varnish after that and leave it for another day 24hours after that. I sprayed varnish on the backside as well. Makes an easy clean surface in case it gets dirty.
After Varnish. Note the Gloss and Texture of the Surface
It is usable after this but I wanted to coat it with resin. Resin is a thick clear coat making it durable against extreme temperatures and gives a reflective glass like finish. Even a small piece of dust will sit and stick to it. The acrylic varnish makes it easy to clean the dust and locks the paint. That is why, the colours don’t smudge or bleed when we pour the resin.
Now for the challenging part – applying the coat of resin. Working with resin can be messy. The clean up is very difficult. Make sure you do this at a place well protected with paper or plastic for any unwanted spills.
Resin is like lacquer. Art resin is a slightly milder form and better to work with at home. Use masking tape or paper tape and pack the edges of the coasters. So in case the resin spills you can remove it with the tape after it dries. Put the coasters on a levelled lifted surface. I placed a paper cup upside down and put the coaster on it.
Wear silicon gloves or plastic bag as gloves. Resin sticks to the hand. It becomes sticky and is difficult to remove. In case you get some on your hand while working use an alcohol based solution or acetone or sanitiser to remove it. It does not go with soap water. I haven’t clicked pictures of the process as both my hands were occupied and I couldn’t touch the camera with dirty hands.
In another paper cup I mixed resin in the ratio 2:1 (resin to hardener) as mentioned in the description on their bottles by ‘Little Birdie’. The next process is same for all resins. We have to stir it continuously using a wooden stick for 3 mins till it becomes transparent and then pour on the surface to coat. 40ml + 20ml = 60ml was sufficient to nicely coat six coasters. The proportion has to be correct else it will not harden upon drying.
I poured the resin mixture at the centre and spread it to the edges using another wooden stick. The excess drips. I cleaned it using the stick. It is a self setting liquid and any craters will level out as it dries. Lightly pop the bubbles that come up using the pointed side of a toothpick. Also use a heat gun or a hair dryer or blower over it once. This pops the bubbles too.
Let it dry in a dust free environment. It gives out a mild smell or fumes as it dries. Hence best to leave it at a spot not frequented by anyone. It takes 12 hours to set and 24 to 48 hours for curing. The surface will be hardened, clear and reflective like a glass. Easy to clean and protective for coasters. We get food grade resin also. They use it for making trays and other kitchen items.
Resin Coasted. The Coating is about 1-2mm in thickness. Note the Reflective and Smooth Surface.
Think creatively and make your own design. Coasters made entirely from resin using silicon moulds and fluid art as also popular. They mix a paste called resin pigment to add an opaque colour, alcohol inks for transparent colours, decorative elements like glitter, stones and dried flowers to the resin and make many artistic home decor items.
Do try it out and share your experience. Have a creative weekend!
Note: This is not an advertisement or paid promotion. I bought the materials, made the coasters and clicked the pictures all myself. Kindly do not use without permission.
We are done with half of 2021. Here is a recap of all the posts on the blog from January 2021 to June 2021 just in case you missed out reading any of them. I will be back in July with more posts on arts and crafts.
There are different ways to add the sparkle to your artwork. One of them is ‘Gilding’. It creates a nice embossed sparkling effect. It could be a simple outline or dots or stats or more in that shiny effect. Embossing with the gilding method is best suited for greeting cards as well as art and craft projects in school. In this post, I am going to share some tips to get this process right!
Yes! That is the term used for a painting technique – ‘IMPASTO.’ Impasto technique in simple words is painting with a knife. A painting knife is different from a regular knife. The blades come in different shapes and sizes to create different textures. You could relate better if I named a famous artwork created with this technique – ‘Starry Night’ by Vincent Van Gogh.
There is a good chance that you might have noticed a very striking similarity between my artwork with henna designs. It is also a possibility that I do more Ink Artwork, Doodle Art, Mandala Art and Zentangle Art because of my fluency in Henna Art. I learnt this art from my mom. Sharing ‘My Henna Story – Henna Art or Mehendi’
Easels are a one-time investment and costly. Every artist uses whatever he or she is comfortable with. Not all artists draw, sketch or paint on an inclined surface. Different painting styles can mean using or not using the Easel.
A short simple post answering questions about selecting an Easel or a Drawing Board. People usually have two opposing thoughts on this topic. Some feel “what is there to select? Every artist or painter needs an Easel” while others feel “it is the last thing to invest in”. There are a lot of myths about an Easel. No doubt it makes an excellent gift to give an artist, but do you know which one to select?
Making a greeting card all by yourself may seem difficult for some. No one wants to be judged or mocked for their artistic skills. Besides not everyone can be a master at it. I understand. But what if I were to tell you that even with minimal artistic skills and creativity one can make beautiful professional looking greeting cards. Yes! In this post, we will be discussing a few tools and techniques for making professional looking greeting cards with ease.
Our guest blogger Dr Shaazia Hawai is a dentist, who spills her love for colours onto the canvas. Join us as she shares more about her Impressionist Style Still Life Painting using acrylic paints. She also conducts live painting sessions on Instagram.
The painting process is very simple. Two steps 1) Create the Outline and 2) Fill the colours. The skilled part is in doing it. And like they say, you have to do it to know it. The texture that you see is the original texture of the glass. We select the glass based on the type we want. The material except the glass isn’t very expensive. The colours in a set are enough to make two or three glass panels. So if you want to re-use or recycle a piece of glass from the renovation, consider ‘Stained Glass Panting’. It will give a fresh and majestic look to your decor.
Taking imagination and fantasy from the world of magic and transforming it into something beautiful in this world; is what I do every day. Does that sound interesting? Hello everyone, I am Radha, a clay artist. Doing something creative by shaping earth with your hands can be an incredibly humble, joyful and healing experience.
For arts and crafts at home, we use Clay that is available at art and craft stores. Basically for hobby crafts and crafts at home there are two types of clay : one is the air drying and the other one that needs to be baked. We can use them to make many artistic objects from the comforts of our home. I have made wall murals, decorated wooden and glass panels, mirrors, jewellery and toy models with both types of clay. Yes! I know friends who have made saleable products from these. They are now successful small businesses.
Hmm.. the aroma of a freshly brewed coffee can be so refreshing, isn’t it? Sniffing coffee beans can almost reset your sense of smell. When we sample different perfumes and a particular strong smell gets to our head, it lingers. How to clear it? Take a few coffee beans in a cup and smell them. After sometime smell another perfume.
We can creatively use coffee for many things other than just sipping a nice cup of coffee. You may have come across or tried these. In this post I am sharing three artistic creative ideas of arts and crafts with coffee. I have tried my hand at all the three and they can be wonderful creative outlets for anyone, especially coffee lovers. It is the skill and material that make this art unique.
Did a hand drawn artwork and now want to make copies OR drew it digitally and now want to print it? Photographs, Graphics, Vector Art, Backgrounds, Designs, Drawings and Paintings – All of us might have tried to print these at some point of time or another. It could be for a School Project, a University Submission or a Personal Art Craft Project or for Commercial use.
I see many people struggle to get good prints of their work. What went wrong? They don’t know. I often get to hear “I gave the print command and the printing device printed it.” “I took it to a professional printer and he said the art work is not done correctly. The printing service owner said the device (printer) has done it correctly.”
It’s our loss as the money is wasted and we are not happy with the output. Today’s post is about ‘Getting a good print out’. I am going try and translate the language of a printer. In other words explain it in simple terms that everyone can understand.
‘Silhouette’ Try saying it as ‘Silu -et’. That’s right! I am not talking about a soft fabric but a technique of painting. Silhouette is also a popular method in photography. It is an object or profile in dark black against a very bright source of light, usually the Sun.
What is Coffee got to do with Art? 😀 My young followers have exams coming up at schools, colleges and universities. Coffee will be their best friend keeping them up studying late nights. Just like a good coffee is all about the blend. Art is also all about blending and having the right combinations. All set? Prepared?
The title says it all ; this is a all you want to know kind of post and it is all about ‘The Washi Tape’. Ok! What is so special about it? Fine! It is just another tape, so use it as one. True! I think it is a door to creativity. Especially for storytellers who cannot draw well but have so much to say and share.
Click! Click! Hehe! We don’t get to hear this clicking sound anymore. The cameras are silent but we still click as many pictures or probably more. Now that our phones have a very strong camera lens, we like to capture every memory.
It is a memory, it is special. Then why let it remain in the phone. Let’s print it and put it in a nice photo frame. That is my topic for today’s post – a very simple easy DIY Photo Frame. Complete description with material details.
My city is almost in a complete state of lockdown. The thing with these people is that they think this is the new normal. They aren’t opening the lockdowns. Stepping out is a complete ‘No-No’. To draw and paint, I need to calm my mind. During such prolonged lockdowns, keeping your mental health good becomes challenging.
We aren’t getting any materials either except groceries. The city never really opened the lockdowns since last year. As the wait becomes longer, hopes get dimmer. Reading all this news only makes it worse.
That is when I came across this Sunday Column in India’s largest selling newspaper. It is called ‘timespapershaper’ by ‘The Times of India’. They share ‘How To Make’ Origami Models. A new one every Sunday! Origami is the Japanese Art of Paper Folding. All you need is a sheet of paper.
I collected the posts and sat down to make the ones I liked. Origami can be a very relaxing activity for a person of any age. I thoroughly enjoyed my time off-screen. Almost felt like I should do this digital detox regularly.
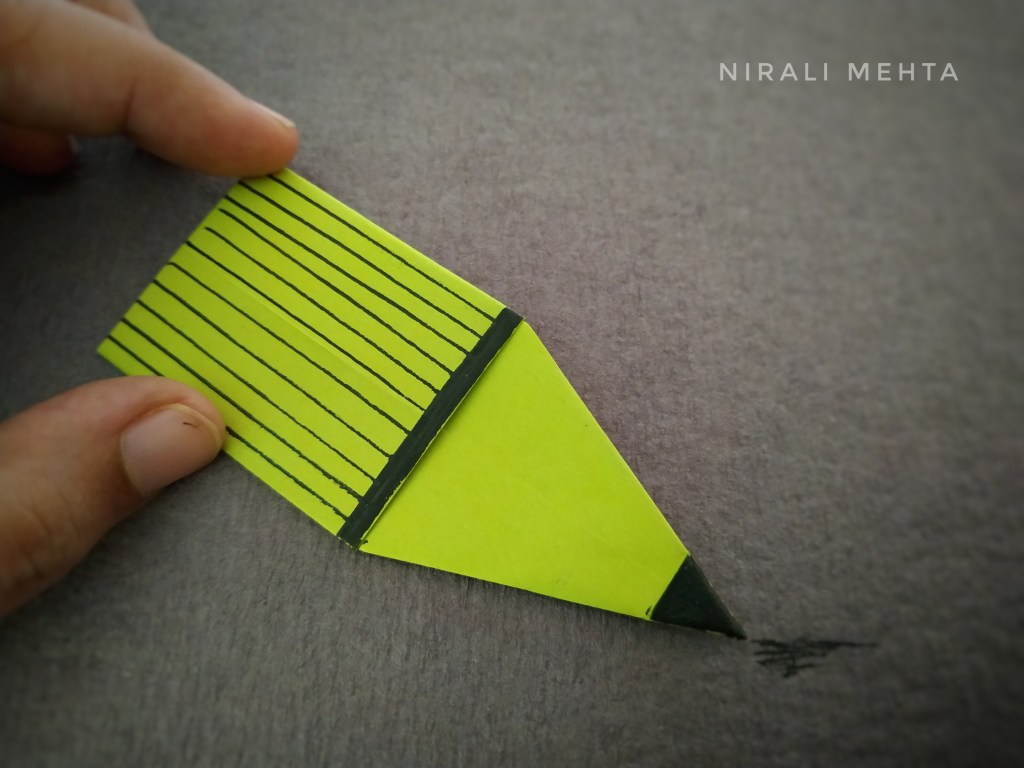
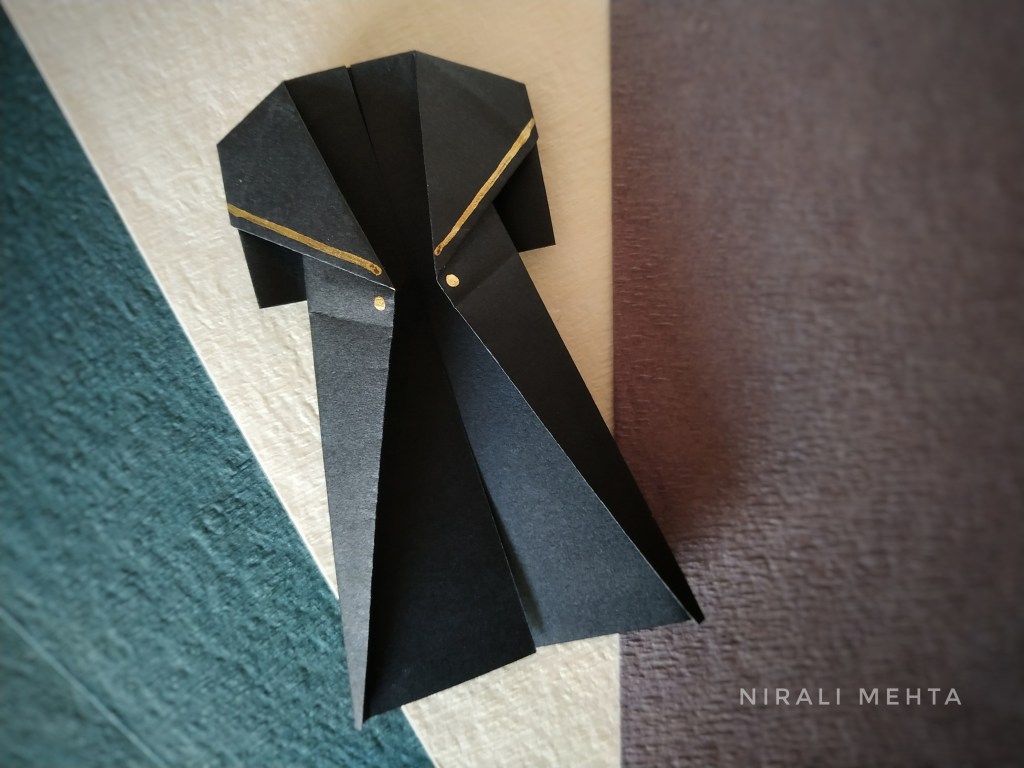
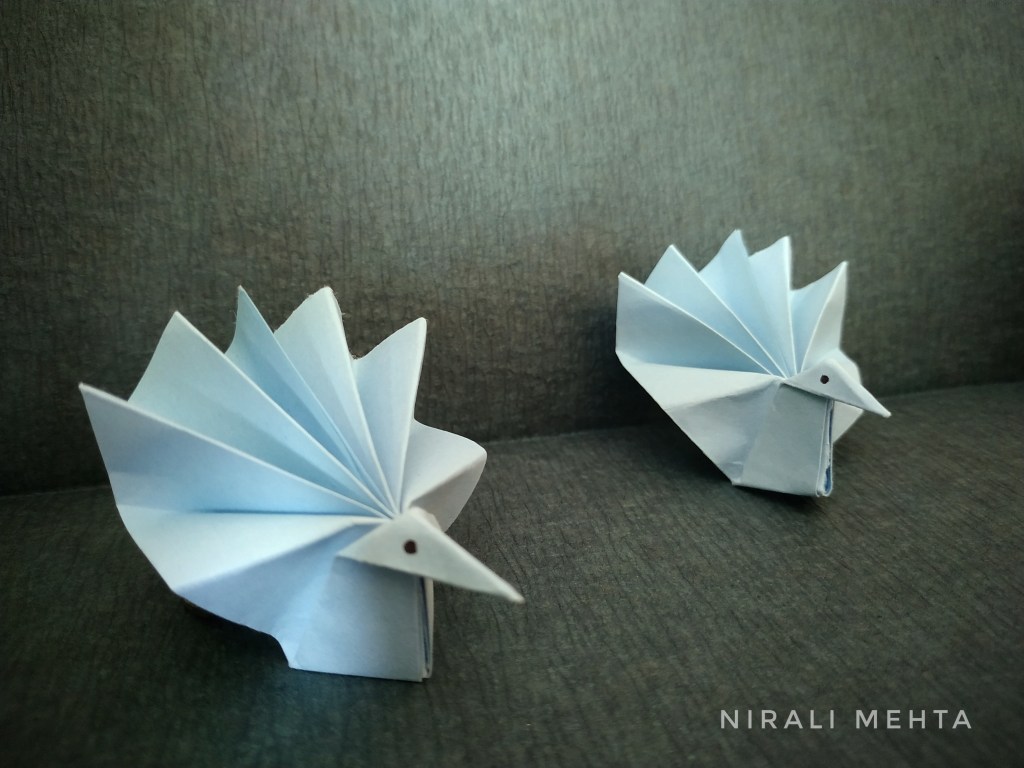
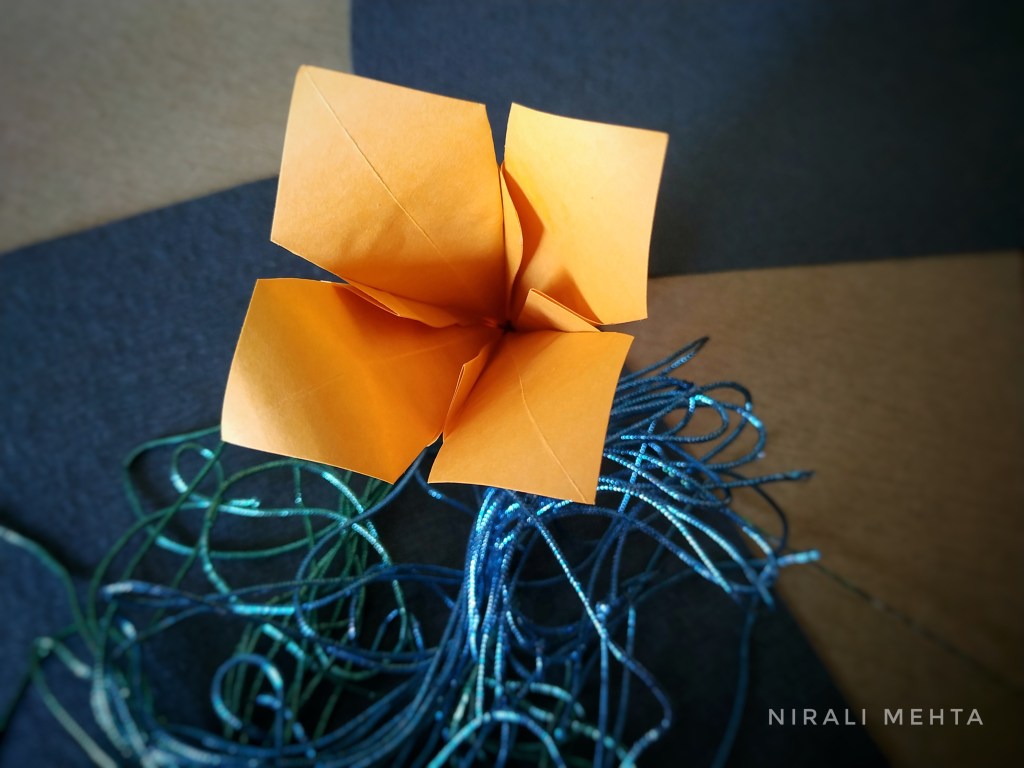
I am sharing pictures of the Origami Models. I made all these by myself reading these posts. For the last few difficult ones, I did turn to their videos on FB and Insta. These are listed in the order of their difficulty level. The difficulty level meter is based on what I felt.
Origami PencilOrigami CoatOrigami DressOrigami DolphinOrigami Star BoxOrigami Peacock Origami LilyOrigami LotusOrigami Rose and LeafOrigami T-Light Holder or Candle Stand
A big Thank you to ‘timespapershaper’ for teaching us these beautiful Origami Models.
It is a simple creative activity that can be done with things we have at home. However it helps relax and rejuvenate. I feel everyone should try them. It doesn’t require any prior training and the benefits are totally worth the time and effort. Have an Arty Week!
Crochet is the Craft of creating Fabrics by interlocking strands of Yarn using a Hook. Crochet isn’t just a Craft. It is a legacy – small presents of love that are passed down from one generation to another. Crochet is different from Knitting. The difference is in the tools and the stitches. How I learnt to Crochet is an interesting story in itself.
I always thought that Crocheting was for my Nana and not something I ever thought I would do. In fact I thought I couldn’t do it at all. My Nana tried to teach me once, when I was a little girl. But she either gave up on teaching me or I gave up on learning it because I just didn’t seem to grasp it. So she taught my brother, who managed to Crochet a Bunny. I must have been envious or something as I can still to this day, picture the bunny that he successfully made while I couldn’t. I am pleased to say that now I can Crochet a lot of bunnies (and my brother has forgotten how to – big smile) and I am sure my Nana, if she was here today would be pleased to know that I finally mastered her skill.
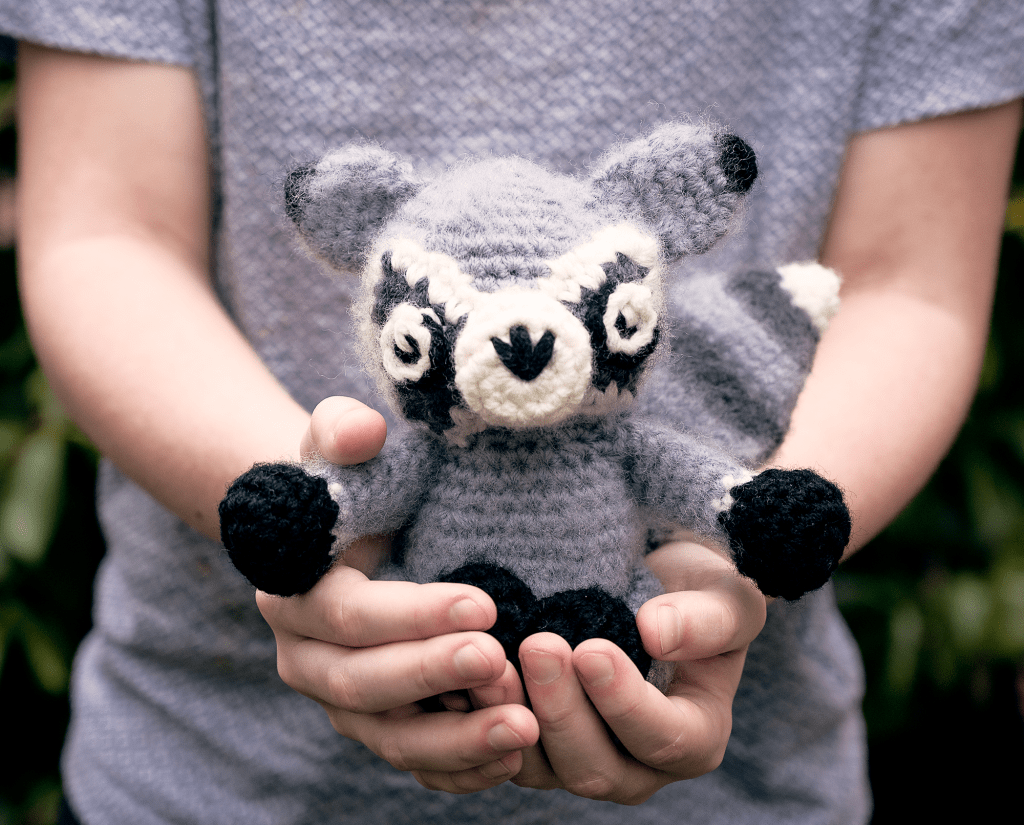
A Baby Racoon made by Emma
I had dropped the whole idea of crocheting for a long time but I have always tried to create something or another. I have dabbled in many crafts. Although not an expert, I have definitely had a go at many Crafts. Crafting and creating are in my blood, passed down for generations on both sides of my family. That makes it really difficult not to be making something.
Once I had children, I started making things for them, mainly toys. I sewed them a bear and Knitted some dolls. The idea of crocheting would pop up from time to time but I never really listened to it until about 7 years ago. I told my Mum, “Surely, if I can manage to knit a little (very little, I might add) I can also learn to Crochet”. My mum tried to teach me but she is more of a Knitter than a Crocheter and so once again I did not understand. However this time the idea to learn Crochet grew even stronger.
Sometimes a little pressure can go a long way in getting you over the hurdle. Not many months after, my sister-in-law asked me if I would like to share a market stall with her. I immediately said Yes! But I had nothing to sell then. I had only 4 weeks to come up with something. That’s right! And that’s when I thought of turning to YouTube and learning to Crochet.
We are truly blessed to have YouTube and as it turns out, it perfectly fits my learning style. So I watched video tutorials. I would pause at each step until I understood it well. Within 4 weeks, I went from not knowing how to Crochet and having nothing to sell at the market, to having some basic little crochet bags and some ill fitting beanies. None the less, I had something! And it was just the beginning. A profound love and passion for Crocheting was born and I have not stopped crocheting, learning, creating and making ever since.
Crochet is known to have many health benefits such as reducing stress while keeping the mind calm. The colours are pleasing to the senses which improve the mood and help fight negative thoughts such as depression, anxiety and insomnia. It has been noticed that people who Crochet can not only concentrate and focus better but also multitask well.
For me, Crocheting taught me a lot about myself. I learnt that I can teach myself with the help of the resources available today, as I am a very visual learner. When you truly love something – you can do it every day for years and it will not be a chore. I like to design and create something new. I love waking up with a new idea and taking the image that is in my head and making it a reality through Crochet.
There are so many beautiful things you can make by crocheting. It is like doing magic with some yarn and a hook. From Fabrics, Household Items, Sandals, Bags, Toys, Cushion Covers, Phone Cases, Baby Outfits, Wearables, Cosies, Headbands and Hair-ties and so much more.
Props for Photoshoots made by Emma
I particularly love making gifts for family and friends, Photo Outfits and Props for Cake Smash Photoshoots (another passion of mine), Bags and Toys. It has always been about making people smile.
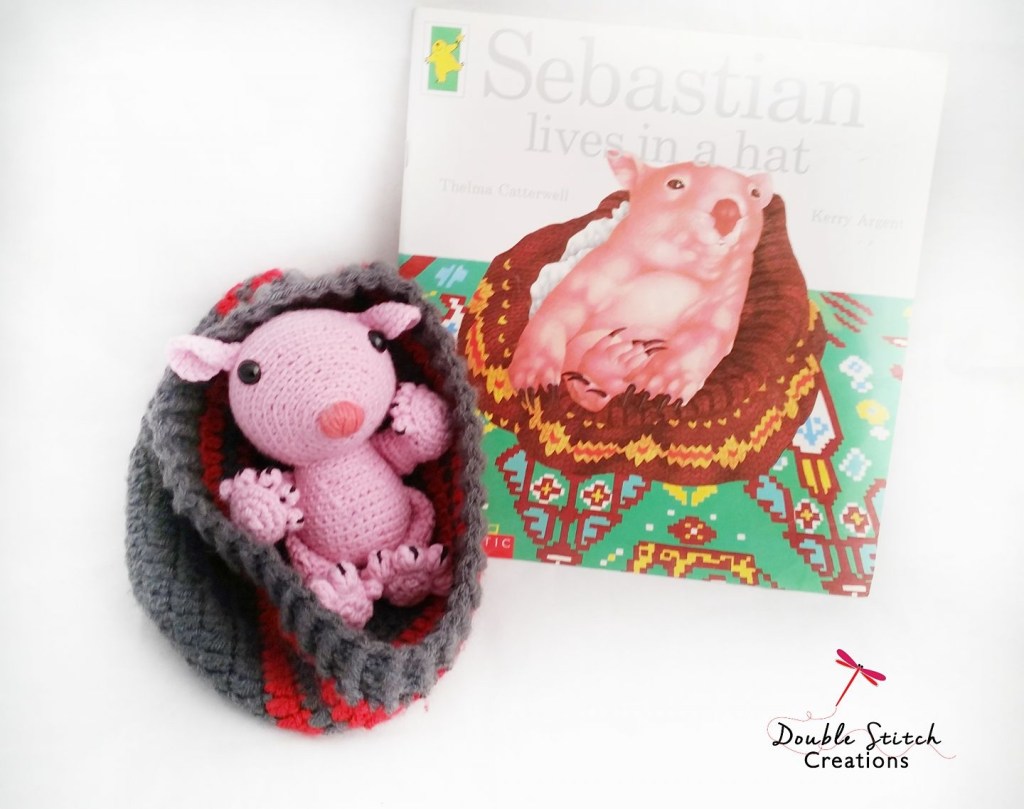
Putting a smile on a little someones face is incredibly important to me, I once made ‘Sebastian’- the Wombat based on the Children’s Book for a child with special needs. This was pretty special. It had to be made just so or he wouldn’t have liked it. I had no idea how I was going to make it when I started off but I just started it and seemingly it all came together. I am pleased to say, he loved it!
Sebastian – The Wombat made by Emma
Selecting your Materials : Go for good quality yarn as it will make a difference to your projects. Cheaper quality will make your job harder. We have a choice among animal based, plant based fibres and synthetic. An important point to note is that the yarn or threads have varying weights (thickness). Keep this in mind while selecting the threads for designs.
Also you might want to go for something machine washable, easily drying, durable and with fast colours. I like using the more natural yarn like 8-ply wool and organic cotton wherever possible. ‘Ply’ means strands twisted together. That means a 5-ply would mean 5 strands twisted to make that single thick bunch.
Crochet Yarn and Hook
To begin with you may want to use quality acrylic yarn often referred to as the beginners yarn or the same yarn which the tutor is using. Other than that you would need the hook or Crochet needle to spin magic and a tapestry needle for weaving in loose ends or embroidering the small details.
Just like needle sizes, we get hook sizes. This is determined by the size of the stitches or the type of project you want to create. Choose a hook that allows your yarn to slide and move without hinderance and you are comfortable holding, as it can take long hours to complete a project.
Additional tools may also be needed, like measuring tape and gauge measure. Gauge is referred to as the number of stitches per inch and rows created per inch. This is because even with the same hook and yarn no two people crochet the same and can create different number of stitches in an inch – loose or tight. Once you practically work on a project, these terms will be more clear. Select any project that you feel simple. I do share Crochet patterns on my YouTube Channel. Feel Free to check it out!
To sum it up I can say ; If you have the desire, you can learn anything. It always comes with a set of challenges and frustrations but don’t give up. It’s a life time of learning and totally worth it! The old saying ‘Practice makes Perfect’ is actually true. Do a bit every day and just enjoy the ride! Have a Crafty Week!
Guest Blogger : Ms. Emma Thomas
I love designing, making and creating new things. I am super passionate about Crochet and Photography. I love running and keeping fit. I am a Mum to 3 Boys and a Girl.
Emma is the Maker and Shop Owner at ‘Double Stitch Creations’ based in Melbourne, Australia.