There are different ways to add the sparkle to your artwork. One of them is ‘Gilding’. It creates a nice embossed sparkling effect. It could be a simple outline or dots or stars or more in that shiny effect. Embossing with the gilding method is best suited for greeting cards as well as art and craft projects in school. In this post, I am going to share some tips to get this process right!
Materials used – Gilding Glue & Gilding Flakes
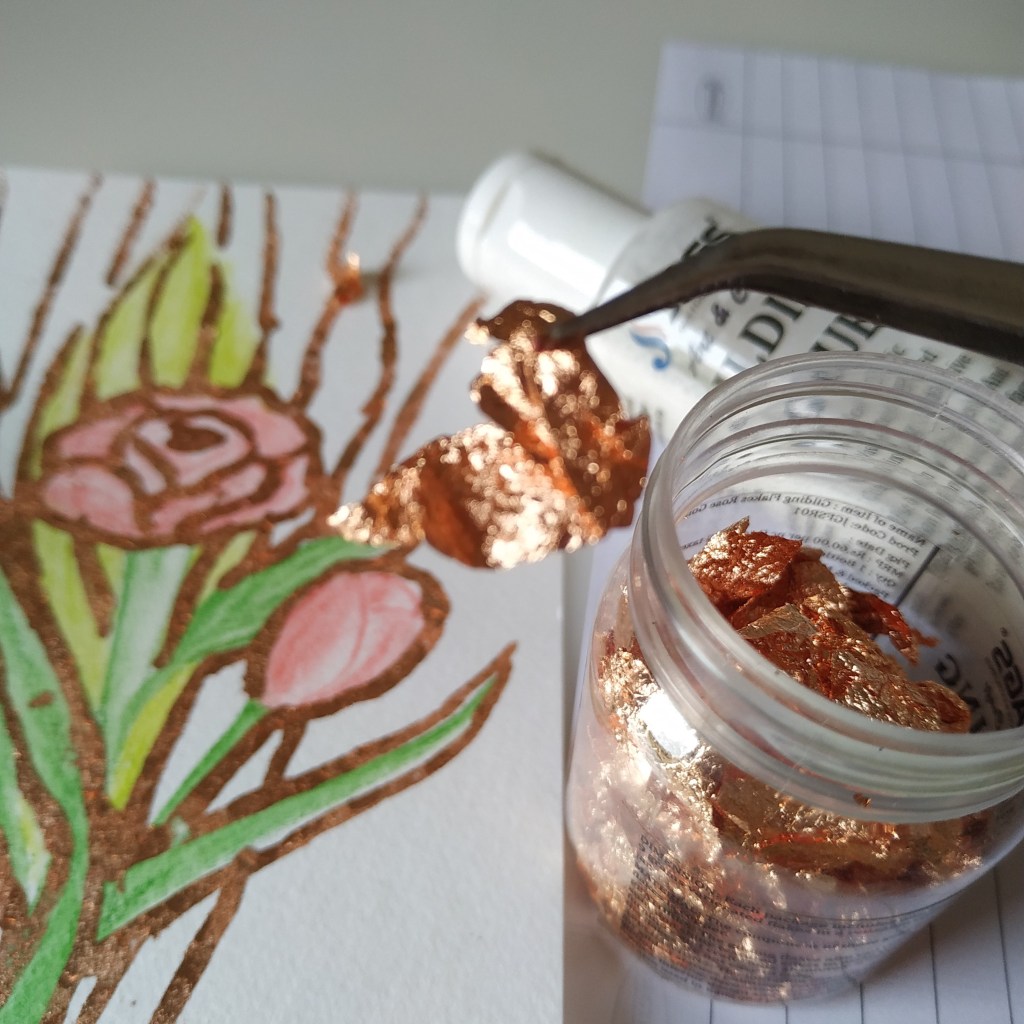
What is the material required? Gilding Glue and Foil Sheets are the main materials. Since I had Gilding Flakes at home, I used them. Gilding Foil Sheets are like cheese slices while Flakes are like crumbs or grated cheese. Hehe..I didn’t know how else to explain it without showing the product. The flakes give a crackled finish while a foil sheet gives a very smooth finish. Other than that we need a brush to apply the glue and dust off excess. Last but not least tissue paper or cloth. Gilding method is a highlight or add on to your existing artwork.
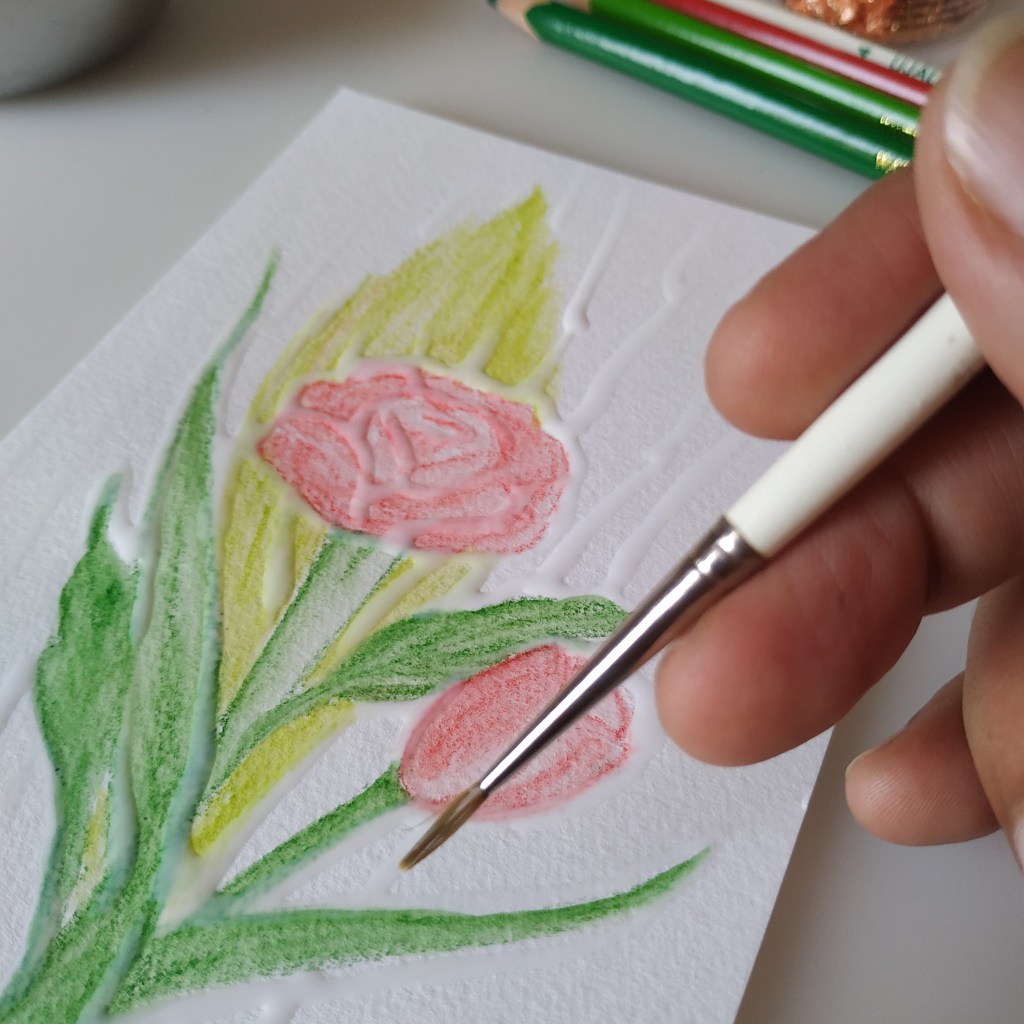
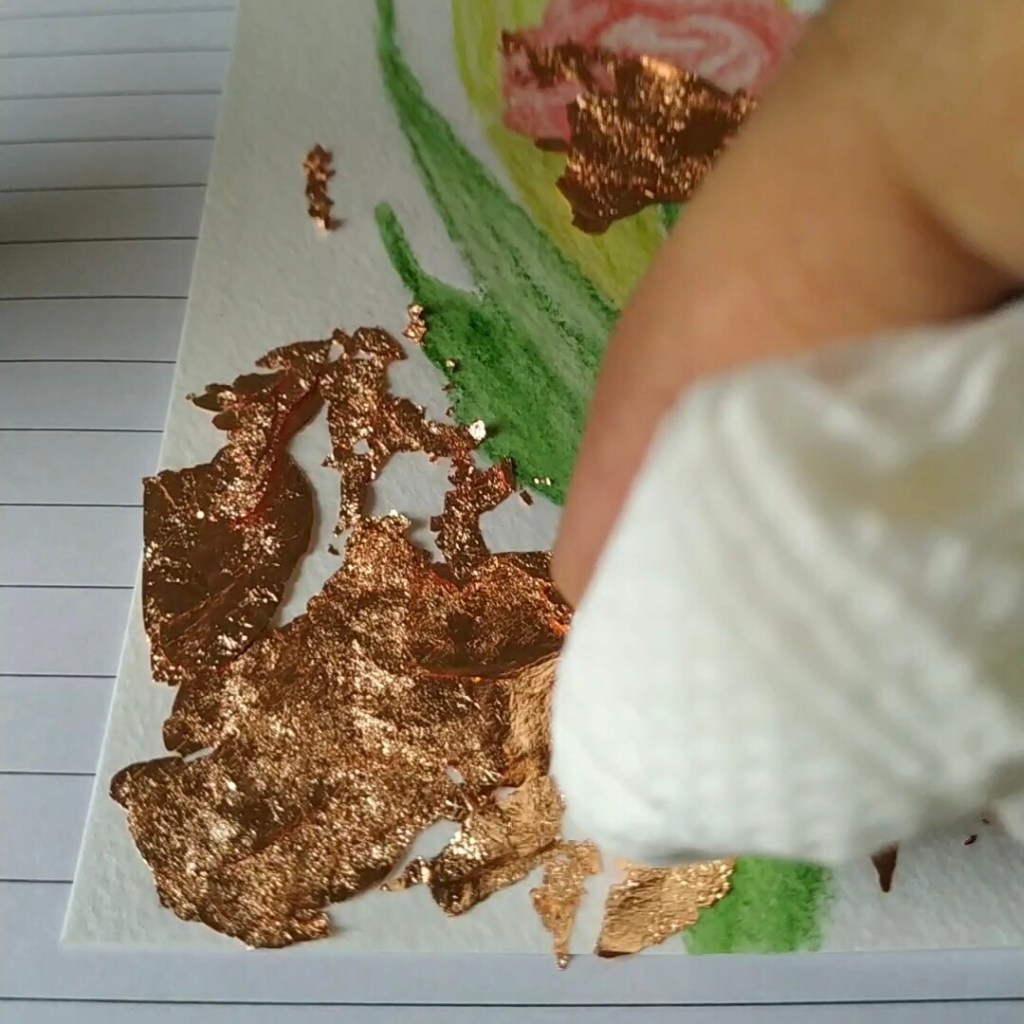
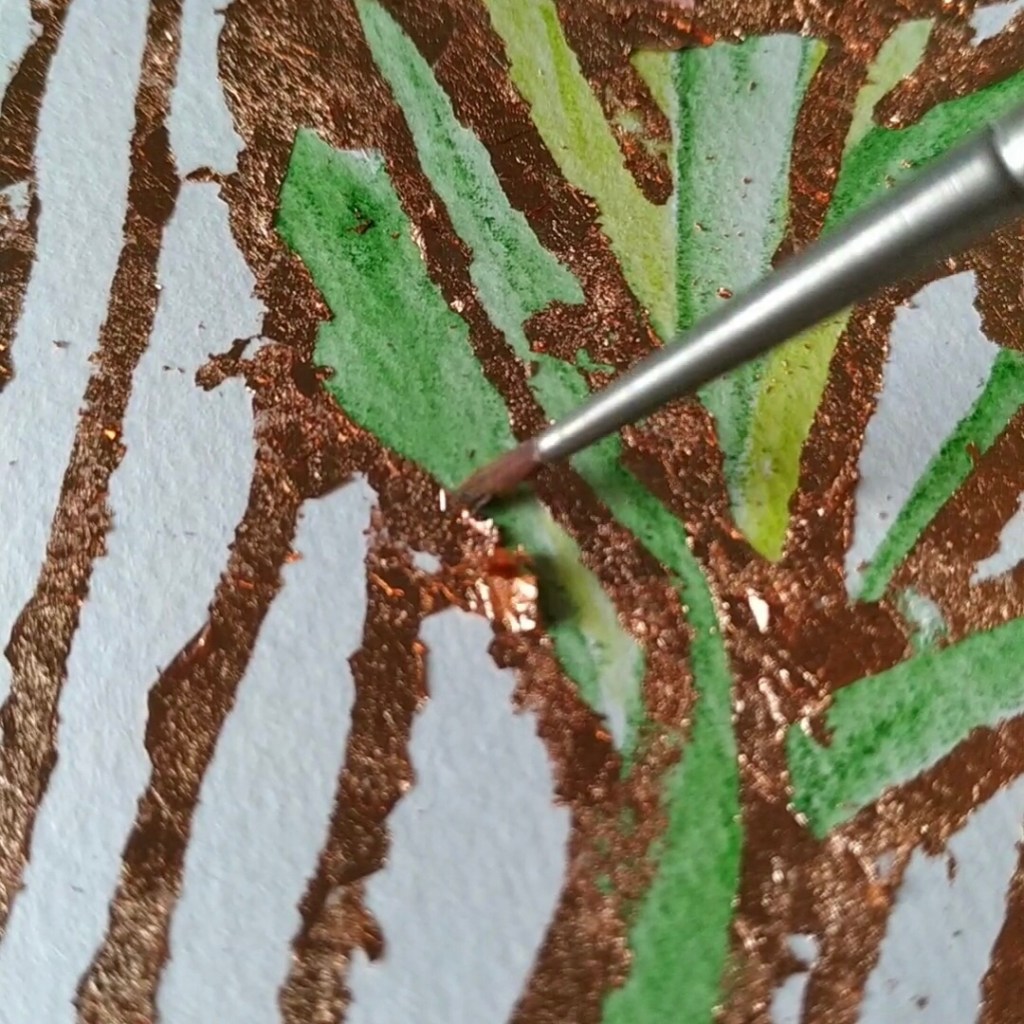
Next, let’s discuss the process. The process is simple. We apply the gilding glue using a brush. It becomes transparent as it dries. It is tacky or sticky for a few hours once it dries. Carefully transfer or lay the sheet on top of the artwork. The foil will automatically stick to this sticky base. Areas in excess where the glue was not applied but the foil fell can be dusted off later.
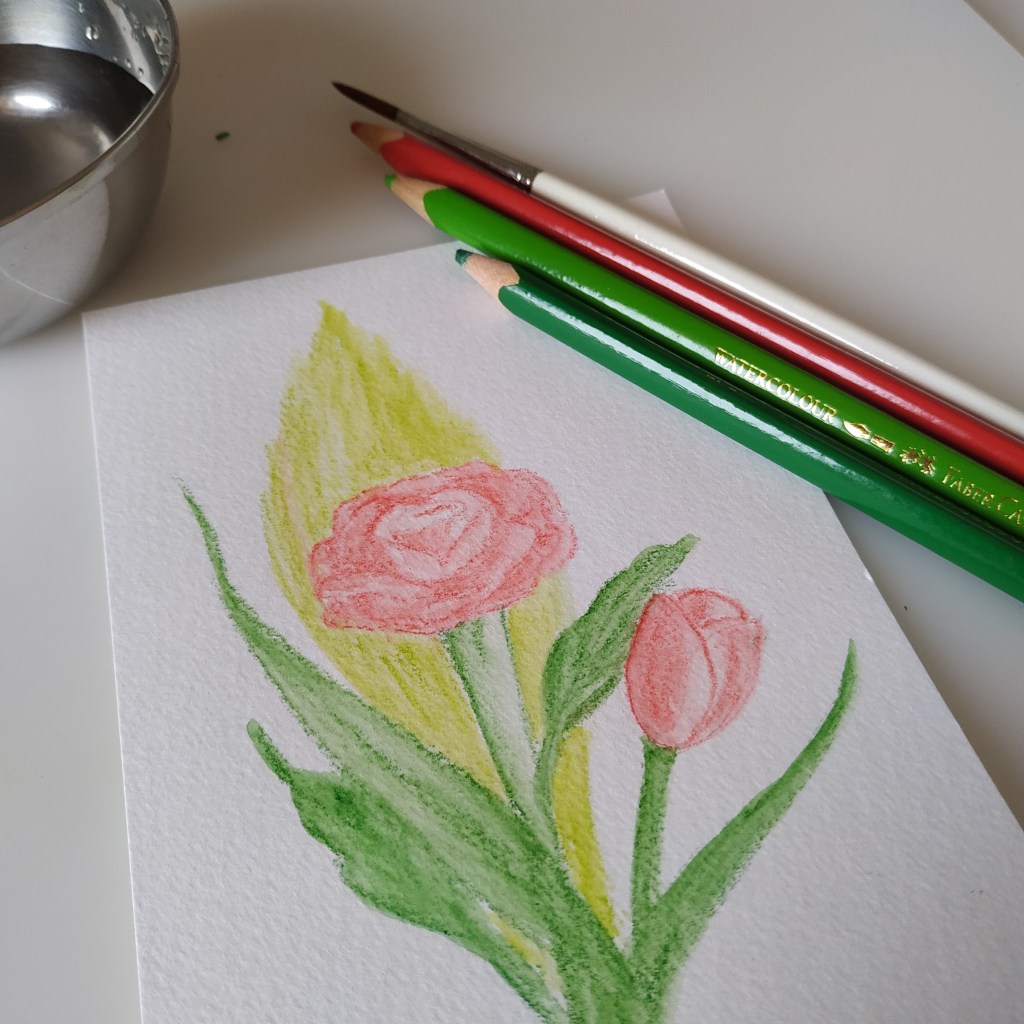
Basic Art with Colour PencilsThe White line is the GlueGlue and Gilding FlakesCloser look at Gilding FlakesDabbing the FoilDusting Off Excess
Gilding gives that metallic embossed look. Unlike ‘Embossing’ which requires a heat gun ‘Gilding’ is a natural drying technique. We use embossing glue and stick fine glitter powder in embossing method. Then we use a heat gun to fix the powder. The powder melts with the heat and sticks to the surface, giving the embossing effect. The look and finish may be similar for both methods. Best to choose the one you like. Depends on the purpose, material and your use.
Five tips for getting the gilding method right :-
Apply a sufficient amount of glue neatly like a thick outline. Points where the glue was less, will not get sticky enough to stick the foil. This will result in breaks in the line or flow.
The glue remains tacky for a good number of hours to work with. No need to hurry. Take your time.
Open the flakes like a sheet or use sheets for a neater look. Rolled or crumbled flakes give a lumpy finish.
Keep a paper or extra tissue below your artwork to collect the excess dusted off. It can be put back into the box for use next time.
Switch off the fan while working on it. The dust flies off very easily. Even if you breathe, the foil or flakes fly off. They are so light in weight.
Artwork using Gilding Glue and Flakes from JAGS store
I tried it on a small postcard first to understand how to use the material. You could do that too. For the background, I drew flowers using watercolour pencils. I am aware that we do get a home-use heat press that works on this principle and gives a more professional finish. The print is like glue, we then insert the foil with the paper in the heat press which sticks the foil to it. I had that machine earlier as a kid. The finishing that I could manage with the heat press was similar to the one that I managed here when I did the process by hand.
Hence if your use is sparing, you need not invest in the heat press or the heat gun. The gilding method will work wonders. For lettering or calligraphy artists, ‘Gilding’ could add that zing to your next artwork. Let me know your views if you have tried this technique. Have an arty week ahead!
I find it very exciting and interesting to make and give handmade greetings with personalised messages. I think I have to tell you, all the cards that I have received till date, I have kept them very neatly stored in my drawer. They are all special and a beautiful memory. In fact whenever I conduct workshops, it is that special thank you card that is worth a billion to me. Is it just me?
Now a days most of the people use digital ways to send messages. Very few people call to wish or invite. I know! The personal touch has changed to digital. That is why, if even one person puts in the effort to send a handmade card, it makes the receiver feel loved. The time, effort and the thought is what counts. Paying or downloading and sending is what anyone can do. Isn’t it?
Making a greeting card all by yourself may seem difficult for some. No one wants to be judged or mocked for their artistic skills. Besides not everyone can be a master at it. I understand. But what if I were to tell you that even with minimal artistic skills and creativity one can make beautiful professional looking greeting cards.
Holiday Season Coming Up! PC : WordPress Library
Yes! In this post, we will be discussing a few tools and techniques for making professional looking greeting cards with ease. There are so many of them, so I have clubbed them as per the method of making. The materials are expensive and a mistake in selection means it was a waste or is just lying around. It is a costly affair. This makes it more important to know about them. I am going to try and explain the tools and the methods together, so that we know what all we will be adding to our shopping lists.
1. Stamps and Inks – Stamps with a variety of designs are available. Every few months all shops stock new designs. I buy them based on the theme like – Birthdays or Christmas. We get everything from alphabets to numbers to florals to the popular movies and more. I buy stamps in off season or bulk for discounts. They stay well for years and is usually a box collection we can share among creative friends too.
Colouring
Coloured
Along with stamps we need a stamping block or a stamping pad. What is that used for? The stamps are silicon and not firm. They have a glue side which helps attach them to the block, dip it in ink and press it on paper for an even finish. A neat finish is very important when selecting quality. Once complete we clean the stamp with a cleaner or dry cloth and put it back in the pack. The same block can now be used along with another stamp. A stamping pad works to stamp multiple ones quickly and neatly. It is a great tool if you make multiple greeting cards.
Stamping Block
Next we select ink pads or pigments for the stamp. A good choice for selecting from the colour options is available. My pick – A black archival ink stamp pad is a must have. The ink is waterproof and instant drying. We can colour the stamped design with markers. We need not worry about any smudges. Other than that a few more standard colours can be selected according to the theme. We also get oxidised inks. They give a different finish and their colour shades are also different. The inks give a kind of the rustic finish rather than the bright regular shades.
Stamping Tools
For beginners, basic tools are great. Once you get a hang of it and use them more often, I am sure you will pick more. There are innumerable creative ways of using stamps. We can use them for journals and other tags too! Most stamp sellers share ideas for using stamps and their latest collection on social media. I am always amazed to see how much creativity one can have. Do check them for inspirations.
2. Embossing – The process of embossing is very simple. The material quality matters. Earlier embossing techniques and materials were not that great and they looked very messy, more like a beginner’ school project. We have now started getting good quality embossing glue and embossing powders. We apply glue using the stencil and then dust it with the embossing powder. The glue is either dabbed onto the surface or applied with a brush. The excess powder falls off once it dries. It is the same method of sticking glitter powders. The difference is in setting embossing powders. An embossing heat gun is used to set the powder. The powder melts due to the heat and binds to the paper.
Embossing
Materials
Different grain sizes and colours are available. They all give a different texture or finish. I select embossing powders in fine grains so that they melt and set evenly.
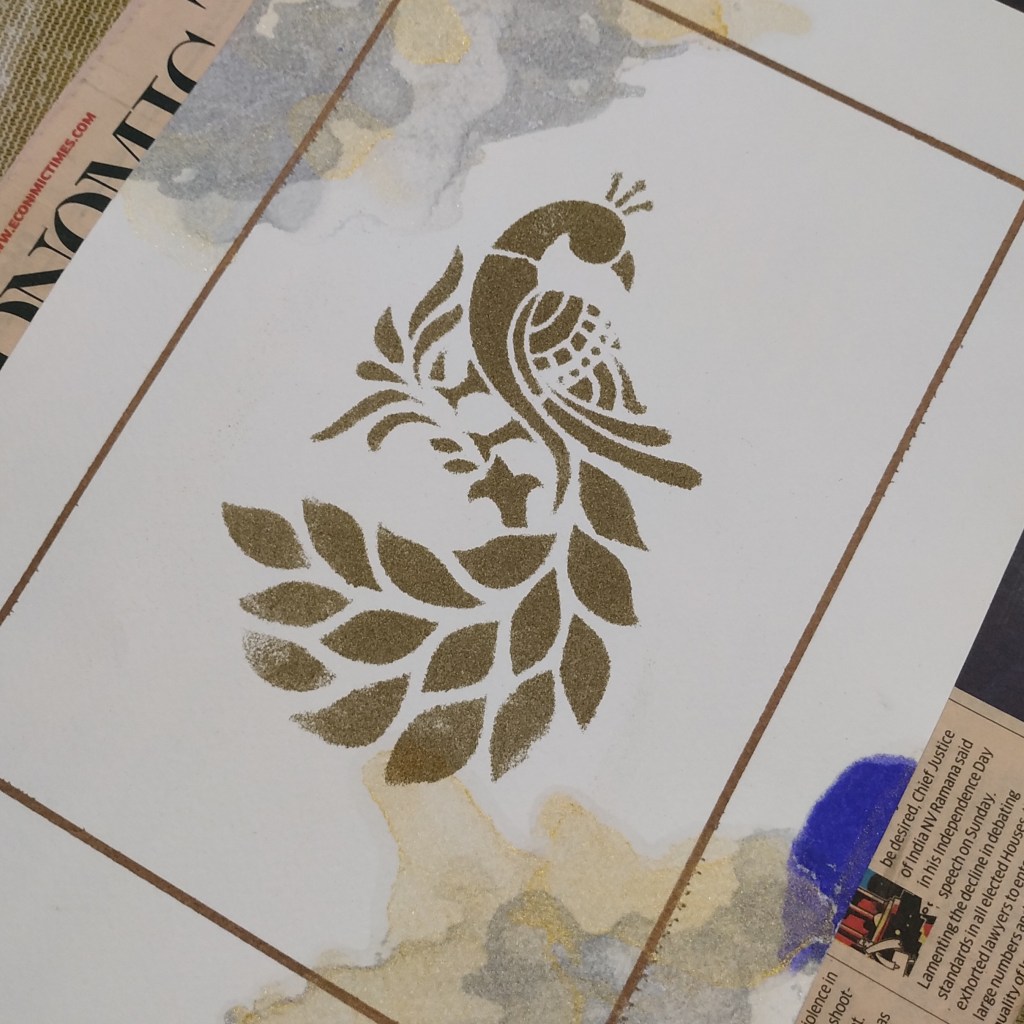
3. Stencils – As the name suggests these are cut outs of various designs on plastic or paper. They are either one use or multiple use stencils. We also get stencils with a sticky backside to stick them on the surface we are working on. This helps secure the stencil in place. We can do the same thing with tape. Stencils are helpful in tracing artwork and can be used for embossing and painting with most materials. It makes a great assistant for the creative folks.
Leaves Stencil
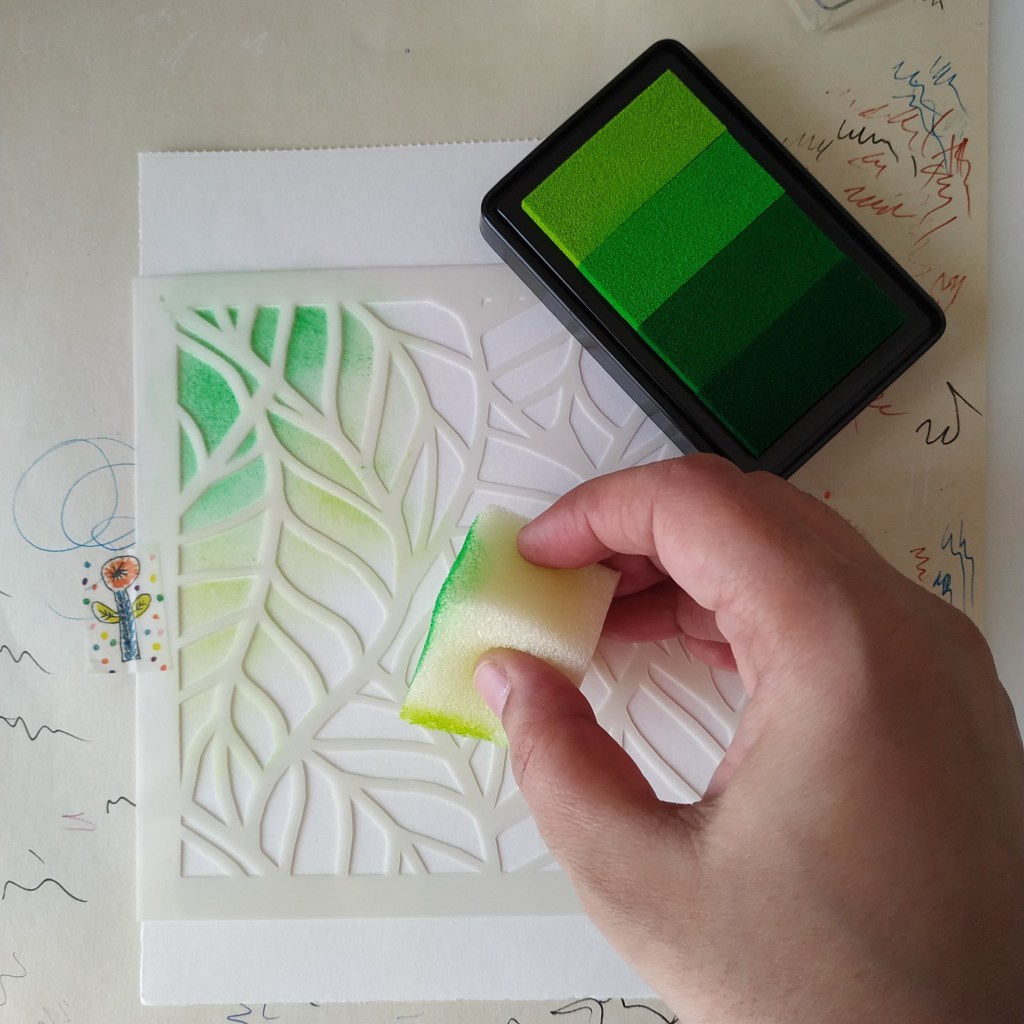
4. Pigments – The name means colour which is present in Inks and paints. We get a concentrated version in a box just like the stamp pad. Pigments are powdery and the composition is different from inks. I find them similar to compressed powder in makeup. They are very useful in applying background colour to the card paper.
Using Pigments
We need a sponge with or without holders to apply and blend it. They are available as single solid colours or as multiple shades in the same box for creating shading. They are very easy to use and create a nice perfect finish if applied correctly. I picked up boxes with basic shades that go on almost all designs. They can be used with stamps and stencils to create different effects. In fact I liked it so much that I bought the other colours too!
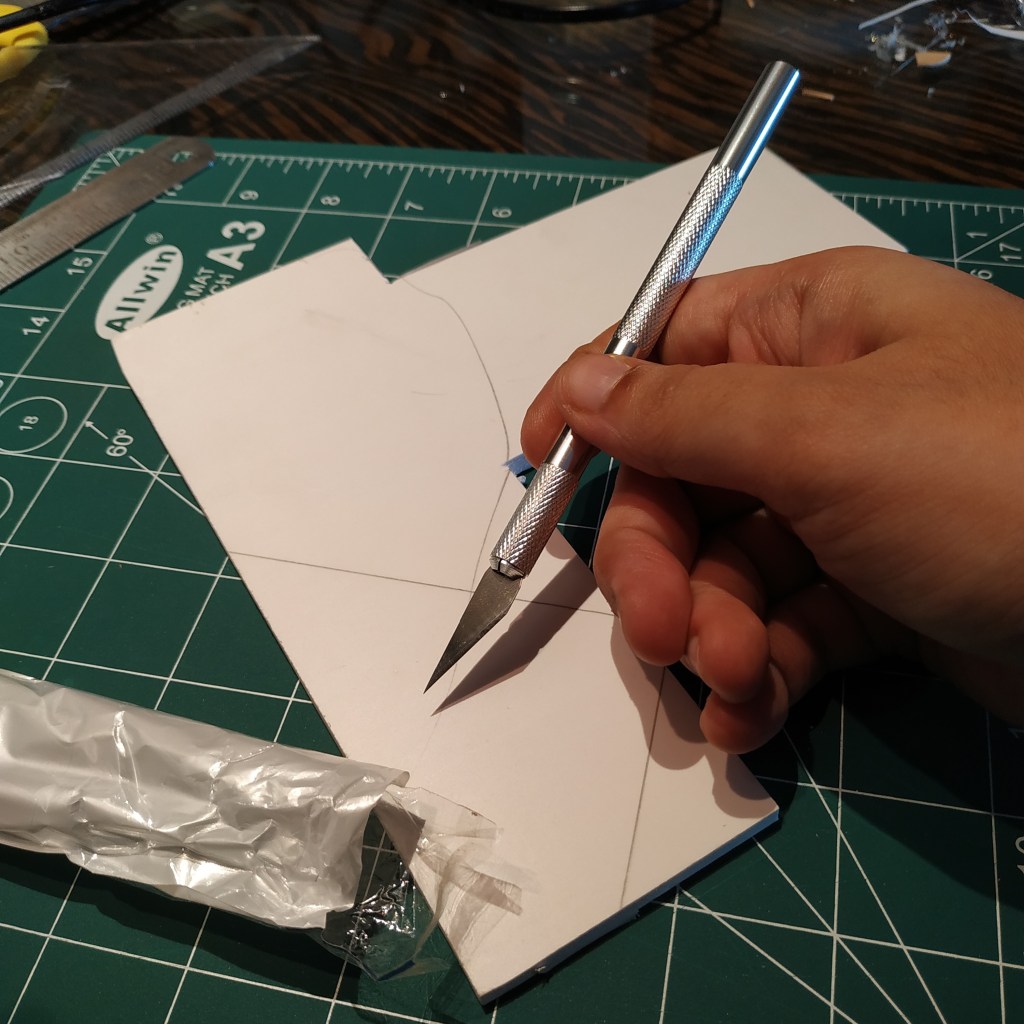
5. Punch – This is the cutting part. Specialised paper cutting knives are available. However if cutting is not exactly your main skill it is best to use a punch machine. Small individual punch machines with small designs like flowers, leaves and more are available. This punch is just like a regular punch machine, just that this one punches fancy shapes instead of the regular circles.
Shapes Cut using the Punch Machine will be equal – PC WordPress Library
Further we get a small dye cutting machine that has metal stencils to cut multiple shapes from paper at the same time. And last but not the least we also get a larger complex machine that cuts various shapes from paper based on computerised designs that we provide. The prices are also likewise.
Specialised Knife
Changeable Blades
The small punch machines are easy to carry and work well for many basic crafts. Professionals might want to invest in the other cutting tools. I prefer the specialised cutting knives because that is my skill. There are many cutting blades that come along with it that are for precision cutting.
A few other helpful tools and materials are – 1) double sided tape and 2) washi tape for graphics or protecting a surface or marking (my detailed post on using Washi Tape is there on the blog page) 3) folding, rolling and shaping tools to make paper crafts. An interesting idea is 3D cards and Shaker Cards. Teachers can ask their students to make shaker cards with all the stars they collected during the month.
I just saw the meme that reads ‘buying crafting materials is a different hobby’. Hehe! That is true. We all stock materials we may not use but we can always try to stock only what we use. Including my previous posts on paper crafts I have now covered all the methods of making creative handmade greeting cards. If you have made a creative paper craft, do share them. I would be very happy to see them. Have a crafty week ahead!
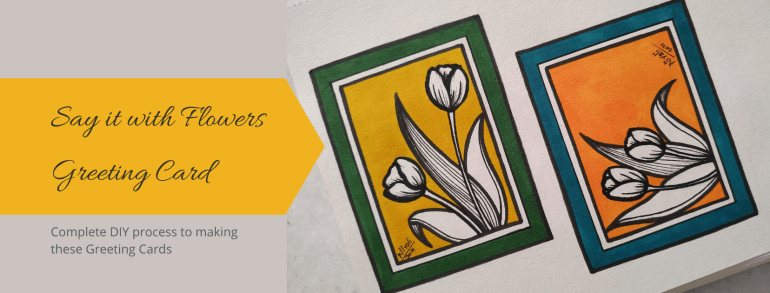
If there is something you want to say, say it! And as they say, say it with Flowers. A floral design card works for so many expressions. Please! Sorry! Thank You! and More! In this post, I am sharing an easy to do design you can try at home.
This simple, elegant and classy design will suit any occasion. We can make a gift tag, a greeting card, a postcard or have it as a letterhead on the letter to your pen pal.
You require some colours, pens, paper, basic drawing skills and your enthusiasm for making a handmade card. The same design can be made for a horizontal (landscape orientation) card as well as a vertical (portrait orientation) card.
Step-by-Step process to making this Floral Design Card
Step 1
Step 1 – DRAW : Draw double borders to the page as shown above. We want one thick outer border and a thin inner border.
Step 2A
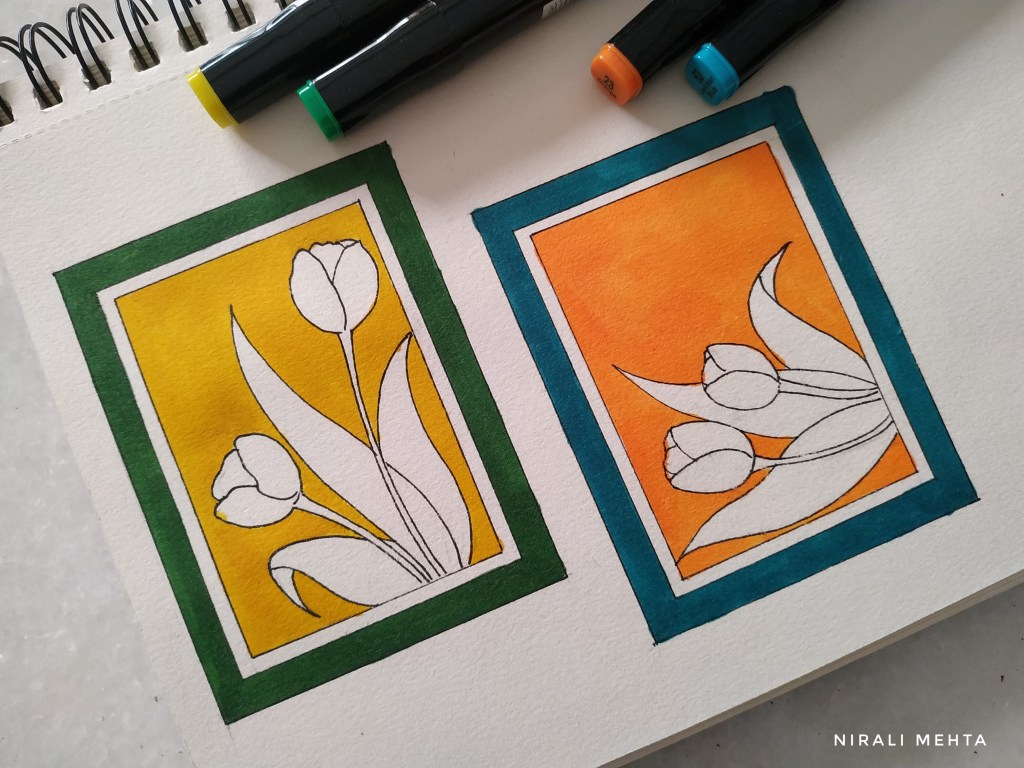
Step 2 – DRAW and OUTLINE : Draw the flowers and leaves. Tulips are the easiest to draw. They have long leaves and very few petals. A floral bunch looks better when it totals to an odd number. I have drawn two flowers and three leaves. We need not fill the entire space. Cover the area enough so that it looks well spaced out. Outline the final drawing with a waterproof black pen. If you don’t have a waterproof pen. You need not outline it at this stage.
Step 2B
Step 3 – COLOUR FILL : Fill the background with colours. Select any two colours – one for the thick border and one for background. Leave the flowers and thin border in natural white of the paper. For this card I have used markers. Even paint will look good.
Step 3
Step 4 – FINAL OUTLINES : Outline the flowers, leaves and borders with a thick marker. Leave the thin border. Add little lines or fill patterns to the flowers and leaves in black. Give the thin border a thin outline. This thick and thin outlines makes it look better.
Landscape or Horizontal Orientation Portrait or Vertical Orientation
Colour combinations like Pink – Blue, Yellow – Blue, Red – Green also look good. Bright colours or Pastel shades both look great. A design like this is a ‘you possibly cannot go wrong kind of a design’. Here are both cards together :-
Tulip Design Greeting Cards
That was easy right? So try it out yourself and let me know if you have any questions. Have an Arty Weekend!
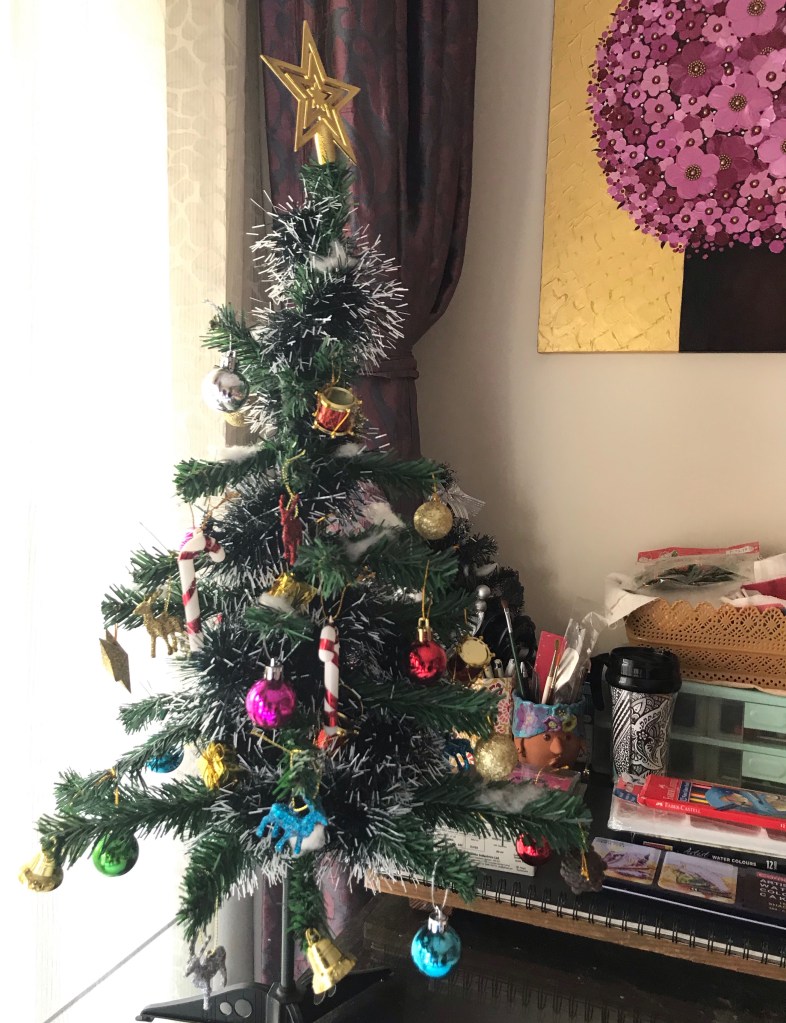
In the Holiday mood, I am also going to take a break next week. Most people have already signed off till New Years. As a shop owners, we are busy making products, posting on social media, settling accounts, packing, shipping and making new and the cycle continues year round. That makes us use our phones for long hours at work. A little digital detox to spend time with yourself, family and nature can rejuvenate us.
My Desk! It’s Christmas 🎄
And we can come back in the New Year refreshed and charged up for another year ahead. Many people also use this time to upgrade their skills, read up on books they always wanted to. I started my Blog this year in September 2020. I have 17 Posts by now. The response to the Blog has been overwhelming. It’s been a good journey with your love, support and encouragement.
So I thought I would do this year in a review post. Helps me connect with the new followers too! Here is a list of the posts I have done on Arts and Crafts so far. You may click on the title to go to the post. All these are listed on my Blog page – ‘The Art Life’
How to select Art Material for Charcoal and Pastels Painting? Explaining the technical names along with their similarities and differences with other Pencils used in Art.
Dr. Wilona Annunciation, a practising Psychiatrist is our Guest Blogger this week. She shares her experience and thoughts on Mental Health and healing with Art – Art Therapy.
Sharing what I learnt when I studied the Copyright Law in simple language for everyone to understand. Tried to keep it to our daily language of conversation while introducing the main topics to read up on.
Learning this beautiful unique visual art related to writing. Answering your questions on Calligraphy- What is it? Where to start? What materials to buy? And more
Four Books I can recommend for Arts and Crafts Lovers. You may want to buy these and learn a new skill – Sewing, Candle Making, Gift Wrapping and Napkin Folding.
Learn about the Art of Paper Quilling and it’s world of infinite possibilities. A Step-by-Step tutorial to making two basic types of beads with explanations to the other varieties. We make a Christmas Tree Ornament using the crafting methods we learn.
My Story and experience with the Japanese Art of Paper Folding – Origami
So just in case you missed out on reading any of them, you still can. Please note the Blog page shows only the last 10posts and so to see the previous ones you may use the links above or scroll to previous posts.
If you like reading my posts and wish to continue our association, you may click follow or subscribe to the Blog. This will make the posts come to your Email Inbox and you may read them at your convenience.
Wishing everyone a Merry Christmas and a Happy New Year!
December Calendar with a Christmas Wreath that I created Digitally
This is an Instant Digital Download (JPEG) File that can be purchased at my Etsy Shop NMARTWORKS Picture Format opens with any Photo Editing Software. Once you pay, you can instantly download and use.
‘For it is in giving, that we receive’ – St.Francis of Assisi
The Festive Season is coming soon. I love to select Gifts, wrap them up with fancy wrapping, add a small hand written note; thus making it special. Everyone likes to feel loved. Sometimes a thoughtful gesture and a little extra touch can bring so much joy. Today I’m sharing a very easy method to craft simple ‘Paper Flowers’. These flowers look pretty on Greeting Cards, Gift Tags or as Fancy Gift Wraps. Alternatively I have even used these to decorate Paper Bags, Pen Stands and even my School Projects. It takes just about 10mins to make these and the material required is usually available at home or can be easily purchased. You may creatively use materials from whatever is available to you, no need to buy anything.
Materials for Paper Flowers
Materials Required:
1) Sheets of Coloured Paper – Ready Packs of Coloured Paper for Crafting OR Printed Paper from discarded magazines OR Used Wrapping Paper ; As long as the Paper is foldable. Laminated thick sheets won’t work. Ready Packets are available as A4 or Square Paper Sheets in various colours.
2) Glue, Scissors and a Pencil
Optional Decorations
3) Paper Strips ( from a shredding machine) or Ready Paper Quilling Strips [Optional]
4) Embellishments [Optional]
5) Markers and Colours for any additional creativity [Optional]
Making the Paper Flowers – Part 1
Making the Flowers :-
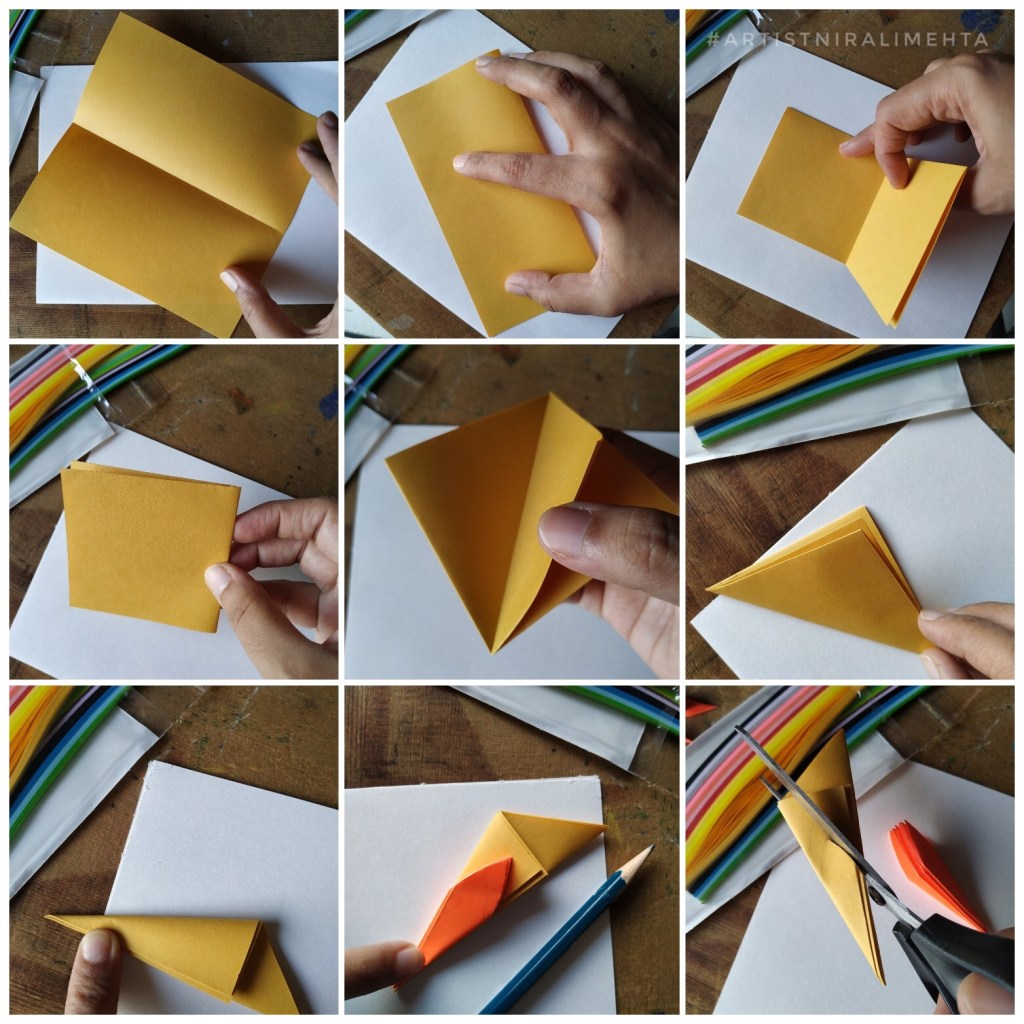
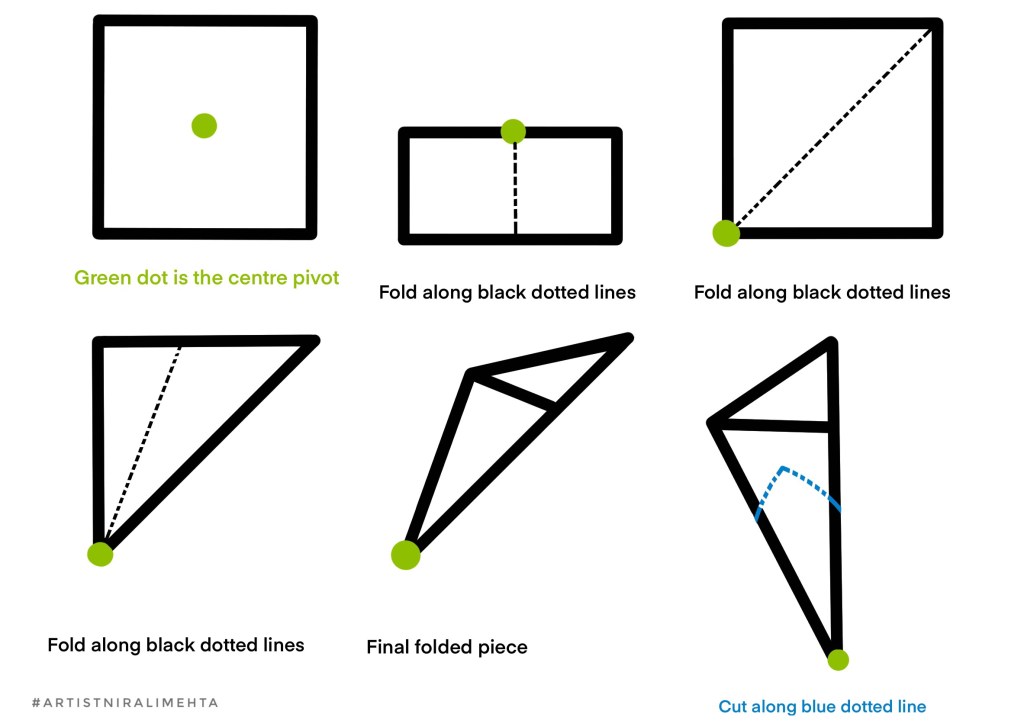
Take a square sheet of Paper. Fold at mid length along the dotted lines as shown in the picture. Once again fold along the dotted line to get a folded square. Next fold matching opposite corners to get a triangle. Last fold, fold the triangle into half at the dotted line as shown. Draw and mark the shape of the Petal and cut along the blue dotted line.
How to fold the Paper
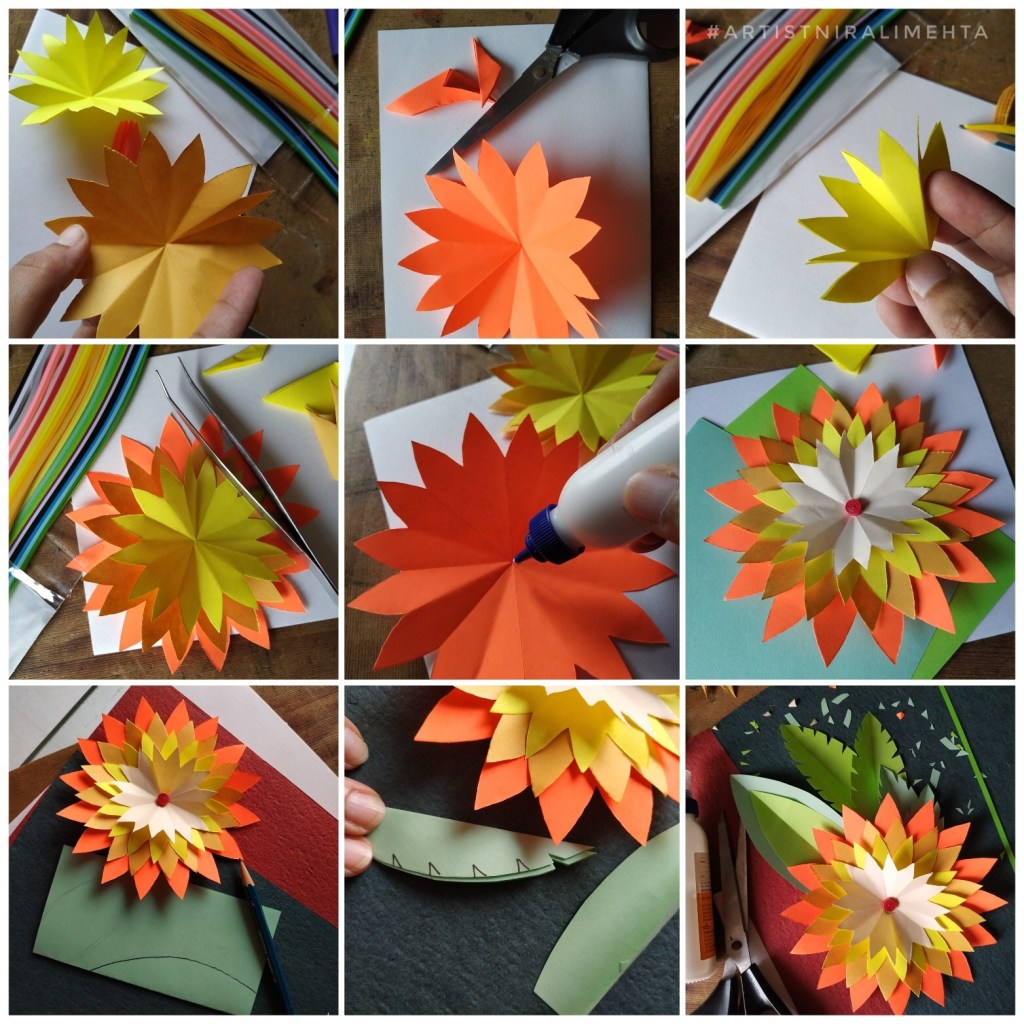
Please note the centre of the paper being folded becomes the pivot and centre of the flower. So all folds are made accordingly. Look at the reference picture below for help. It is shown as a green dot reference. Open up the Flower once it is cut. Make more flowers smaller and smaller each time. Layer them by placing one inside another.
Apply glue as a dot only at the centre to stick the flowers. Add a paper dot in the centre of the flower using a quilled circle or a punch hole from paper or an embellishment. Cut Leaves. I have shown two-three different leaves. Choose the ones you feel are easy. Arrange all this with optional decorations on your base Paper.
Making Paper Flowers – Part 2
Special Tip: It is always a good idea to make a bunch of flowers and leaves in odd numbers. Example 3 Flowers -5 leaves. It looks more natural.
Making it colourful and neat is more important. One does not require too much precision in this. Someone without much practice will also be able to make a flower as pretty as another. Anything natural is not perfectly in a line. The beauty lies in the imperfections. Creatively I used the extra crumbs from discarded cutouts of this paper as confetti in the background. It looks better when the background is complete. Go ahead try these and let me know if you enjoyed. Have a Crafty Weekend!